
Printing time: 10+ hours, depending on printer and materials. In December 2025, $60 + a cable for the cheapest version, $70 for the “pro” version of pads. Easy to moderate difficulty, depending on your choices.

[Editor’s note: the 3 for ease of printing is a reflection of the fascia I chose; if you go with the original fascia the ease of printing is a solid 4 out of 5.]
[Tl;dr: This was my first DIY headphone, and while there were some frustrations along the way, it was a great first project AND a headphone I genuinely enjoy listening to today. If you don’t know how to solder and don’t want to learn, skip this and go with a Head(amame) kit. If you know how to solder, are curious to learn a little bit about electronics, or want a much higher performing headphone, this one is for you.
Great project. Easy to source, relatively straightforward to both print and assemble, and an output that I really like listening to.]
Table of Contents:
Introduction
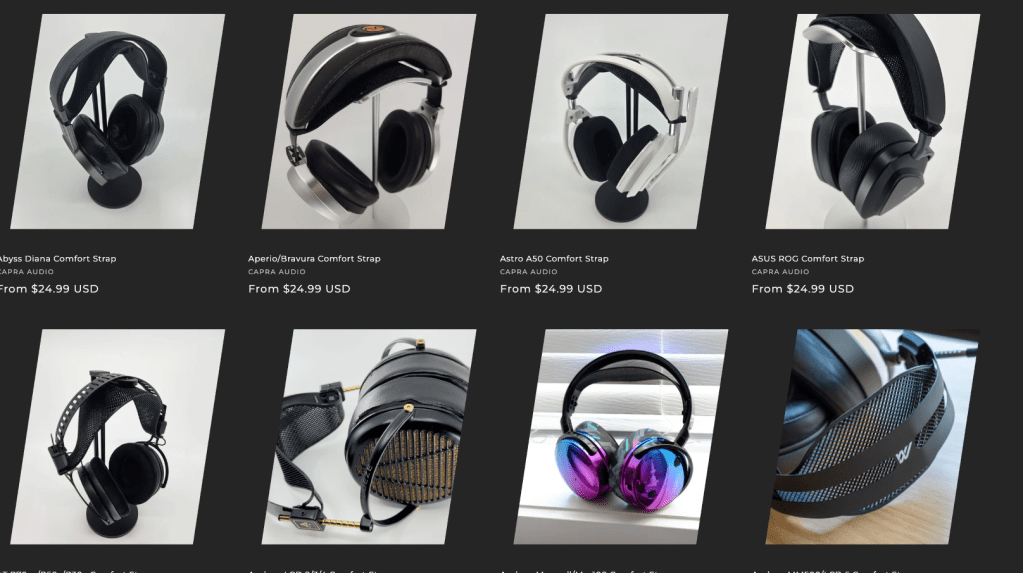
Capra Audio was one of my first introductions to both the idea of headphone modding AND building 3D headphones. Brian Hayden (owner, engineer, CSR etc. of Capra Audio, herein “Capra”) is mentioned a lot on r/Headphones and r/HeadphonesAdvice for his really excellent Capra Straps, aftermarket suspension straps that make many major commercial headphones more comfortable for many users. Because he’s a wise and benevolent man, he makes the plans for most of his straps free online on Printables, allowing people like me who have a printer to make their own. He also sells high-quality versions at a very reasonable price, including shipping to much of the world (sometimes, it seems, at a loss).
What not everyone who has a Capra strap may know is that Capra also designs his own headphones and makes the designs free to download and print. A lot of DIY headphones on the internet are pretty slapdash and may look great, but they often sound … less awesome. Capra is the exception; his headphones are carefully designed and planned out to sound really good, and they’re regularly updated. He also maintains a pretty great Discord community full of people who have been, in my experience, mostly pretty helpful when you run into issues with printing, assembly, design, etc., and I’ve rarely gone more than an hour without a question being answered by someone.
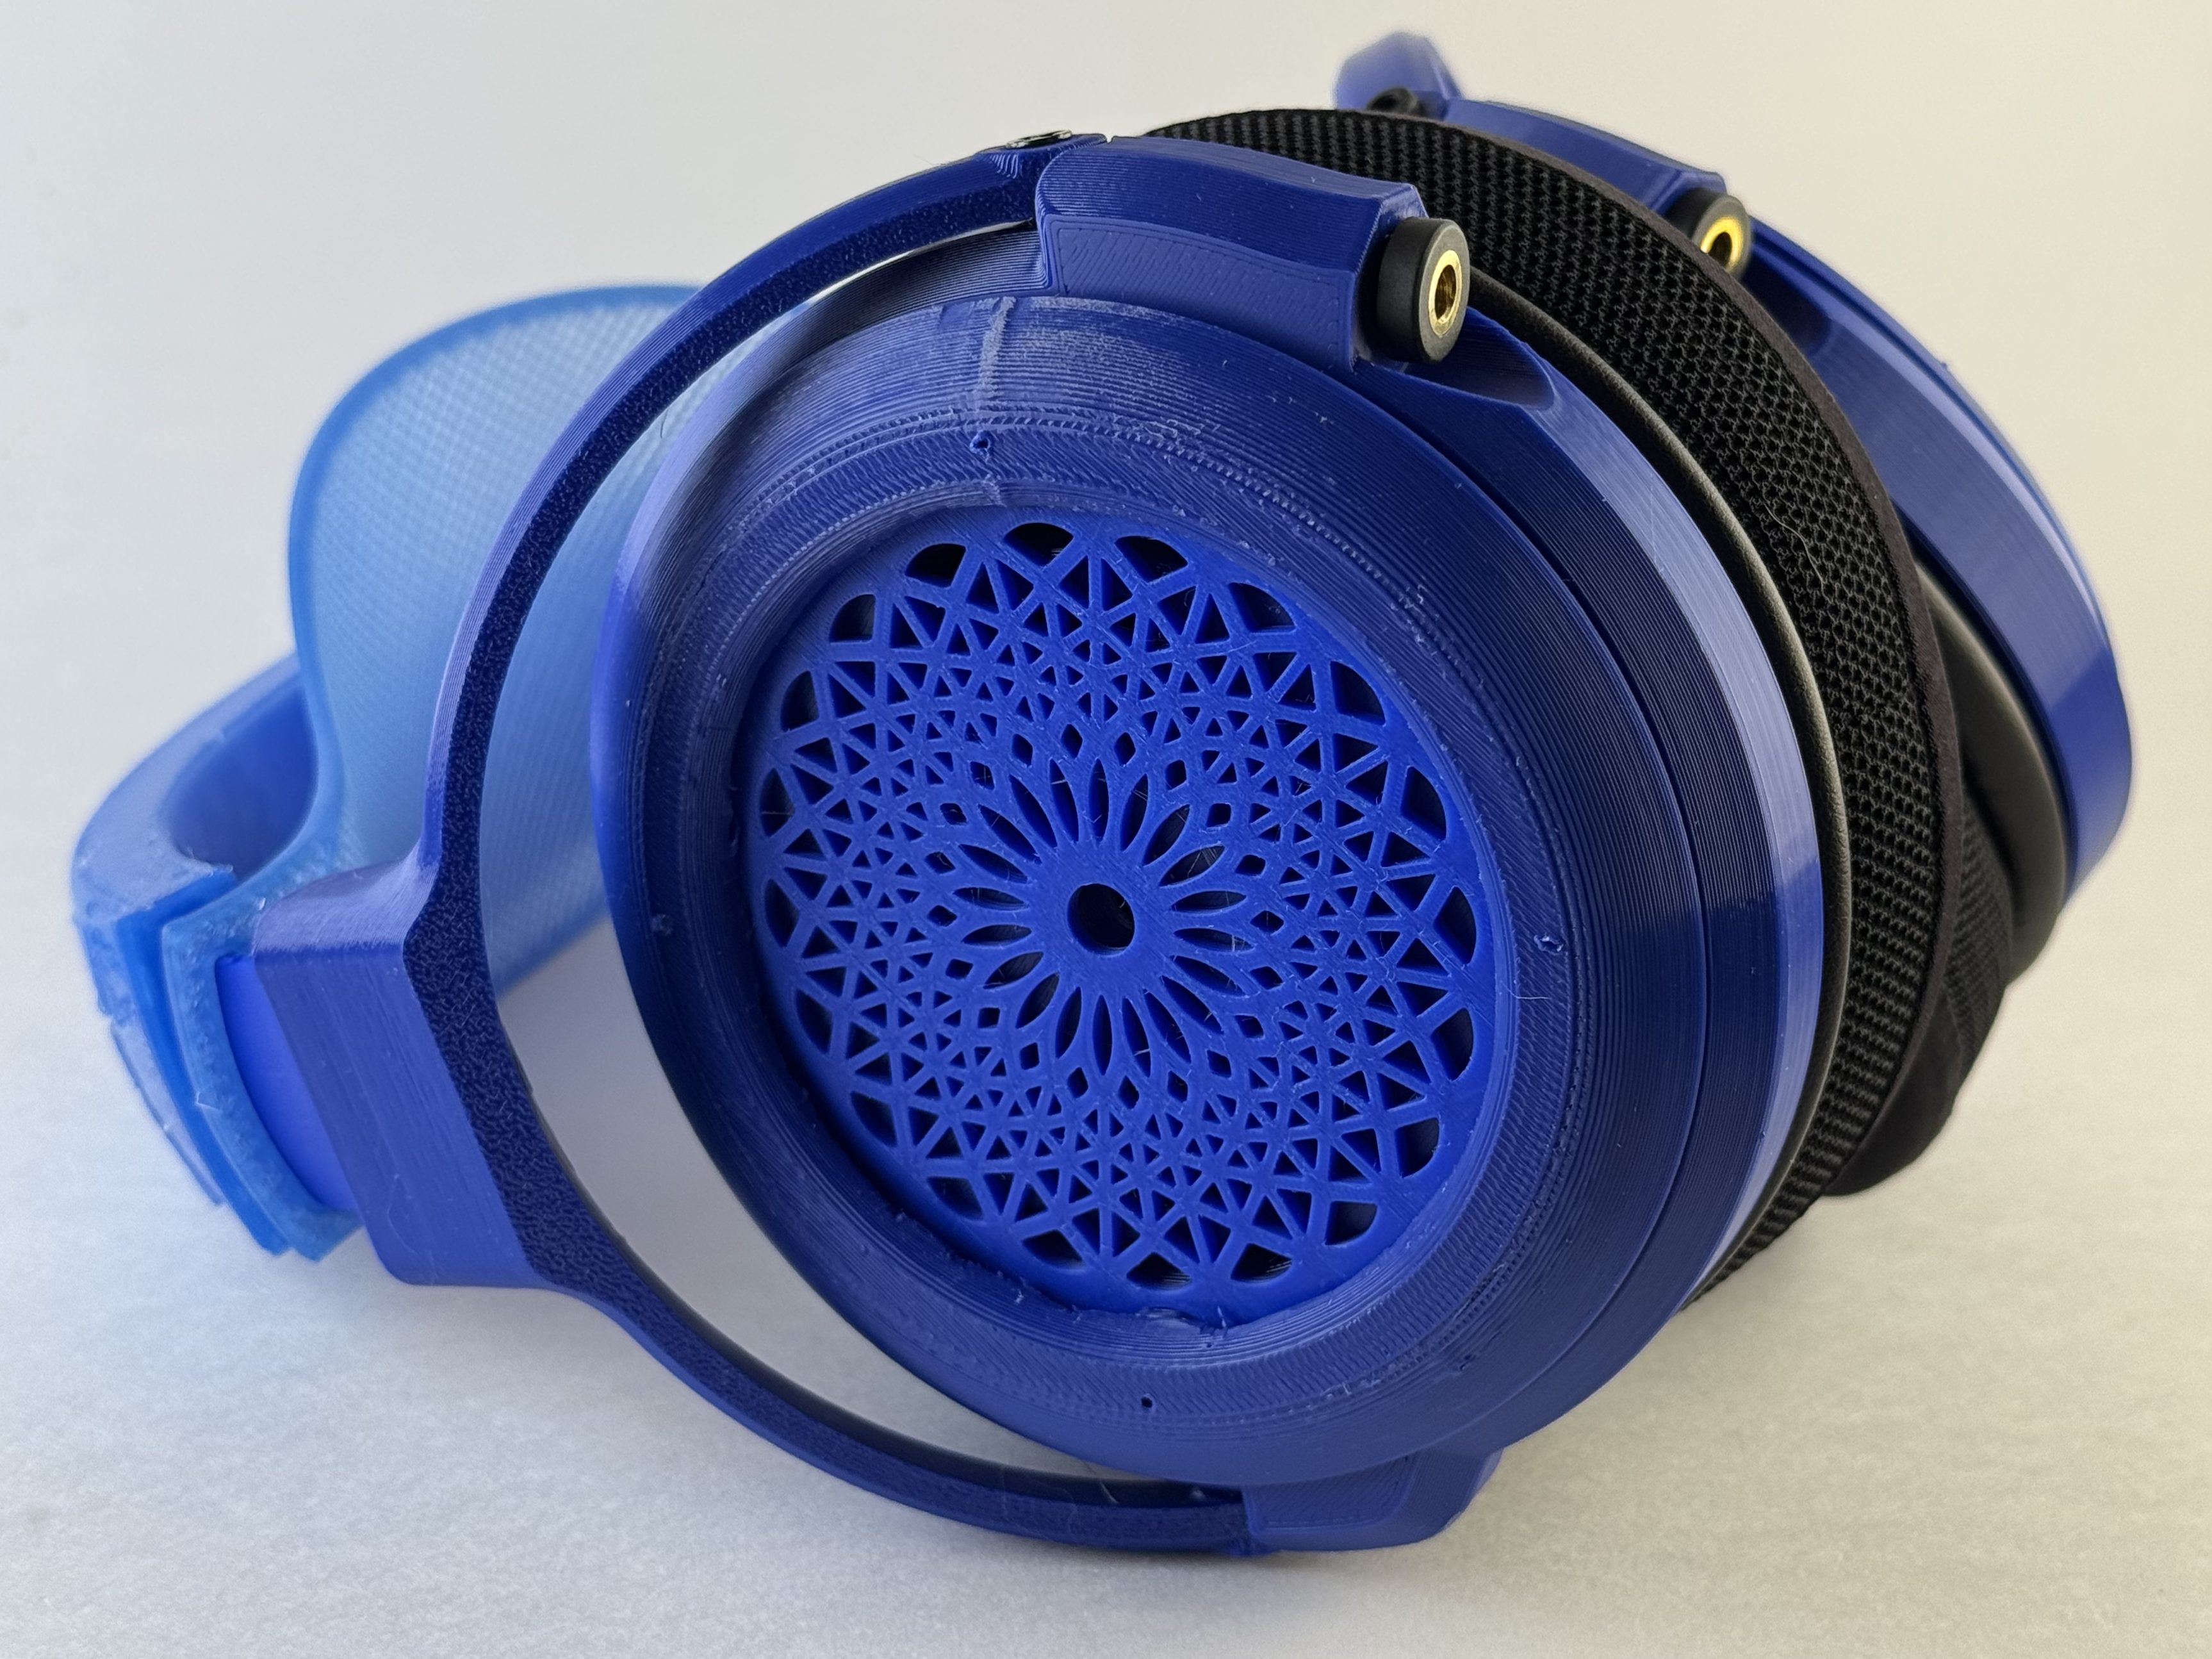
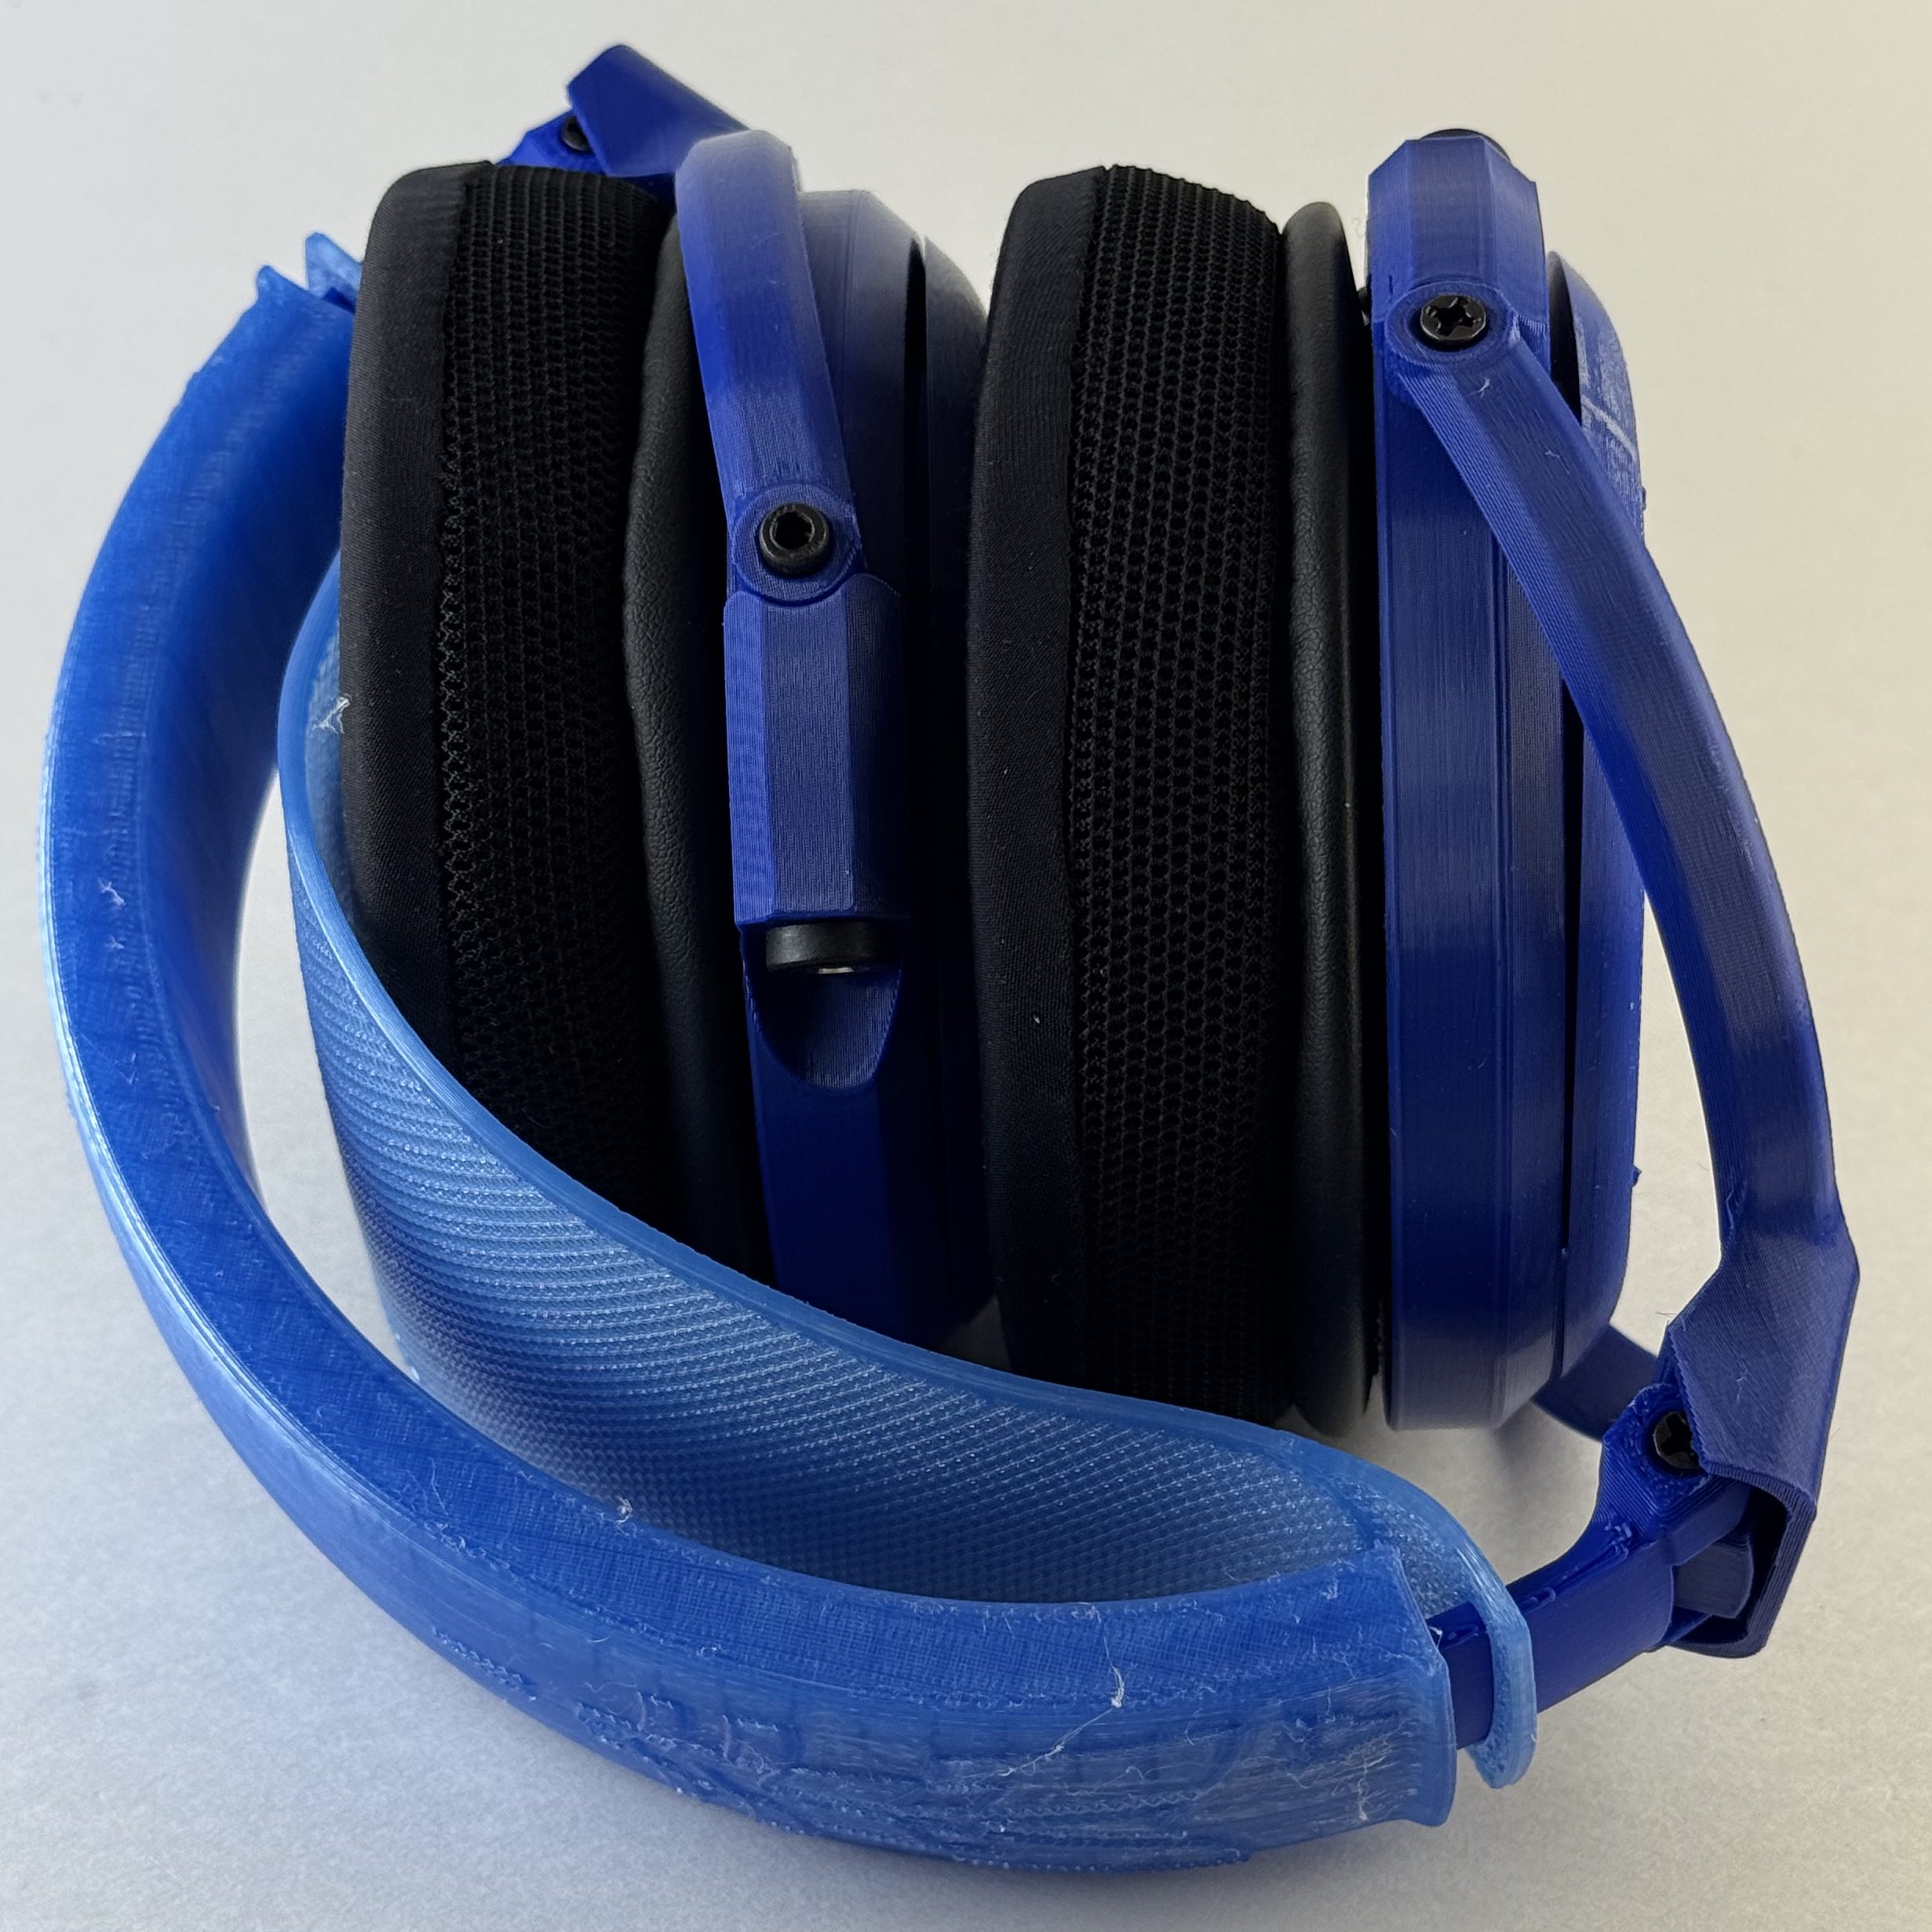
My first experience with Capra’s headphones was the current iteration of his open-back, over ear headphone, the Satyr 3. This was my introduction to the world of of 3D printed, DIY headphones. I don’t even remember where I saw them … maybe in a shared collection with an IKEA Skadis-compatible headphone holder that I was briefly obsessed with before I discovered Multiboard? I started printing this one a piece at a time every time I was at OlyMega‘s makerspace. That first unit, for me, was a random collection of whatever colors I could get there plus whatever happened to arrive first with my newly-purchased P1S, and ended up being the ‘Murkaphones,1 serendipitously finished in July 2025:

They’re a really good headphone, and they were a really good first electronics project (the first time I’d ever soldered something!), and I learned a lot. I also look back at the print quality on that project and … yeah, there’s a reason I made a second pair almost immediately, and why I will probably crank out a cleaner pair in the near future.
The Basics
The Capra Audio Satyr 3 is a largely 3D printed, do it yourself (DIY), open-backed, dynamic driver headphone. It takes a well-respected-but-generic driver (i.e. a headphone speaker) and through judicious use of design and damping produces a really, really excellent headphone. For about $60. That legitimately competes with (and in some cases handily beats) things in the market that cost $200 or $300. My particular pair (printed in PETG and TPU 95A) weigh in around 400 g (on the higher side for headphones, but not bad). You connect the Satyr 3 to a source via either mini-XLR connectors (deprecated version) or a standard dual-entry 3.5 mm headphone cable.
What Do I Need?
Each headphone will have some slightly different techniques or tools, but here are the most common ones and links to versions I like/use (affiliate links to Amazon; please feel free to just search).
- A 3D printer, obviously. I have the Bambu Labs H2D, P1S, A1, and A1 mini. All of them will work, though the Mini will limit your ability to batch overnight, and these are straightforward enough that any printer should work.
- A small/security screwdriver kit: I personally really like iFixit’s excellent combination set with screwdrivers, bits, and prying tools (particularly if you’re going to also make Ouroboros), but I also like having the Fanttik electric screwdrivers around for bigger projects.2
- Soldering iron: I really like my Pinecil and its portability, but I also have an X-Tronic soldering station that I use at my work desk
- Helping hands3
- Solder
- Craft knife: I really like this one from X-Acto but any will work
- Deburring tool
- Protective equipment:
- Magnifying, lighted glasses (if you’re old/blind like me)
- Silicon mat (for soldering/cutting on)4
Cost/Materials
These are an easy 5/5 for ease of sourcing. One of my favorite things about Capra’s headphones (particularly compared to other options) is how well organized the Bill of Materials (“BOM”) are. Capra provides links to everything you need to build the Satyr 3. Most of them are on the US Amazon site which makes them easy to buy (and they are mostly affiliate links, and I would encourage you to use them to support him), the drivers are usually available worldwide from Digikey, and one of the pad options is available directly from Capra Audio and the other from Amazon (and both are reasonably priced, unlike other options). The only thing he doesn’t link is a cable, and most folks making these probably already have a dual-entry, 3.5 mm terminated cable kicking around, from a Fiio, Meze, Focal, or Hifiman headphone. If you don’t have one, my opinion on cables is that any modern, competent cable won’t affect sound and I’d recommend either of these (these are Amazon affiliate links; feel free to just search for the items): New Fantasia ($12, normal 3.5 mm aka aux connection) or Youkamoo ($25, 4.4 mm-terminated balanced cable).
All in, and assuming no misprints, you’ll need a little less than a quarter spool of filament, around 160 grams of a harder filament like PLA/PETG and slightly more than 50 grams of TPU, and it will take you between 10 and 11 hours to print.
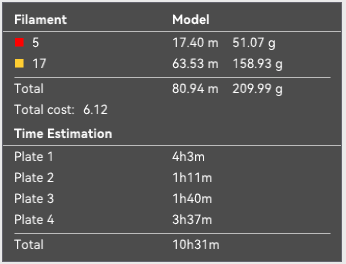
Total cost for me was around $60 ($70 with the pro pads), with my best estimates of the amount of larger packs I used for this specific build:

I used the basic pad option from Amazon,5 though I have some pro pads6 on order for my next build.
Build Process
I’d give the Satyr a 4 out of 5 for ease of printing, 3 if you go with qyw’s fascia, and a 4 out of 5 for assembly. A couple of suggestions to start:
- Pick your adjustment arms. Decide whether you want adjustable arms (cups that fold up into the the headband) or static, and print accordingly.7
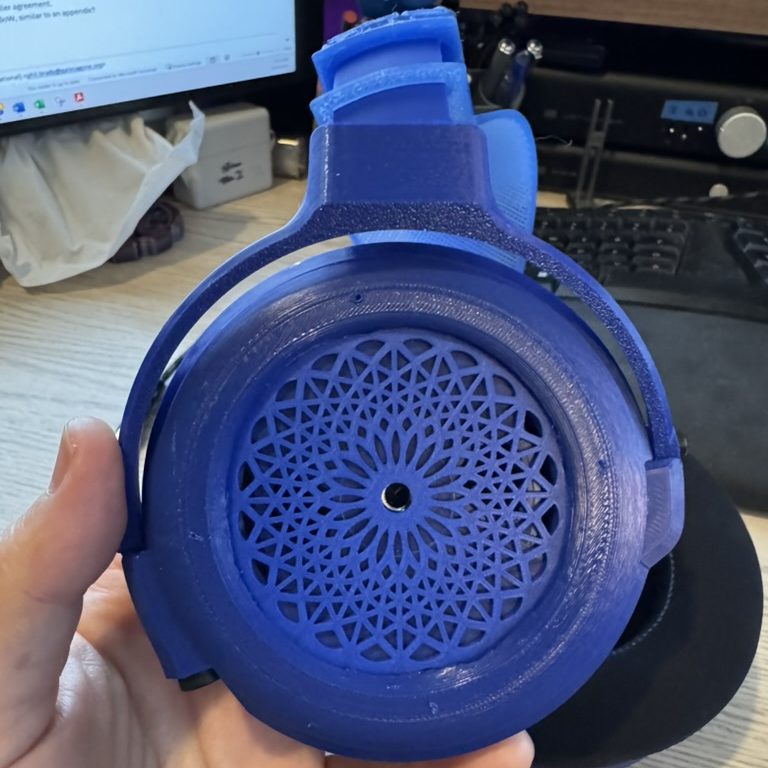
- Pick your fascia. I don’t love the basic Satyr fascia, so I printed Aplo’s alternative (easy print) and qyw’s stained-glass-style fascia (very challenging print).
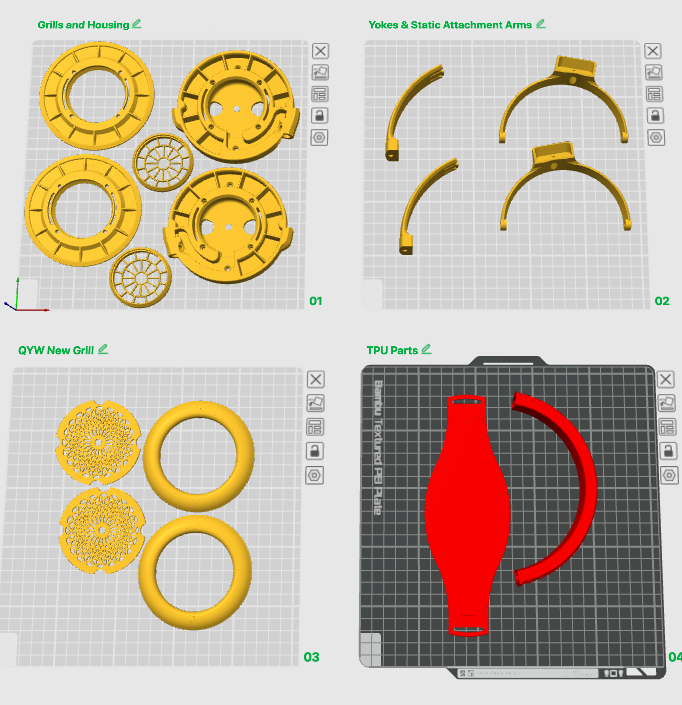
- Build the project file first. Capra provides the files for one side of the headphone but not the other, so some basic manipulation will be required. For me, before starting this project I created a new project file in Bambu Studio and built plates with all of the necessary pieces. You’ll need:
- Left housing
- Right housing (the left housing from Printables, just mirrored)
- 2 x Pad Lip
- 2 x Driver Grill
- 2 x static attachment arm
- OR
- 2 x adjustment attachment arm AND 2 x pivot blocks
- Left yoke
- Right yoke (the left yoke from Printables, just mirrored)
- 2 x fascia (left and right, OG, Aplo’s, or qyw’s)
- Download and prepare the Capra V3 headband files and print (in TPU, follow Capra’s instructions re: setup):
- 1 x TPU headband
- 1 x TPU comfort strap, printed without top or bottom layers.
- Pick your color scheme and plan it out.
- Pick your materials. If you are keeping them for yourself, PLA is fine because you can swap out parts. If you’re gifting them, or don’t have easy access to a 3D printer, use PETG for the attachment arms and yokes and consider printing spare parts to include with the gift. The parts that are likely to break are also pretty easy to replace with just a screwdriver, if you have pre-set the inserts.
- Read the instructions several times, and think about building a checklist. The instructions are generally pretty good, but they (like a lot of 3D printed DIY headphones) skip some important steps/details.
Printing
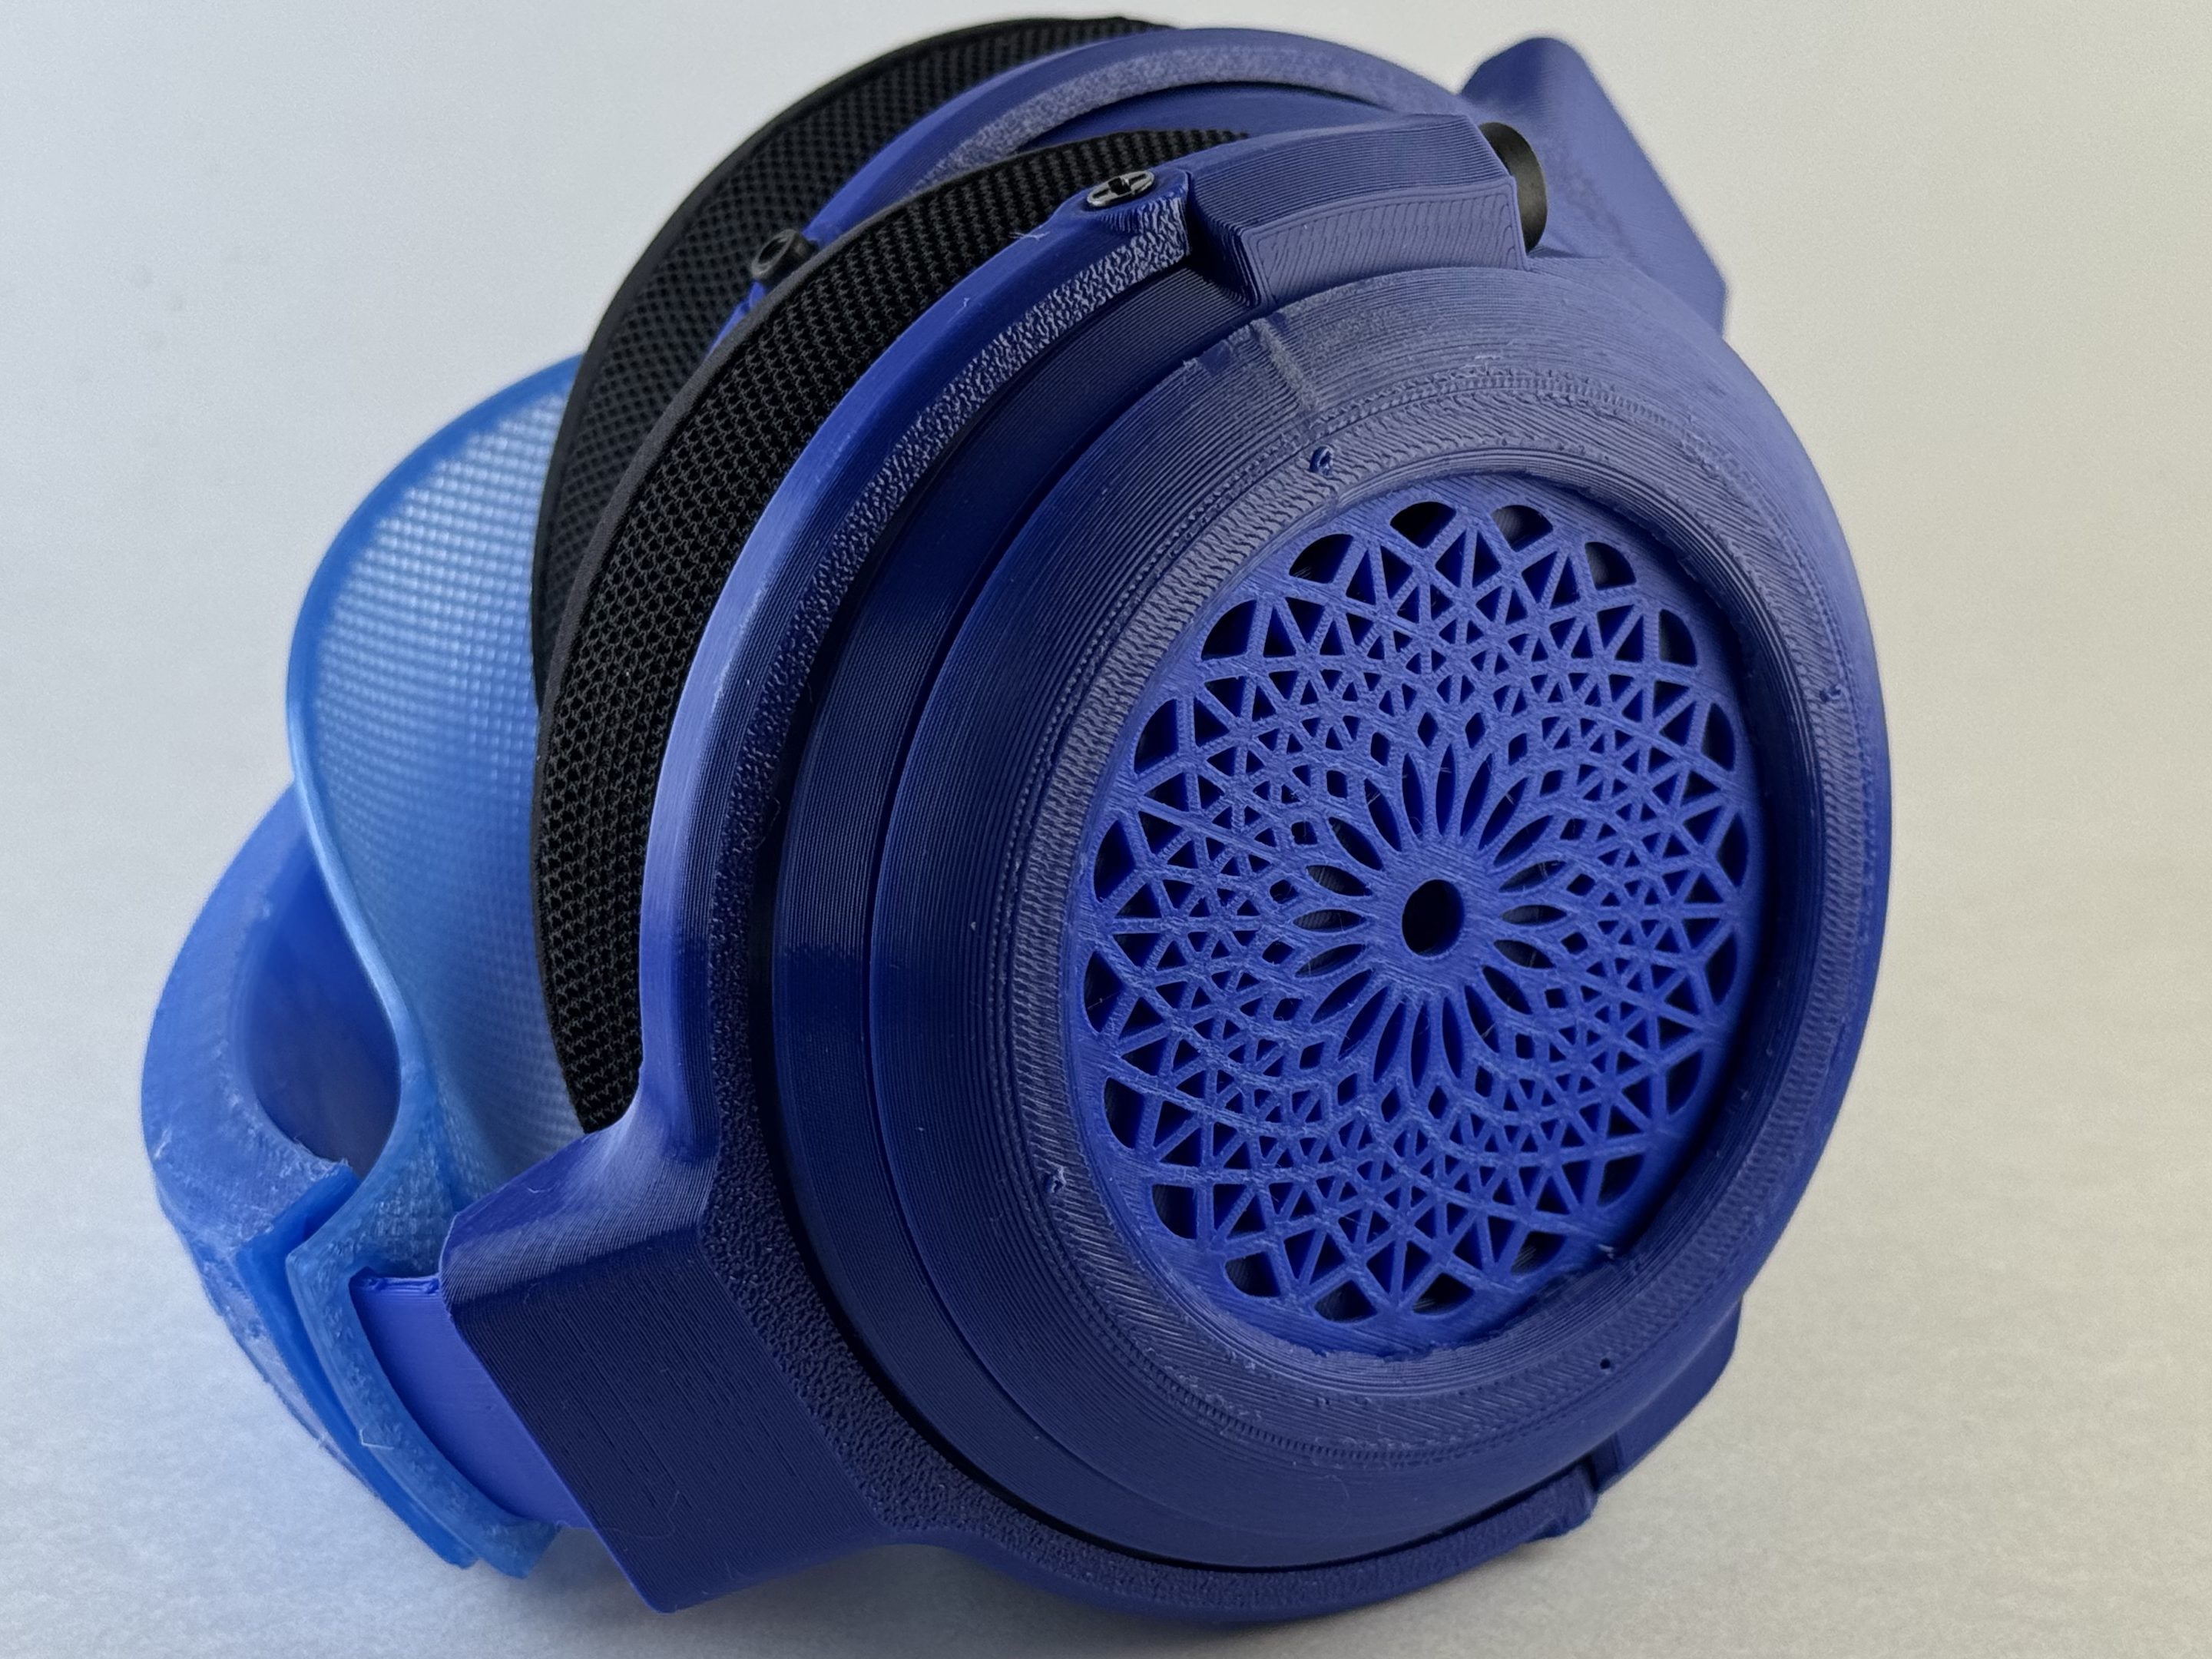
The hardest pieces to print will be the fascia (if you go with the complex one) and the attachment arms. The challenge of the fascia is buildups on the center of the rose. The attachment arms are just hard because they require support and removing the support can be challenging. You might get a little stringing on the interior of the pad mounts or fascia supports, but slowing down helped me with that. Suggestions:
- Print the fascia slowly, ideally in .2 mm, and watching it like a hawk. The issue I’ve had is build up from the nozzle rubbing near the center.
- Print the attachment arms as below, on their side, with supports. If you can do supports in a non-sticking material (PLA for PETG, vice versa, or a “support” material for whatever you’re using), that’s ideal though in a single-nozzle printer it may reduce structural strength a bit.
The best way to print this project (or most projects, really) is in small batches of just a single part or paired parts, but I tend to set my printer for longer prints overnight. I’ve printed this a couple of times in four plates on the P1S/A1, arranged this way:
In total, this prints in a little more than 10 and a half hours, and will run you a little less than a quarter spool of filament (160 grams of PLA/PETG and a little more than 60 grams of a TPU), if you don’t have any printer issues.
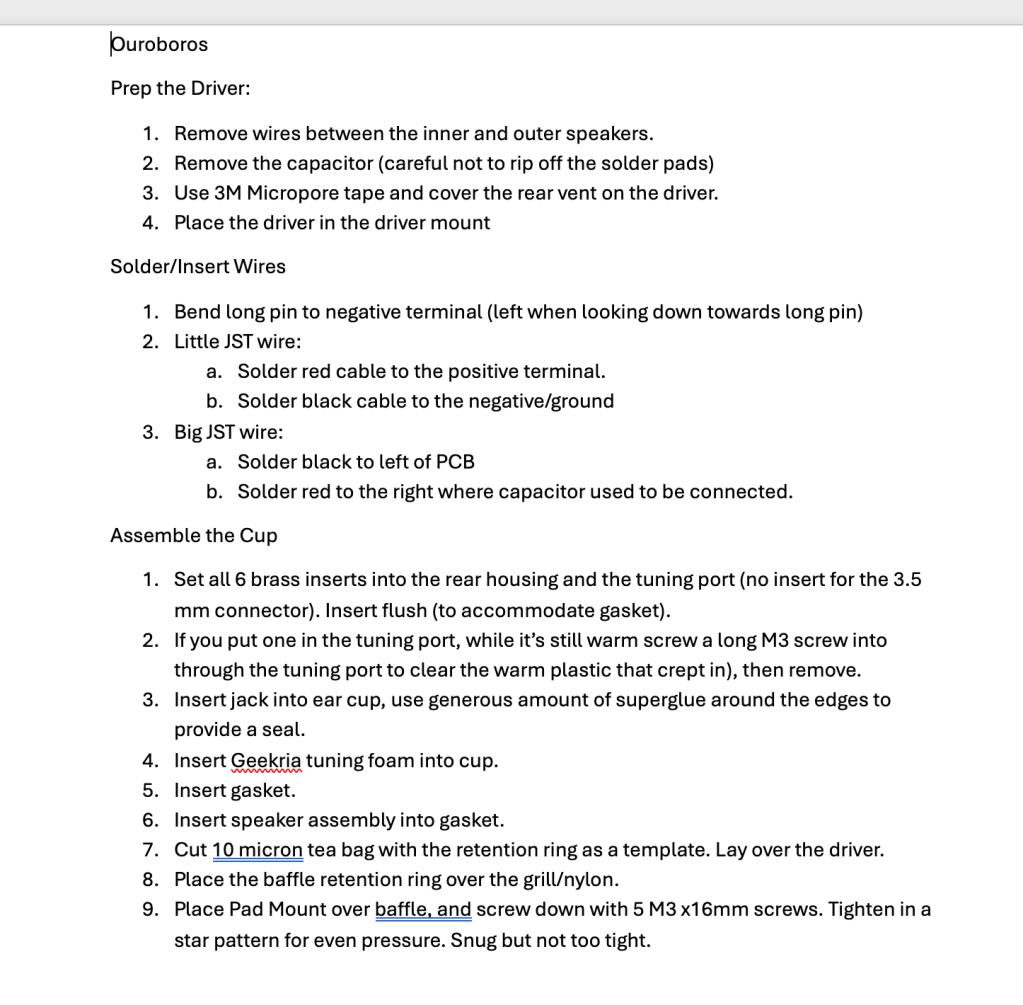
Assembly
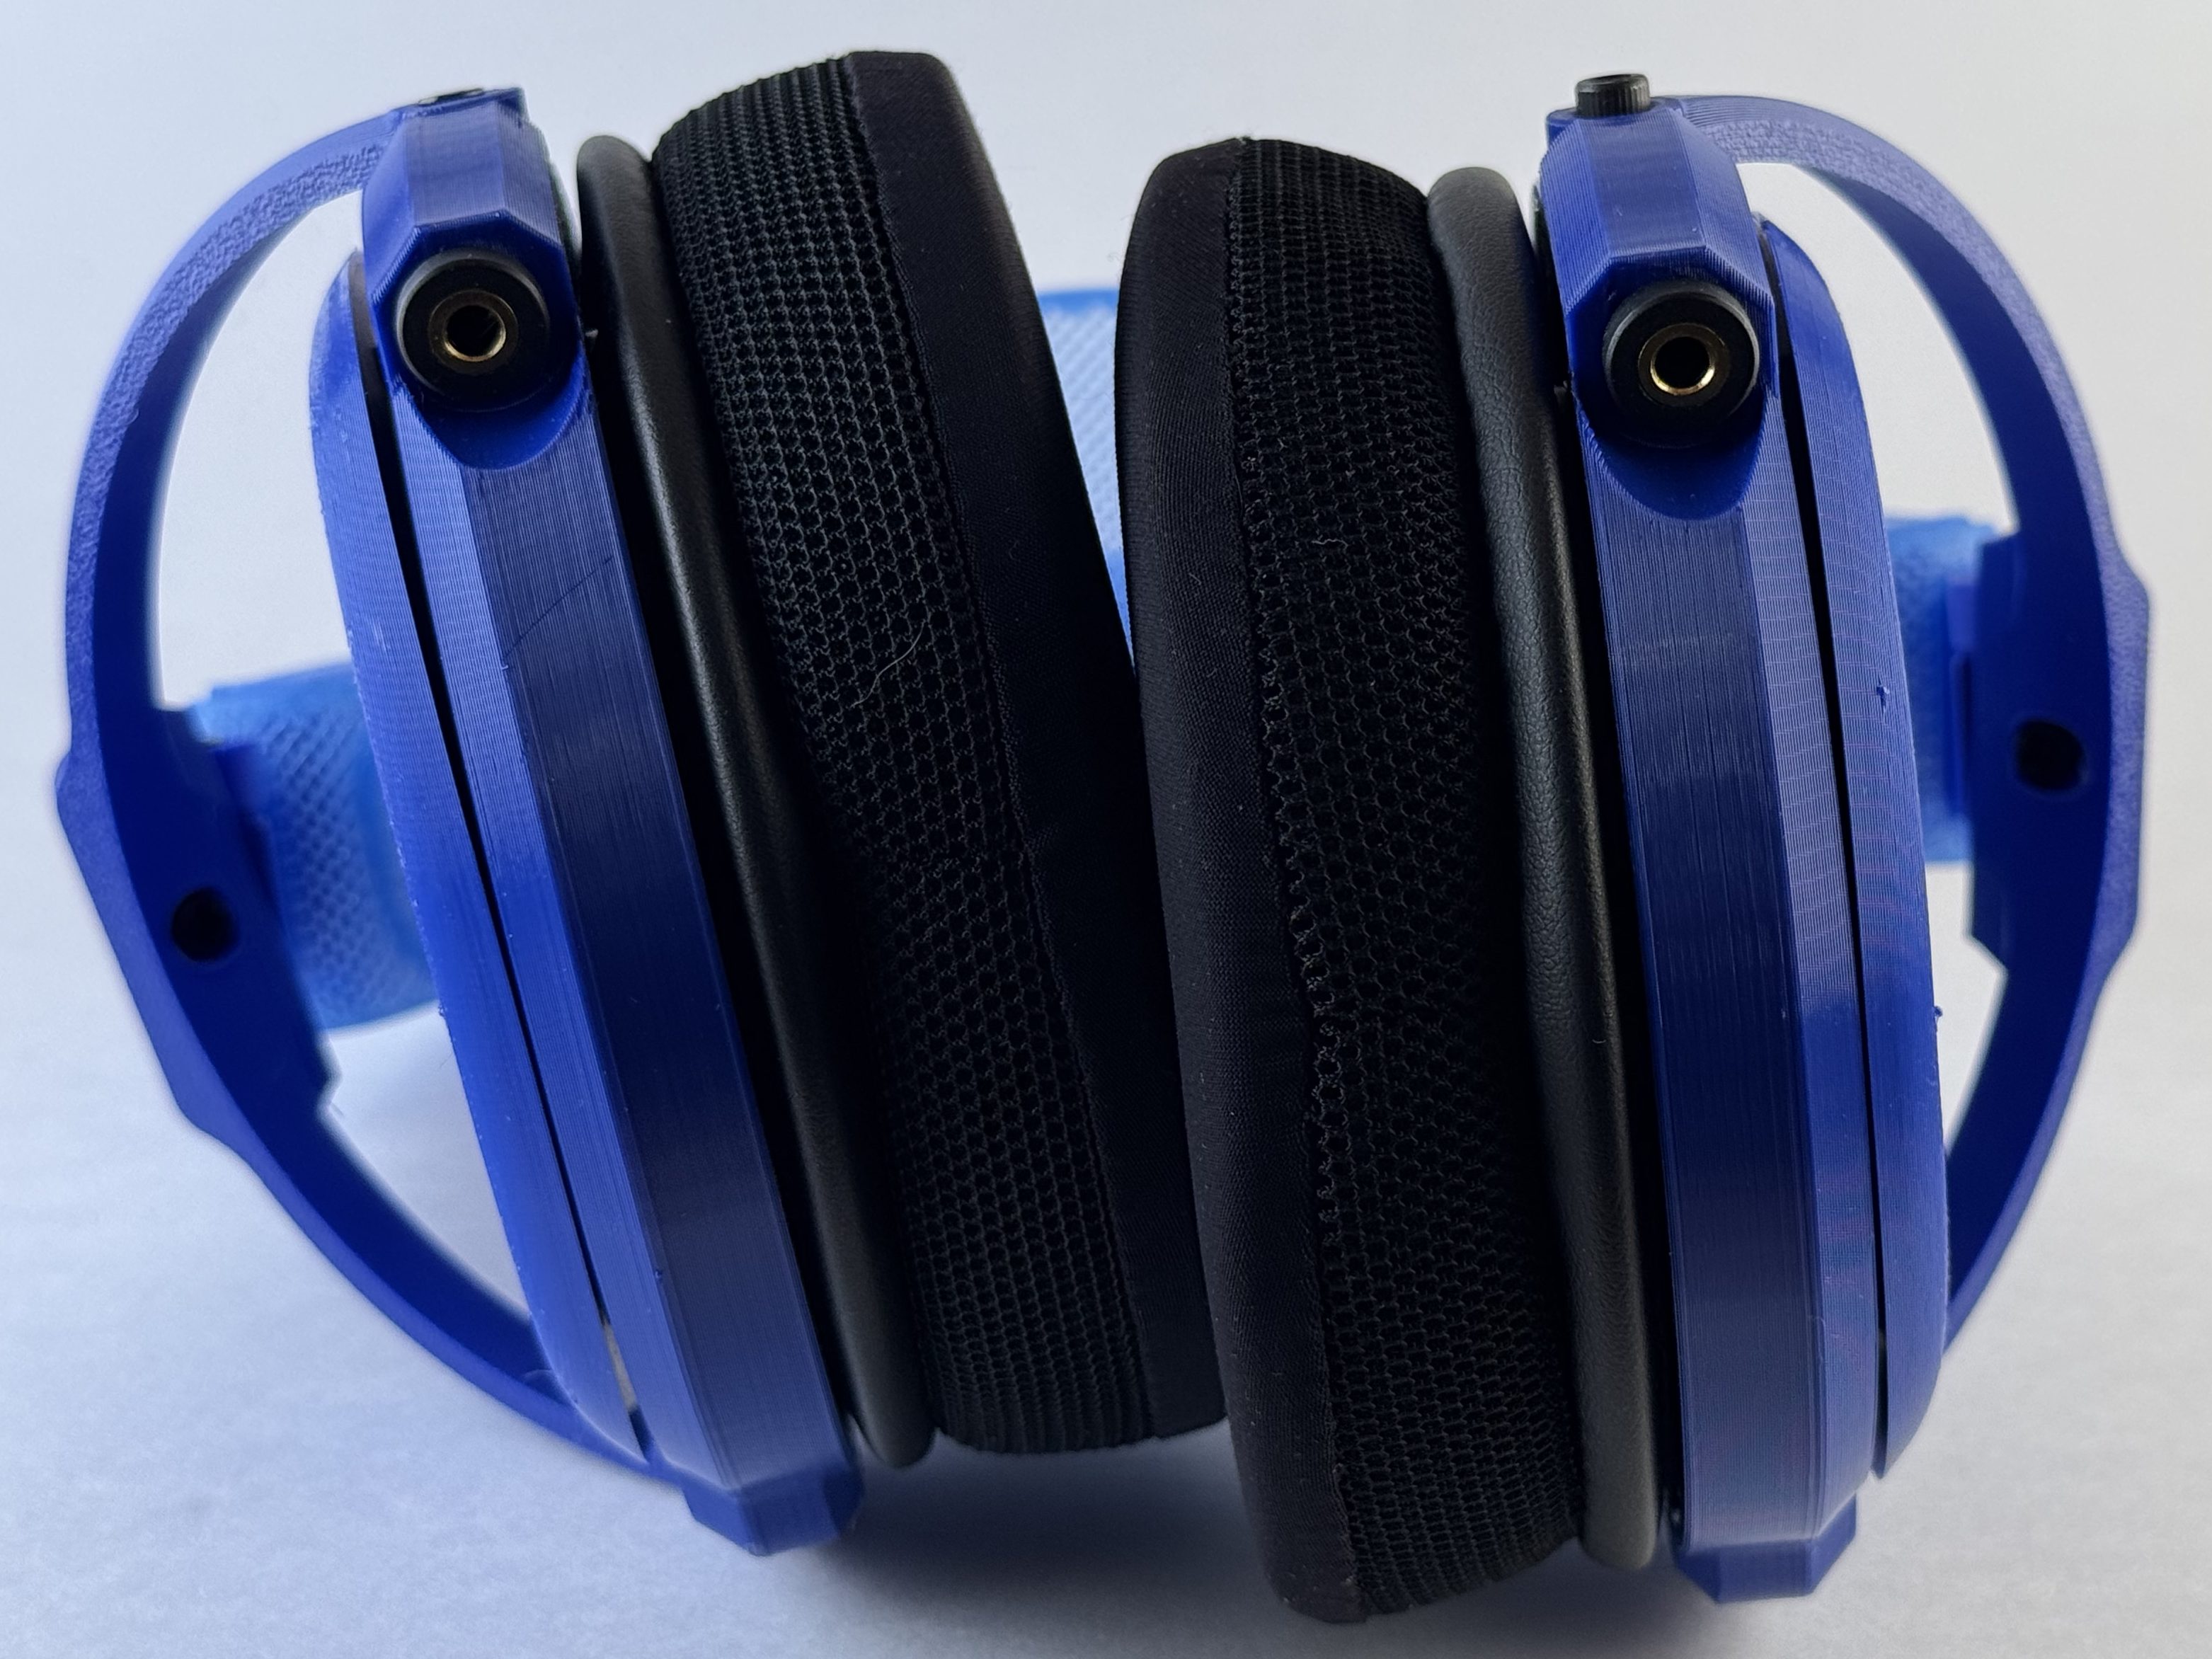
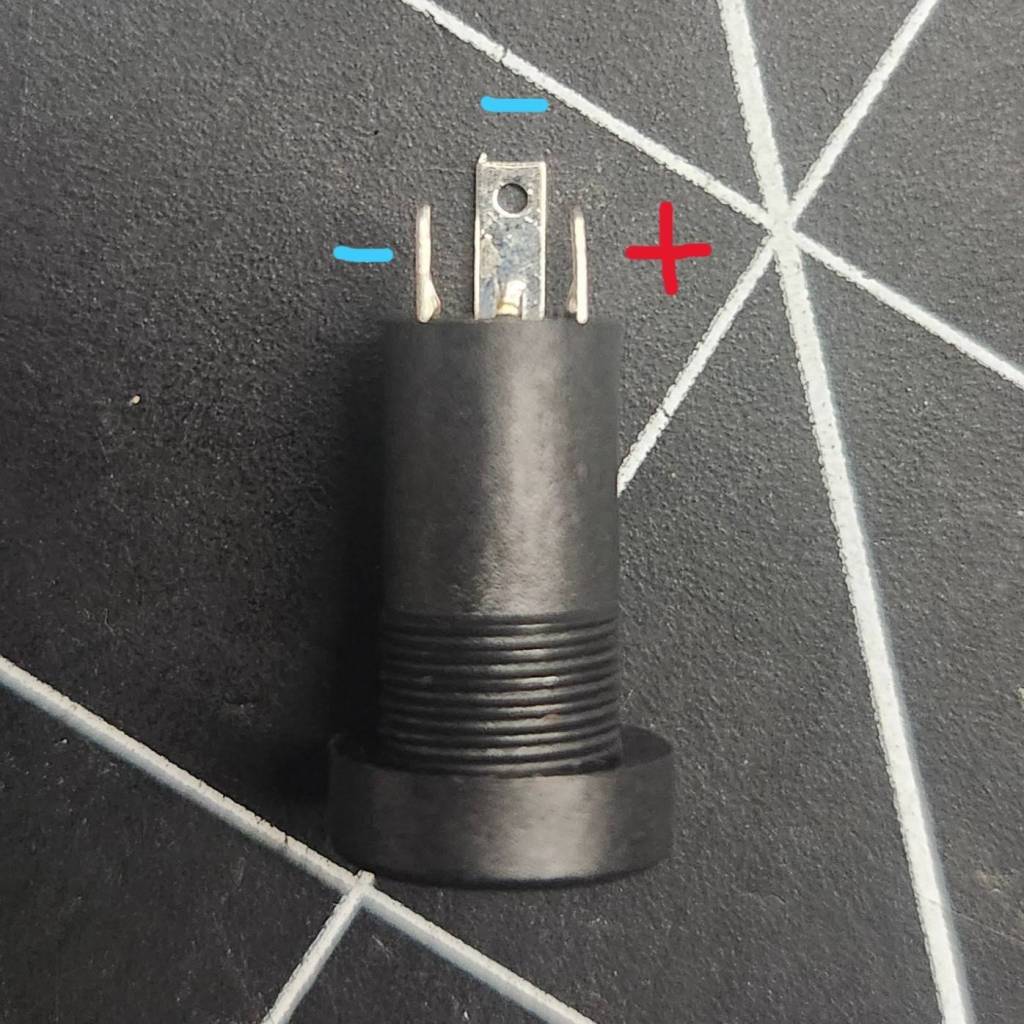
Capra’s instructions are really good for the cup assembly; the only thing missing is a little detail about how you solder the speakers and the 3.5 mm jacks (and how to use the JST connectors if you want to8). For the 3.5 mm jacks, you’re going to bend that back pin to the one on the left and then solder the black cable to the joined pins, and the red to the pin on the right. On the speakers, black goes to the left pad and red the right; I strongly encourage you to use the JST connectors that Capra recommends instead of trying to solder a solid wire between the two; that way lies madness and frustration whenever you need to change anything.
A couple of tips for this process:
- When you are soldering the JST connectors, solder the smaller connector to the 3.5 mm jack and the bigger one to the driver. This avoids two problems: a) the bigger connector won’t fit through the hole that allows the wires to come into the cup and b) having two of the same connector on a single ear cup means they can’t connect.
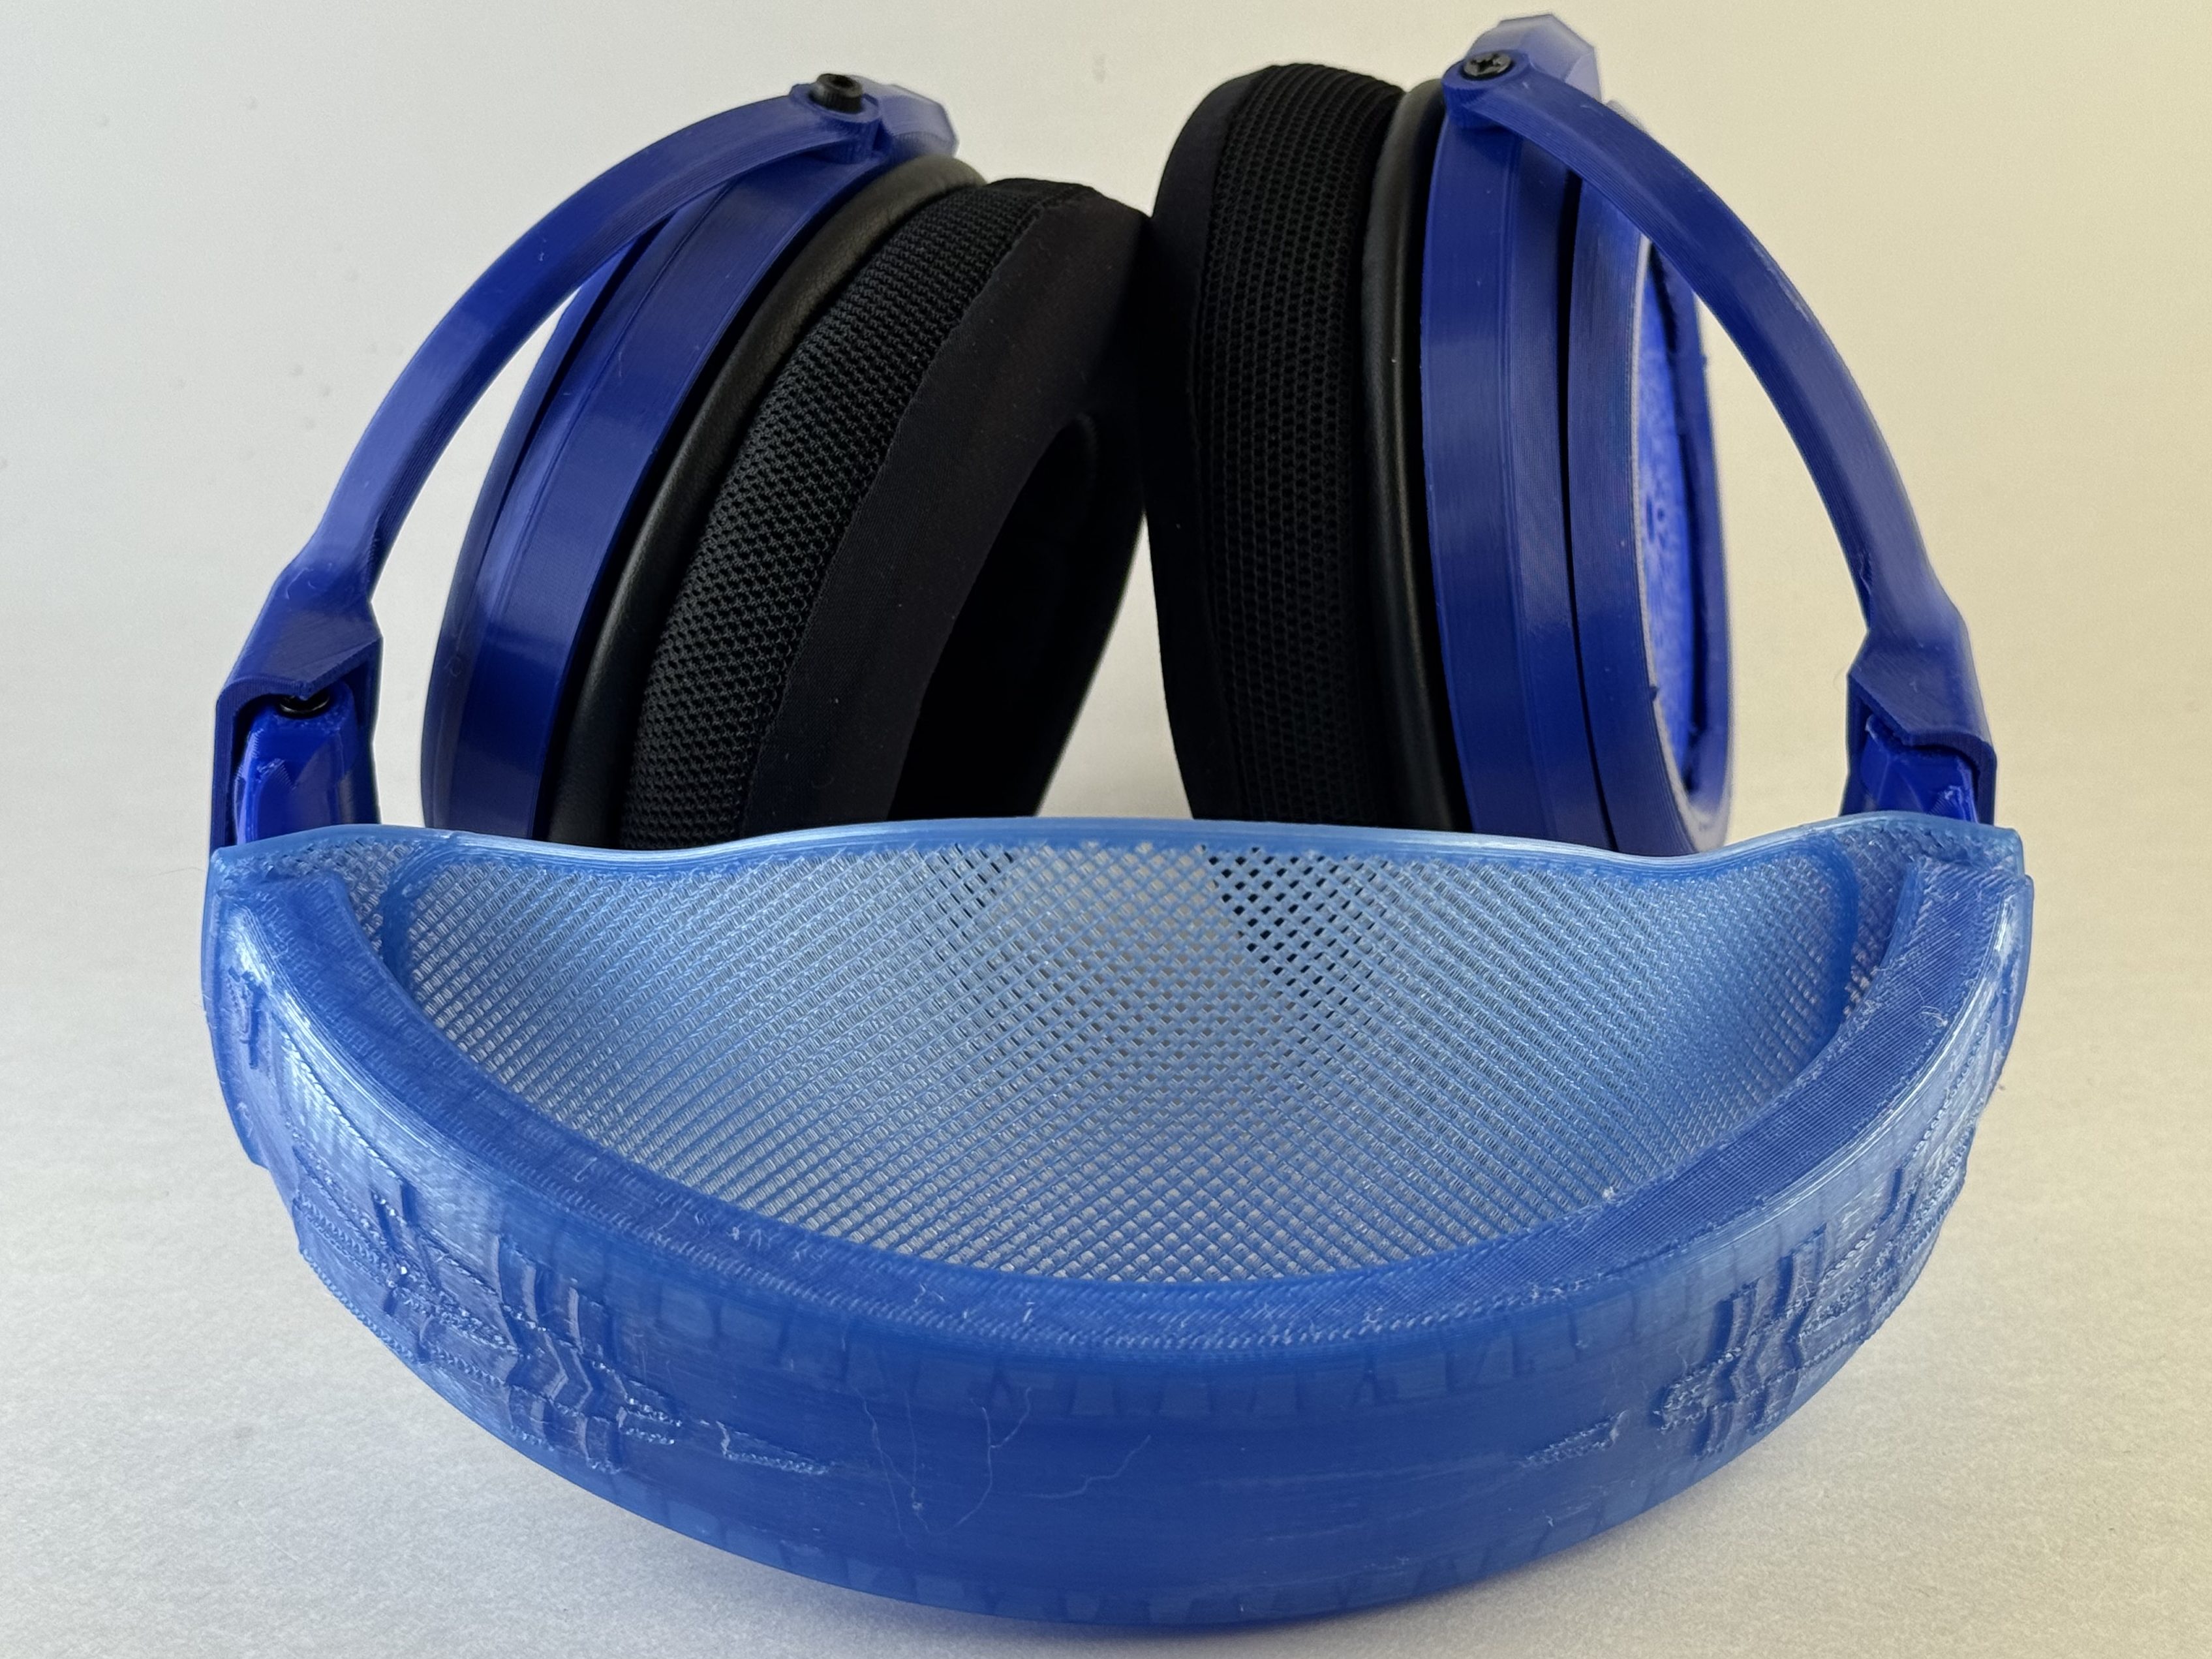
- Putting the earpads on can be a frustrating task; I attempt to show it on a different headphone here, but it’s the same process. Don’t be afraid to put your fingers through the cup; the drivers are protected by the grill. It does get easier over time.
Sound
Because this is a DIY headphone, my normal philosophy about allocation of resources in headfi doesn’t really apply and I’m running it on my Mimir/Jotunheim 2 stack because I can unless otherwise noted.
Volume
Here are the volume settings I use with the Satyr 3 (unless otherwise noted, running via Roon with no headroom management, playing Daft Punk’s “Face to Face” from Tidal):
- Mimir/Jotunheim 2 (Mimir has a -15 dB pregain applied via Forkbeard): low gain, 9:30 (balanced); low gain, 11:00 (single-ended)
- Modius/Magnius: low gain, 9:30 (balanced); low gain, 11:00 (single-ended)
- Modi/Magni: low gain, 8:30
- Fulla/Hel2: 9:00
- E30/L30: lowest gain, 10:00
- Apple dongle via Mac Studio: 35%
- North American Apple dongle via iPhone 15: 50%
My testing method/philosophy.
My torture testing list: Apple, Tidal, Spotify.]
Technicalities
The Peerless driver that the Satyr 3 uses is a pretty common one in both the DIY world and the independent headphone producer world, and is included in some VERY expensive offerings like the DMS Project Omega ($850), Auroras Australis ($900), and Headphones for All Dahlia ($1000). It’s an extraordinarily capable driver, and when it is implemented right can produce a remarkable sound profile, especially for less than $35/pair (less if you bulk buy).
The soundstage is good, but not amazing, with reasonable width and pretty good precision/separation within it. The musicians in “Chan Chan” are both spread out pretty well right-to-left and are clearly placed within it, with the two lead guitar lines evenly spread across the channels, the bass out to the far left, and singers nicely centered. The soundstage is mostly right to left without a ton of front to back (rotational) staging on “Love Can Damage your Health (Laid Mix)”). Instrument separation and timbre are solid if not amazing; I can identify the lead guitars on “Garcia Counterpoint” mostly by placement in the mix rather than tone, but instruments generally sound correct.
The dynamic range is really good; starting at a comfortable volume, “It’s All So Incredibly Loud” is unpleasant starting around the 2:30 mark. Microdynamics are solid but not amazing, and pretty consistent across low and high notes. Both the lower bell tones and the chimes at the beginning of “Angel (Blur Mix)” are nicely accenting, even if I do want a little more punch and warble on the bass notes.
Detail retrieval seems generally good; after a few hours nothing has jumped out at me as being unusual, but neither do I feel like anything is lacking in the mix.
Bass
I’d say bass on the Satyr 3 is good, not great in both quality and quantity. I would like both a little more punch and a bit more clarity on the bass as it comes in on “Out of My Hands” around 2:50, and I want both a little more power and precision on “Got ‘Til It’s Gone.” Some of the lowest notes on “Limit to Your Love” are rolling off, though you still get a satisfying brain wobble in the mid bass, and there’s definitely some splatter on “Superpredators.”
Midrange
Midrange is one of the strengths on the Satyr 3, both in terms of vocals and instruments. Jill Scott is clear and strong on “Calls”, even when the mix starts to get crowded in the mids. Justin Hicks’ is beautifully reproduced on “What Did I Do?”, even early in the track when he can be a little recessed on some headphones. They’re just very natural sounding, and compare reasonably favorably to my favorite headphones for mids (the 6X0 family).
Treble
The treble, often the issue in a DIY headphone, is nicely balanced. “Easy” is a hard track for treble balance with the synths throughout, but they’re present and clear without being harsh. Same with the guitar riff on “2021” and Miles Davis’ solo on “Will O’ the Wisp.” Occasionally I might want a hair more treble, but a little bit of relaxation is a totally fair trade for control in the treble, and the balance is genuinely impressive.
Comfort
I’m going to skip the build section from my normal review process on 3D printed headphones, but I think it is worth talking about comfort.
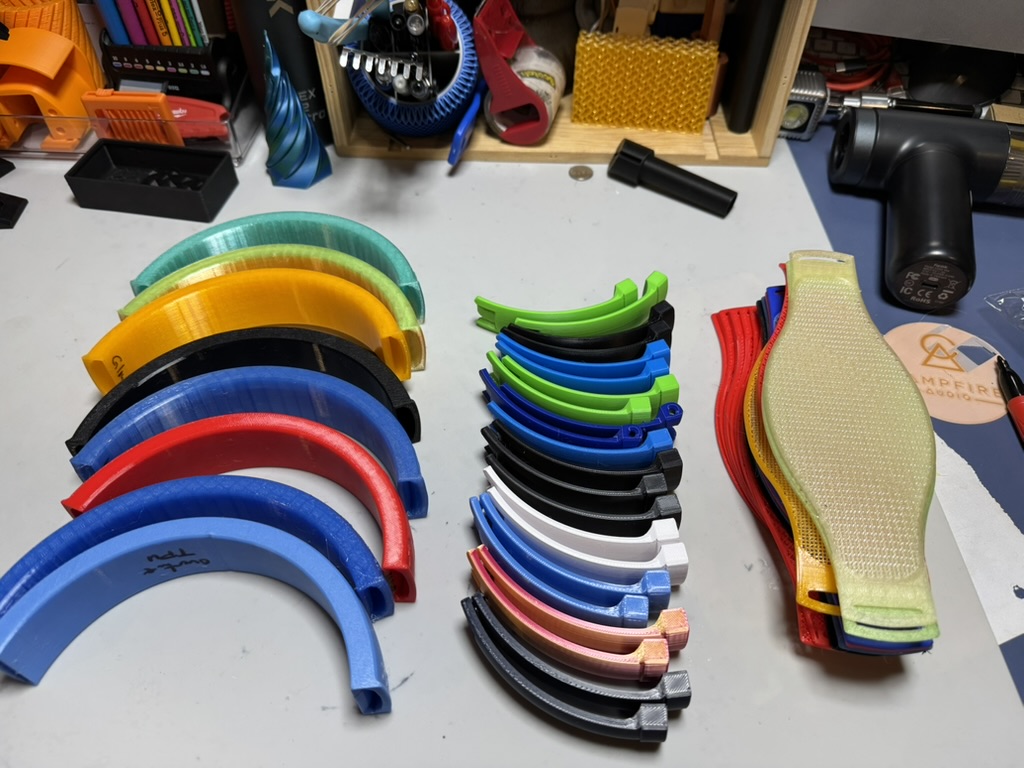
I’ll start by saying that Capra is a freakin’ wizard with his headband. It’s … extraordinary. It just … works. It’s clampy enough to feel very secure without being uncomfortable. The stretchy TPU band does a good job of spreading the weight out over the top of my head, and combines with just enough clamp force on these that the cups bear some of the weight, and I can wear these for a couple of hours before I start feeling any discomfort. I have printed … a lot of them.
I also, weirdly, really love the cooling pads that Capra suggests as his non-“pro” option. I’d never tried a pair of them (sticking mostly to OEM pads for my headphones), but they have brought me around to the joys of Soulwit pads.
The biggest downside about these is that until you get used to and know what kinds of force you can apply to them, it can be a bit nerve-wracking to put them on and take them off. Properly printed, the adjustment arms and headband can actually take a reasonable amount of force, but they get pretty stiff pretty quick when you start to pull them away from your head. Capra recently released an extra large band and strap, and I might need to give those a try soon!
Overall
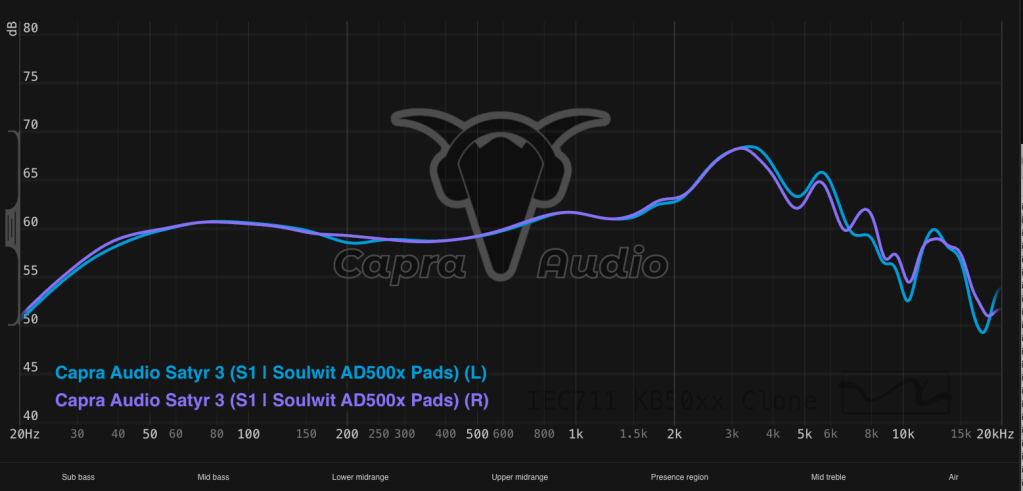
Every time I come back to these, I’m impressed by how good they sound. I think I like the DMS Open Omega just a tiny bit more, but it’s pretty close. They’re not super bassy, though the bass is mostly well-controlled, and it has both pretty good midrange and well-managed treble. Here’s Capra’s measurements9:
I’m probably not going to grab them over one of the 6XXes, but that’s more habit and weight-related than a pure tune-based choice. There are a number of well-loved, commercially-available headphones that I’ll take these over.
I’m not going to do a lot of value discussion or comparisons here (feels weird? and unfair to Capra since I have no idea if I built these right?) but I did a bit of a look-see over in my Sundara review.
Conclusion
I really like these headphones as headphones. Super comfortable, really good sound, reasonably easy to print and build … these are really a jack of all trades, master of none. I prefer the sound (marginally) on the Open Omega or Ouroboros (Golem); the Head(amame) kit is easier to assemble; Tofty’s Aurorora Borealis clone is arguably easier to print … but none of them combine all of these factors quite as well as the Satyr 3.
If you’re a true newbie who doesn’t know how to solder and doesn’t want to learn, the Head(amame) kits are your best bet. BUT, if you know a bit about soldering or are willing to learn, I think the Satyr 3 (or Ouroboros!) are a much more interesting, fulfilling project AND produce a better sounding headphone overall. Particularly if you’ve never spent any time with good, well-tuned, audiophile-style headphones, this headphone is so worth your time. Add in the fact that there is both a really excellent instructional video AND a Discord full of helpful folks who want you to produce a good product (and Capra himself hanging out and answering questions) and this would be my pick for most folks who are 3D headphone curious.
- This image on my computer is labeled “‘Murka, Fuck Yeah.jpg.”. Yes, I am a millennial. Why do you ask? ↩︎
- You don’t always WANT an electric screwdriver, but it’s nice in a pinch. ↩︎
- I go back and forth on whether these are actually helpful, but I think particularly for the 3.5 mm jacks this is a really helpful tool if you don’t get the X-tronic with built in arms. ↩︎
- I’m paranoid about solder beads; they’re small enough and have little enough thermal mass that they’re *probably* fine, but I like a surface I can either cut on or drop hot metal on. ↩︎
- Nicely cooling! ↩︎
- https://capraaudio.com/products/satyr-3-pro-pads?_pos=4&_fid=e1728271f&_ss=c ↩︎
- These are open backs so they’re never leaving the house with me. I found the the pivot block on the adjustable arms was my most common point of failure on both the ‘Murkaphones and my first Ouroboros, so I’ve swapped entirely to the static arms after making the Blueberry Satyr. If you want adjustable, I’d make a few extra sets of pivot blocks and set the heat inserts to keep around. ↩︎
- And you should. ↩︎
- While all headphones have a certain amount of unit variation, I’m reasonably certain that it’s even higher with 3D printed and DIY headphones; there’s no way I’m ever going to know how close my units are to this (and there are some differences between my two pairs). ↩︎

Leave a comment