

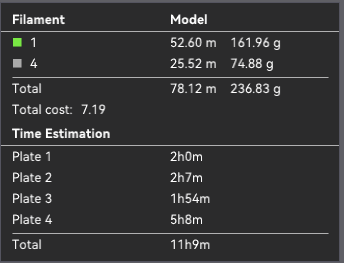
Printing time: 10+ hours, depending on printer and materials (almost exactly 10 hours on Bambu H2D). Cost (in January 2026): $66 + a cable based on portion of materials uses, $126 for all materials out the door. Moderate difficulty.

[Tl;dr: I have been enjoying the Satyr 4 the last week or two. It’s a really fun, engaging project, and results in a really fun, engaging headphone. This isn’t the easiest 3D printing project out there (that’s the Head(amame) kit), and doesn’t produce the most resolving headphone I’ve ever built (that’s either the Satyr 3 or the DMS Open Omega), but it’s a good middle ground. I’d say that it’s not unlike the Sennheiser x Drop HD 6XX in tuning, with a little less resolution and a little more fun.
Great project. Pretty easy to source, relatively straightforward to both print, and mostly straightforward to assemble, and an output that I really like listening to.]
Table of Contents:
Introduction
Capra Audio was one of my first introductions to both the idea of headphone modding AND building 3D headphones. Brian Hayden (owner, engineer, CSR etc. of Capra Audio, herein “Capra”) is mentioned a lot on r/Headphones and r/HeadphonesAdvice for his really excellent Capra Straps, aftermarket suspension straps that make many major commercial headphones more comfortable for many users. You can see more about my journey with Capra’s headphones here.
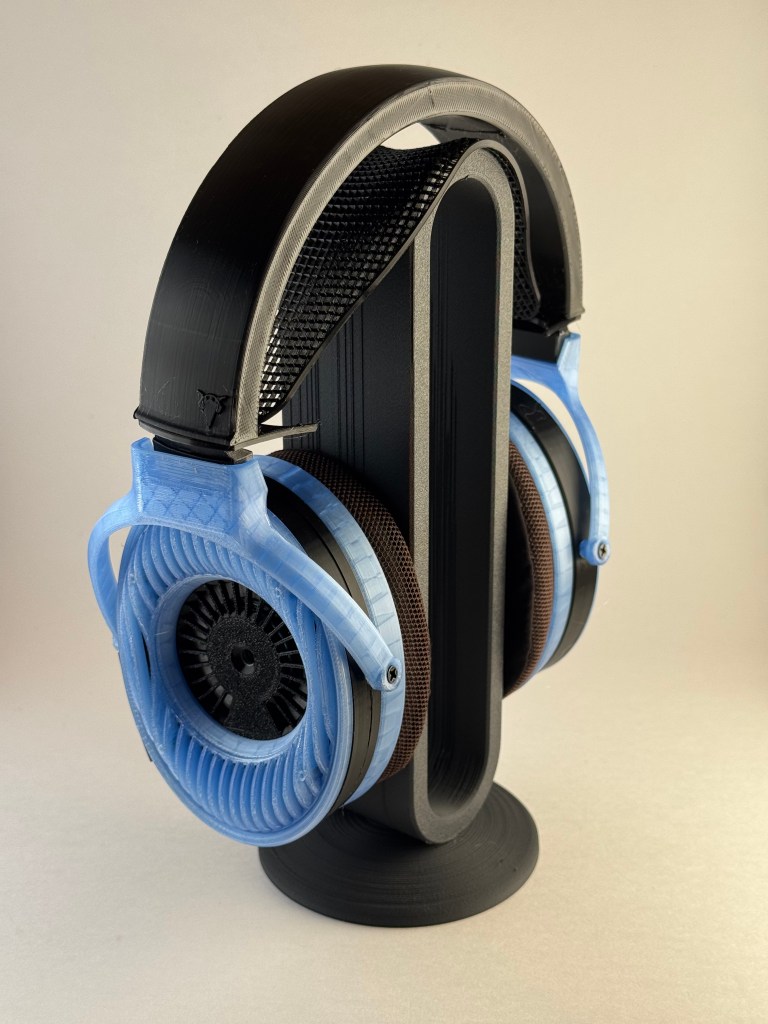
My first experience with Capra’s headphones was the previous iteration of his open-back, over ear, dynamic driver headphone, the Satyr 3. This was my introduction to the world of of 3D printed, DIY headphones. That first unit, for me, was a random collection of whatever colors I could get at my local maker space plus whatever happened to arrive first with my newly-purchased P1S, and ended up being the ‘Murkaphones,1 serendipitously finished in July 2025:

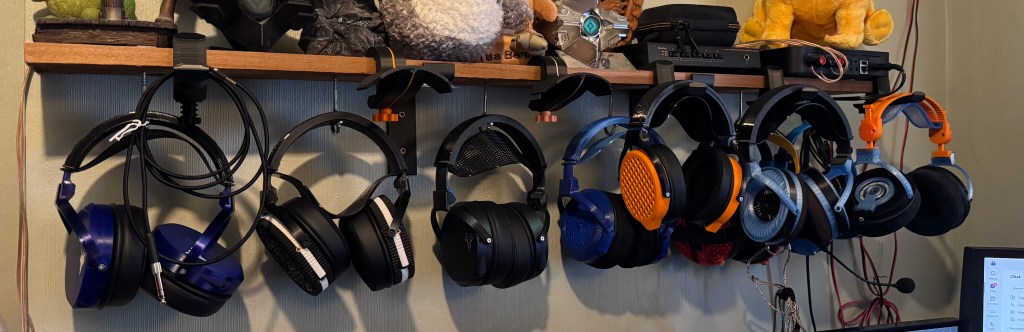
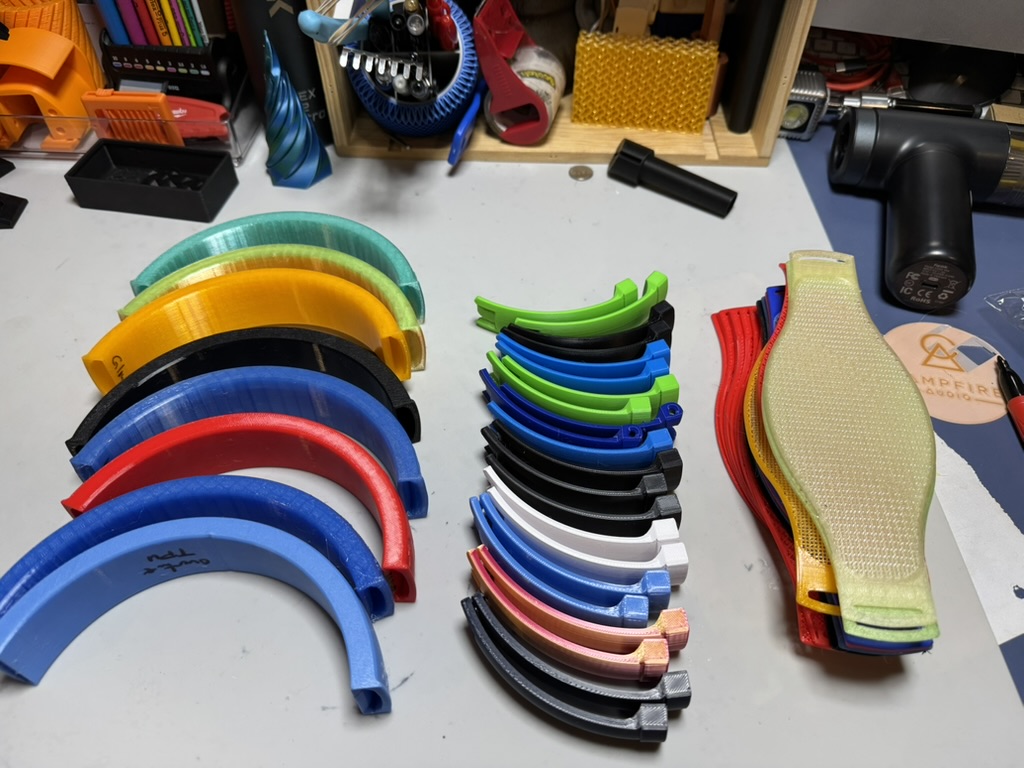
They’re a really good headphone, and they were a really good first electronics project (the first time I’d ever soldered something!), and I learned a lot along the way. I’ve made a half a dozen or so different models since then:2
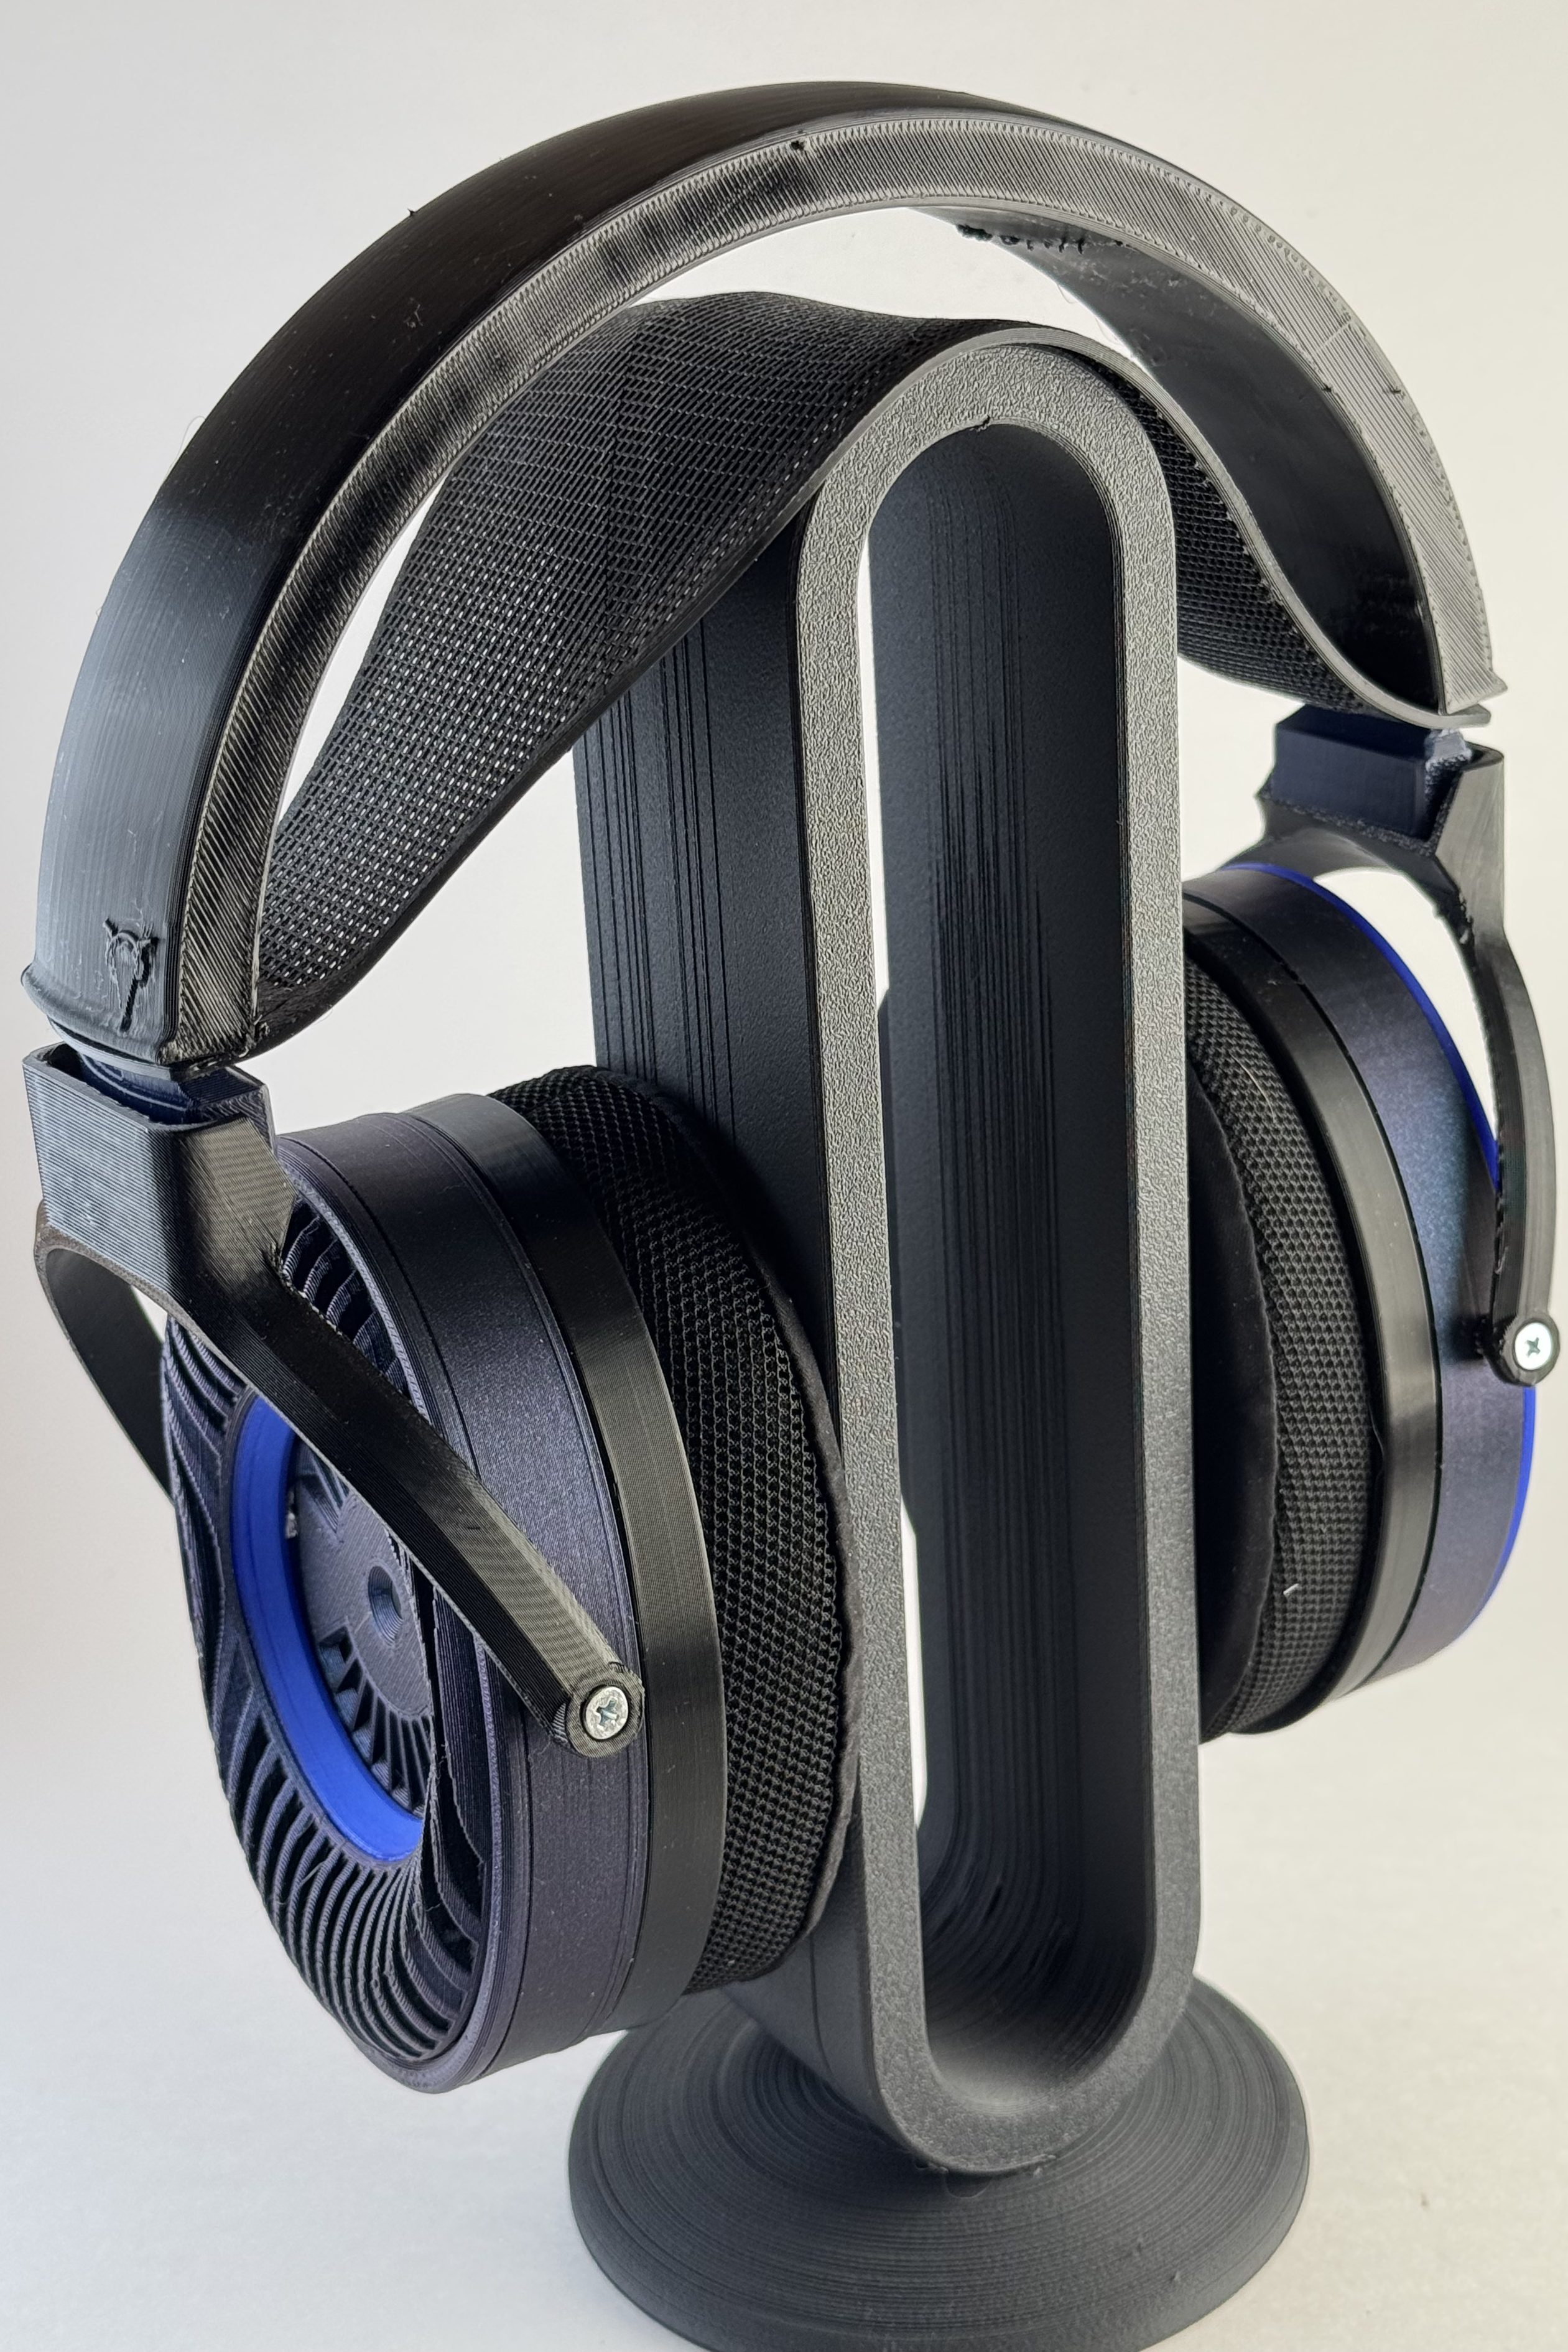
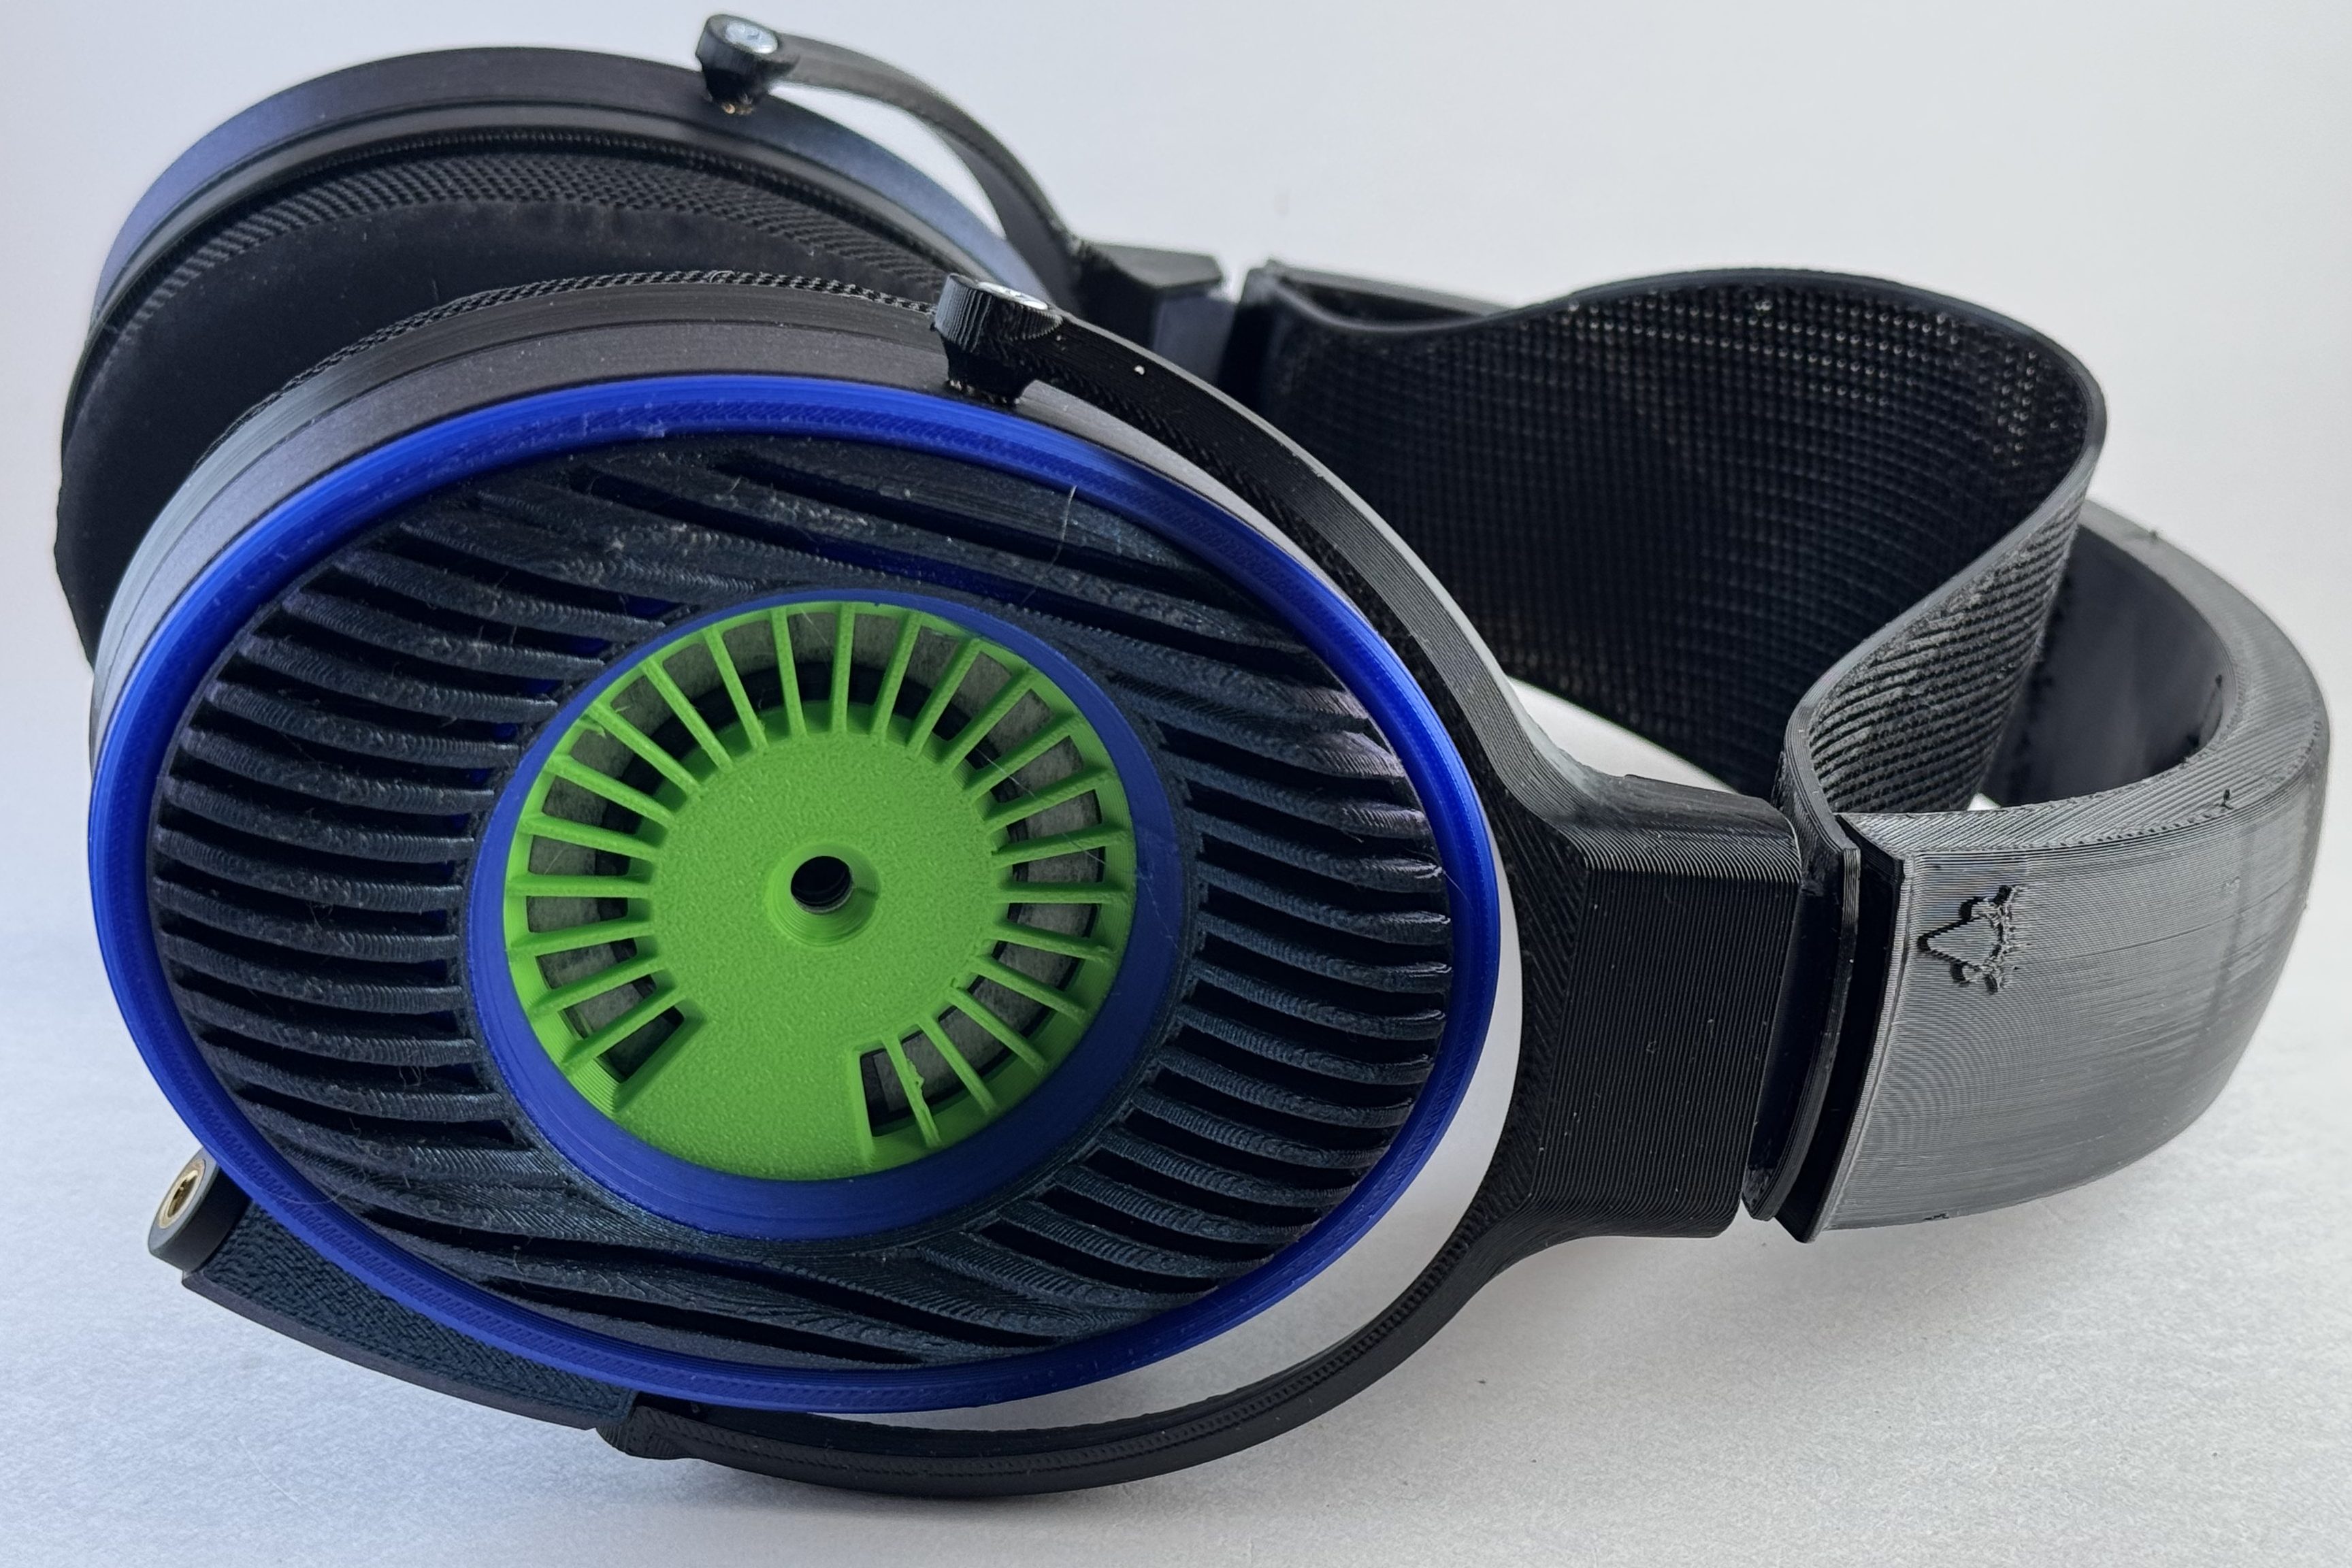
In January of 2026, Capra released the much-anticipated and teased 4th iteration of his Satyr line, the Satyr 4. It’s a substantial change from his prior iterations, both in terms of shape, tune, and materials, and incorporates a resistor to bump the bass and adjust the mids and treble a bit:
So of course, I had to make them. Fortunately, almost all of the parts were carry overs from other projects, and the only truly new thing I had to order was a box of resistors and an updated pad (though it turns out the pads are compatible with the 6X0 family, so I had a lot of pads laying around to play with!).
The Basics
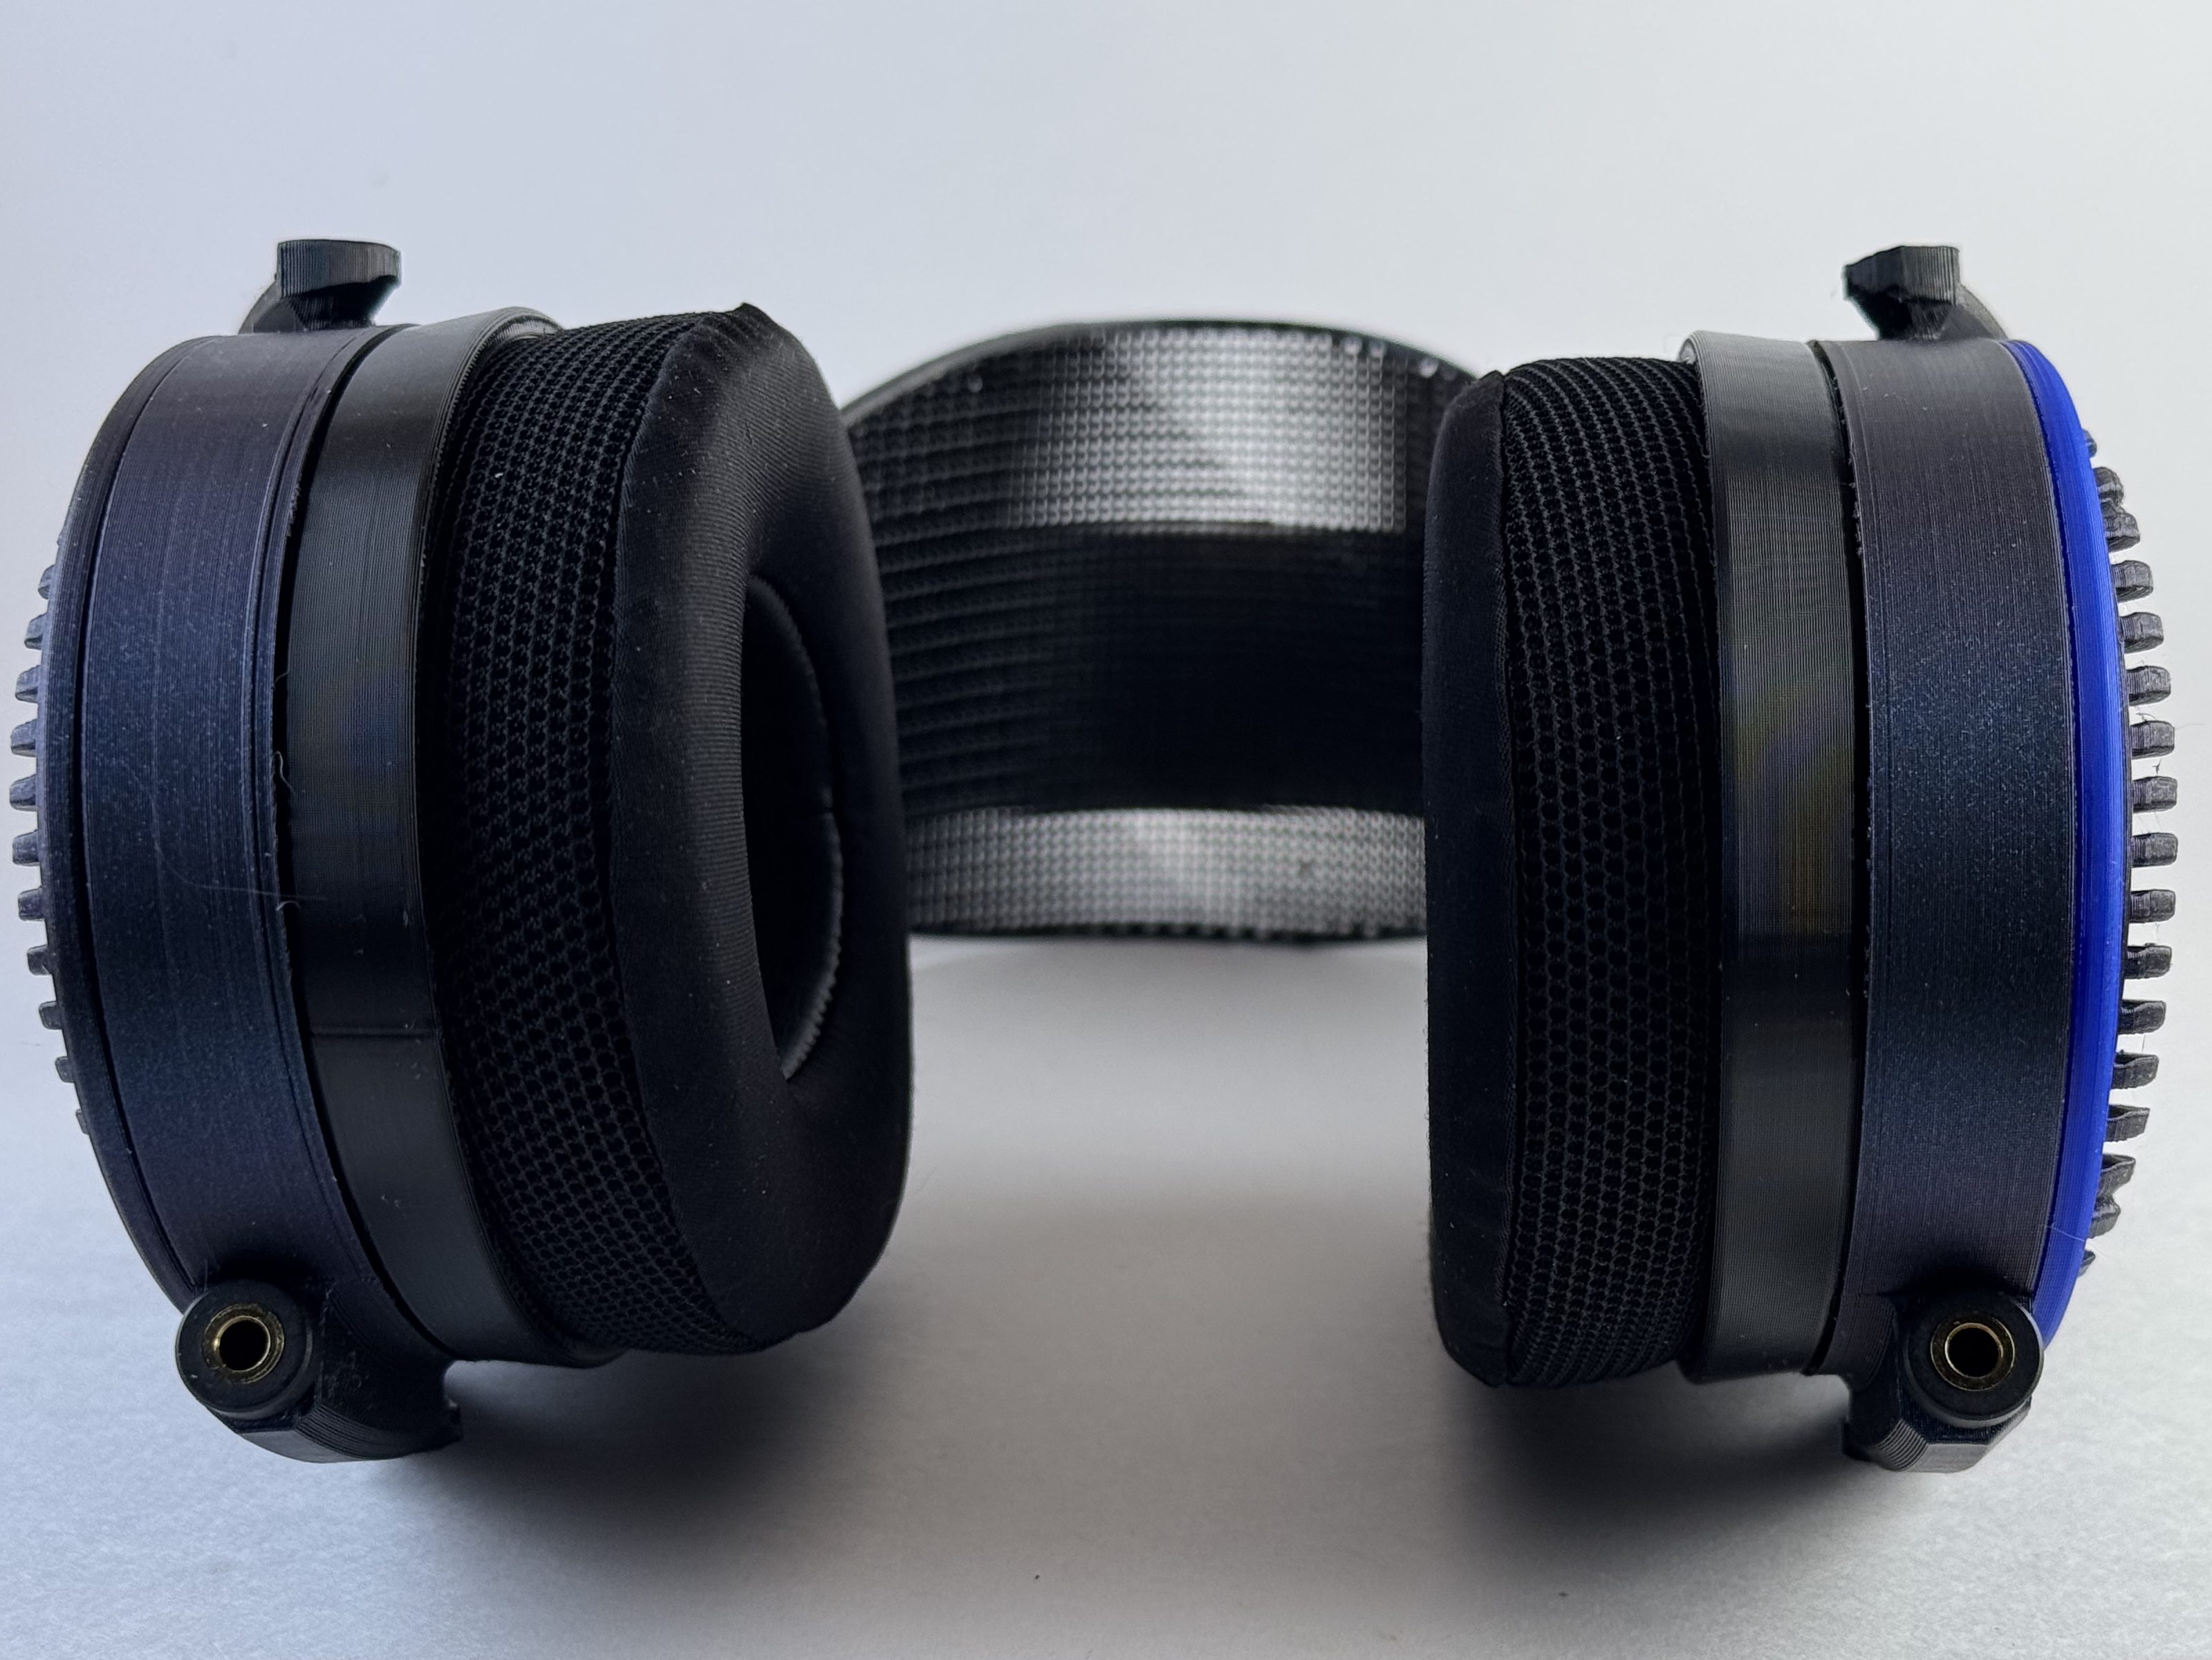
The Capra Audio Satyr 4 is a largely 3D printed, do it yourself (DIY), open-backed, dynamic driver headphone. It takes a well-respected-but-generic driver (i.e. a headphone speaker), the Tympany Peerless 50 mm, and through judicious use of design and damping produces a really, really excellent headphone.
For a little more than $60 in consumables.3
That legitimately competes with (and in some cases handily beats) things in the market that cost $300+.
Pretty cool, right?
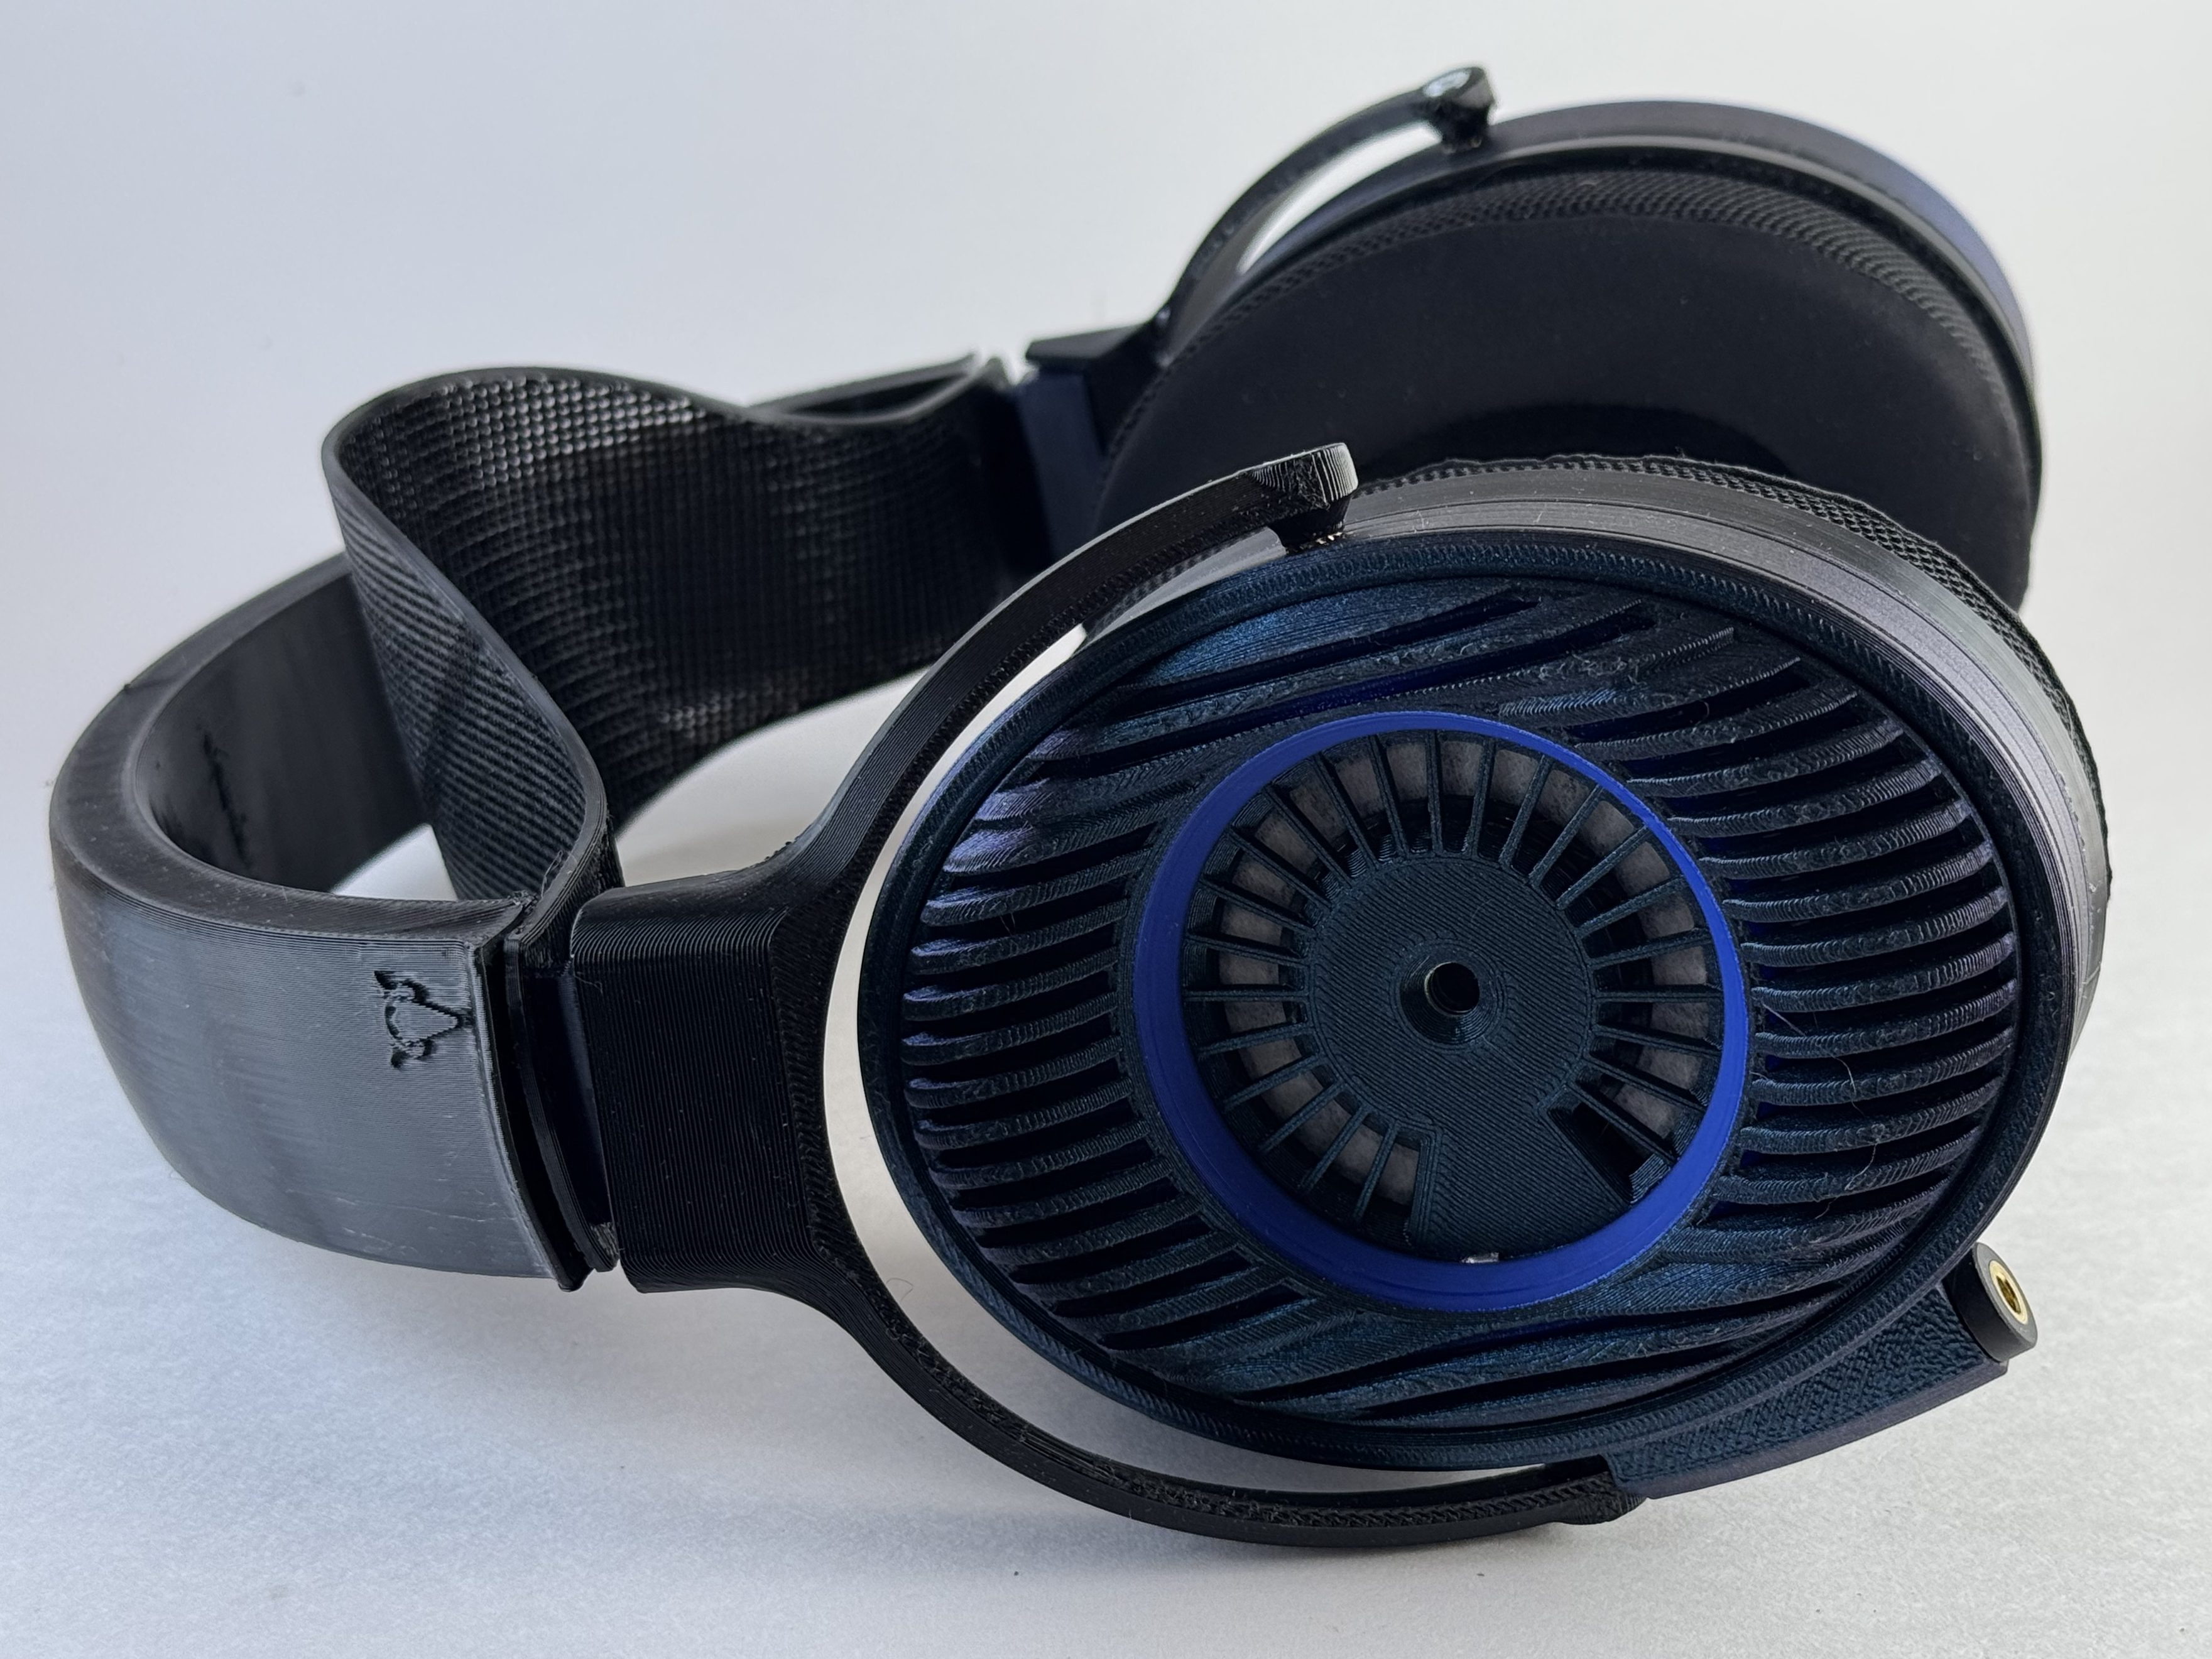
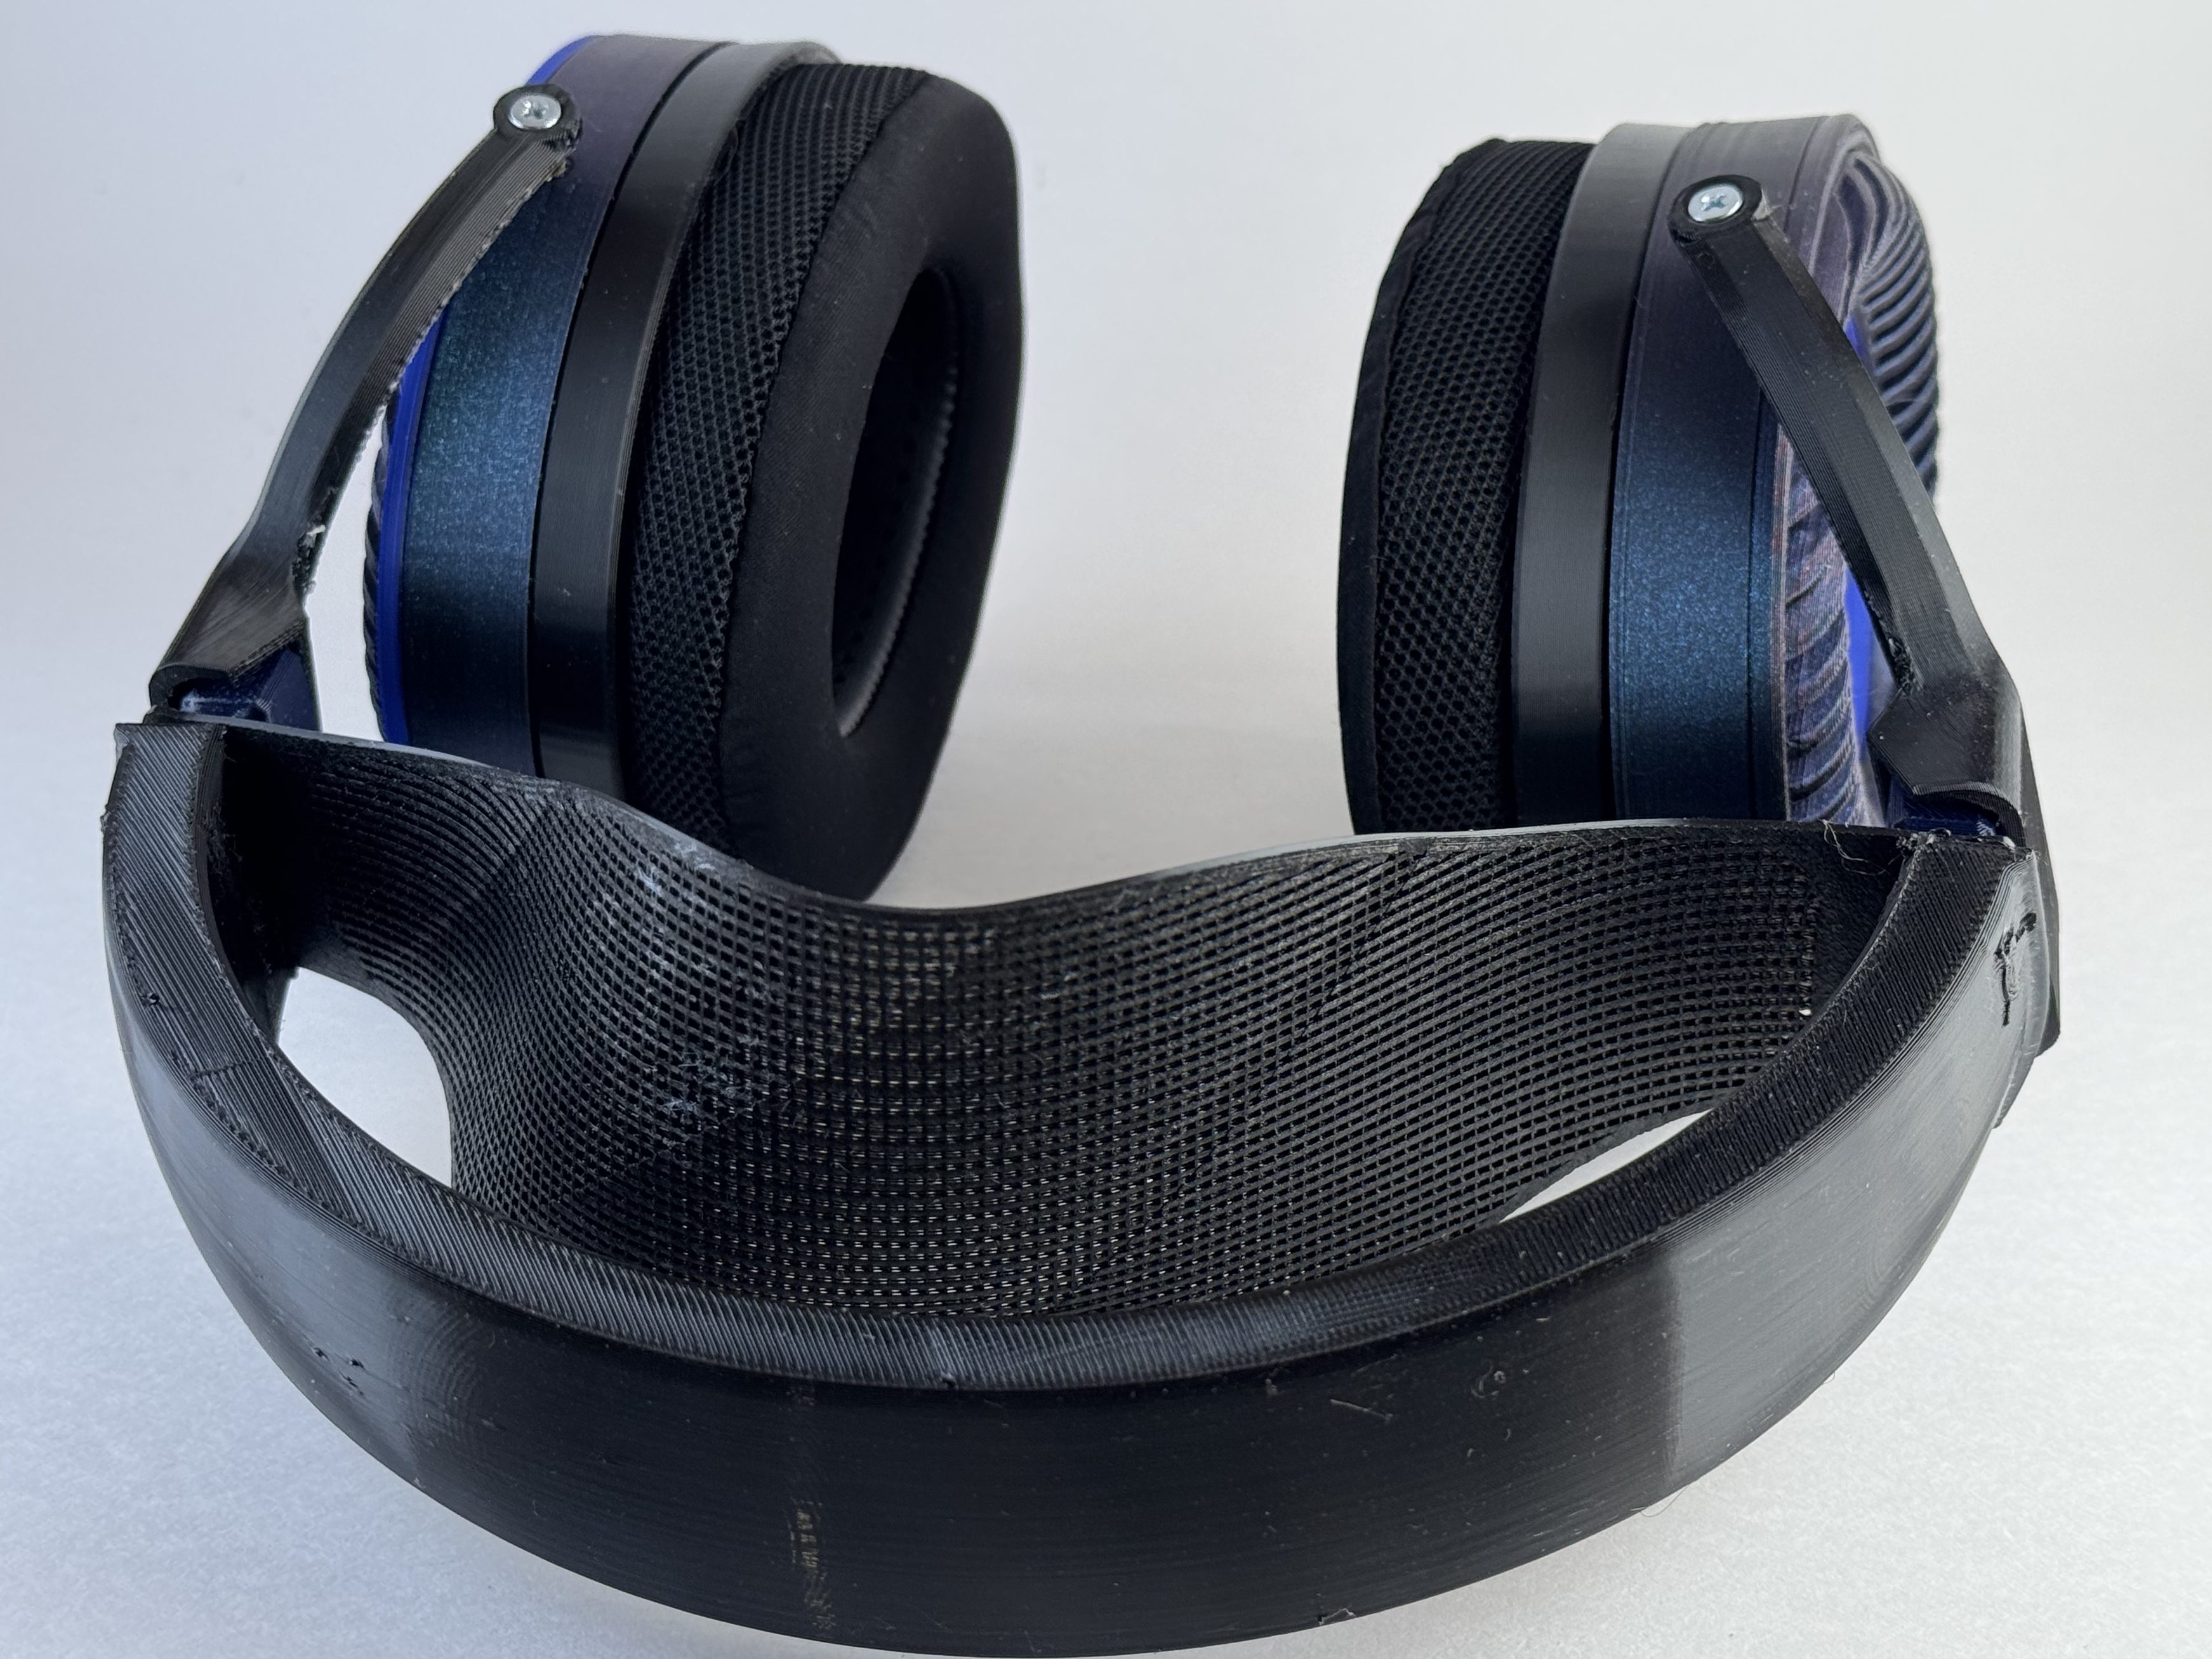
My first pair (printed in PETG HF and TPU 95A) weigh in around 360 g without cables4 (on the higher side for headphones, but 40 g or so less than the Satyr 3). My second pair (printed largely in metallic PLA) weigh around 350 g without cables. You connect the Satyr 4 to a source via a standard dual-entry 3.5 mm headphone cable, meaning that they can (if properly wired) be used both single-ended and balanced.
What Do I Need?
Each headphone will have some slightly different tools required, but here are the most common ones and links to versions I like/use (affiliate links to Amazon; please feel free to just search).
- A 3D printer, obviously. I have the Bambu Labs H2D, P1S, A1, and A1 mini. All of them will work, though the Mini will limit your ability to batch overnight. These are straightforward enough to print that any printer should work.
- A small/security screwdriver kit: I personally really like iFixit’s excellent combination set with screwdrivers, bits, and prying tools (particularly if you’re going to also make Ouroboros), but I also like having the Fanttik electric screwdrivers around for bigger projects.5
- Soldering iron: I really like my Pinecil and its portability, but I also have an X-Tronic soldering station that I use at my work desk
- Helping hands6
- Solder
- Craft knife (I really like this one from X-Acto but any will work) or scissors
- Deburring tool
- Protective equipment:
- Magnifying, lighted glasses (if you’re old/blind like me)
- Silicon mat (for soldering/cutting on)7
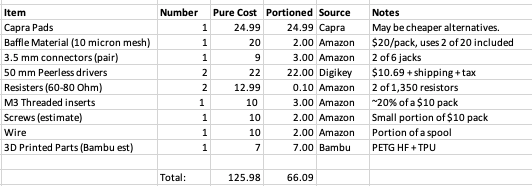
Cost/Materials
These are an easy 4/5 for ease of sourcing; the only challenge is the 10 micron mesh (which I acquired as “tea” bags when I made the Ouroboros). One of my favorite things about Capra’s headphones (particularly compared to other options) is how well organized the Bills of Materials (“BOM”) are. Capra provides links to everything you need to build the Satyr 4. Most of them are on the US Amazon site which makes them easy to buy (and they are mostly affiliate links, and I would encourage you to use them to support him), the drivers are usually available worldwide from Digikey, and the pads are available directly from Capra Audio (and are reasonably priced, unlike other options). The only thing he doesn’t link is a cable, and most folks making these headphones probably already have a dual-entry, 3.5 mm terminated cable kicking around, from a Fiio, Meze, Focal, or Hifiman headphone. If you don’t have one, my opinion on cables is that any modern, competent cable won’t affect sound and I’d recommend either of these (these are Amazon affiliate links; feel free to just search for the items): New Fantasia ($12, normal 3.5 mm aka aux connection) or Youkamoo ($25, 4.4 mm-terminated balanced cable).
All in, and assuming no misprints, you’ll need a little less than a quarter spool of filament, around 160 grams of a harder filament like PETG/ABS and around 80 grams of TPU, and it will take you a little more than 11 hours to print.
Total cost for me was around $66, with my best estimates of the amount of larger packs I used for this specific build. All in, you’re looking at around $126 to buy all of the linked components.
Build Process
I’d give the Satyr 4 a 4 out of 5 for ease of printing, and a 3 out of 5 for assembly. The only reason that they get a 3 on assembly is that 1) the cups are pretty tight, necessitating soldering with the wires in place instead of using JSTs, and 2) getting the nylon mesh to stretch taught across the drivers while assembling the rest of the cup can be a little challenging. The assembly itself is basically a multi-layer sandwich, and getting everything lined up properly to tighten the screws is a little challenging too, compared to some other options.
A couple of suggestions to think about before you start printing:
- Pick your adjustment arms. Decide whether you want adjustable arms (cups that fold up into the the headband) or static, and print accordingly.8
- Build the project file first. Capra provides the files for one side of the headphone but not the other, so some basic manipulation will be required. For me, before starting this project I created a new project file in Bambu Studio and built plates with all of the necessary pieces. You’ll need:
- Baffle rim x 2
- Baffle x 2
- Driver plate x 2
- Housing
- Housing (mirrored)
- Inner grill x 2
- Outer grill x 2
- Yoke-r
- Yoke-r (mirrored)
- Spacer x 2 (TPU)
- 2 x static attachment arm
- OR
- 2 x adjustment attachment arm AND 2 x pivot blocks
- Download and prepare the Capra V3 headband files and print (in TPU, follow Capra’s instructions re: setup):
- 1 x TPU headband
- 1 x TPU comfort strap, printed without top or bottom layers.
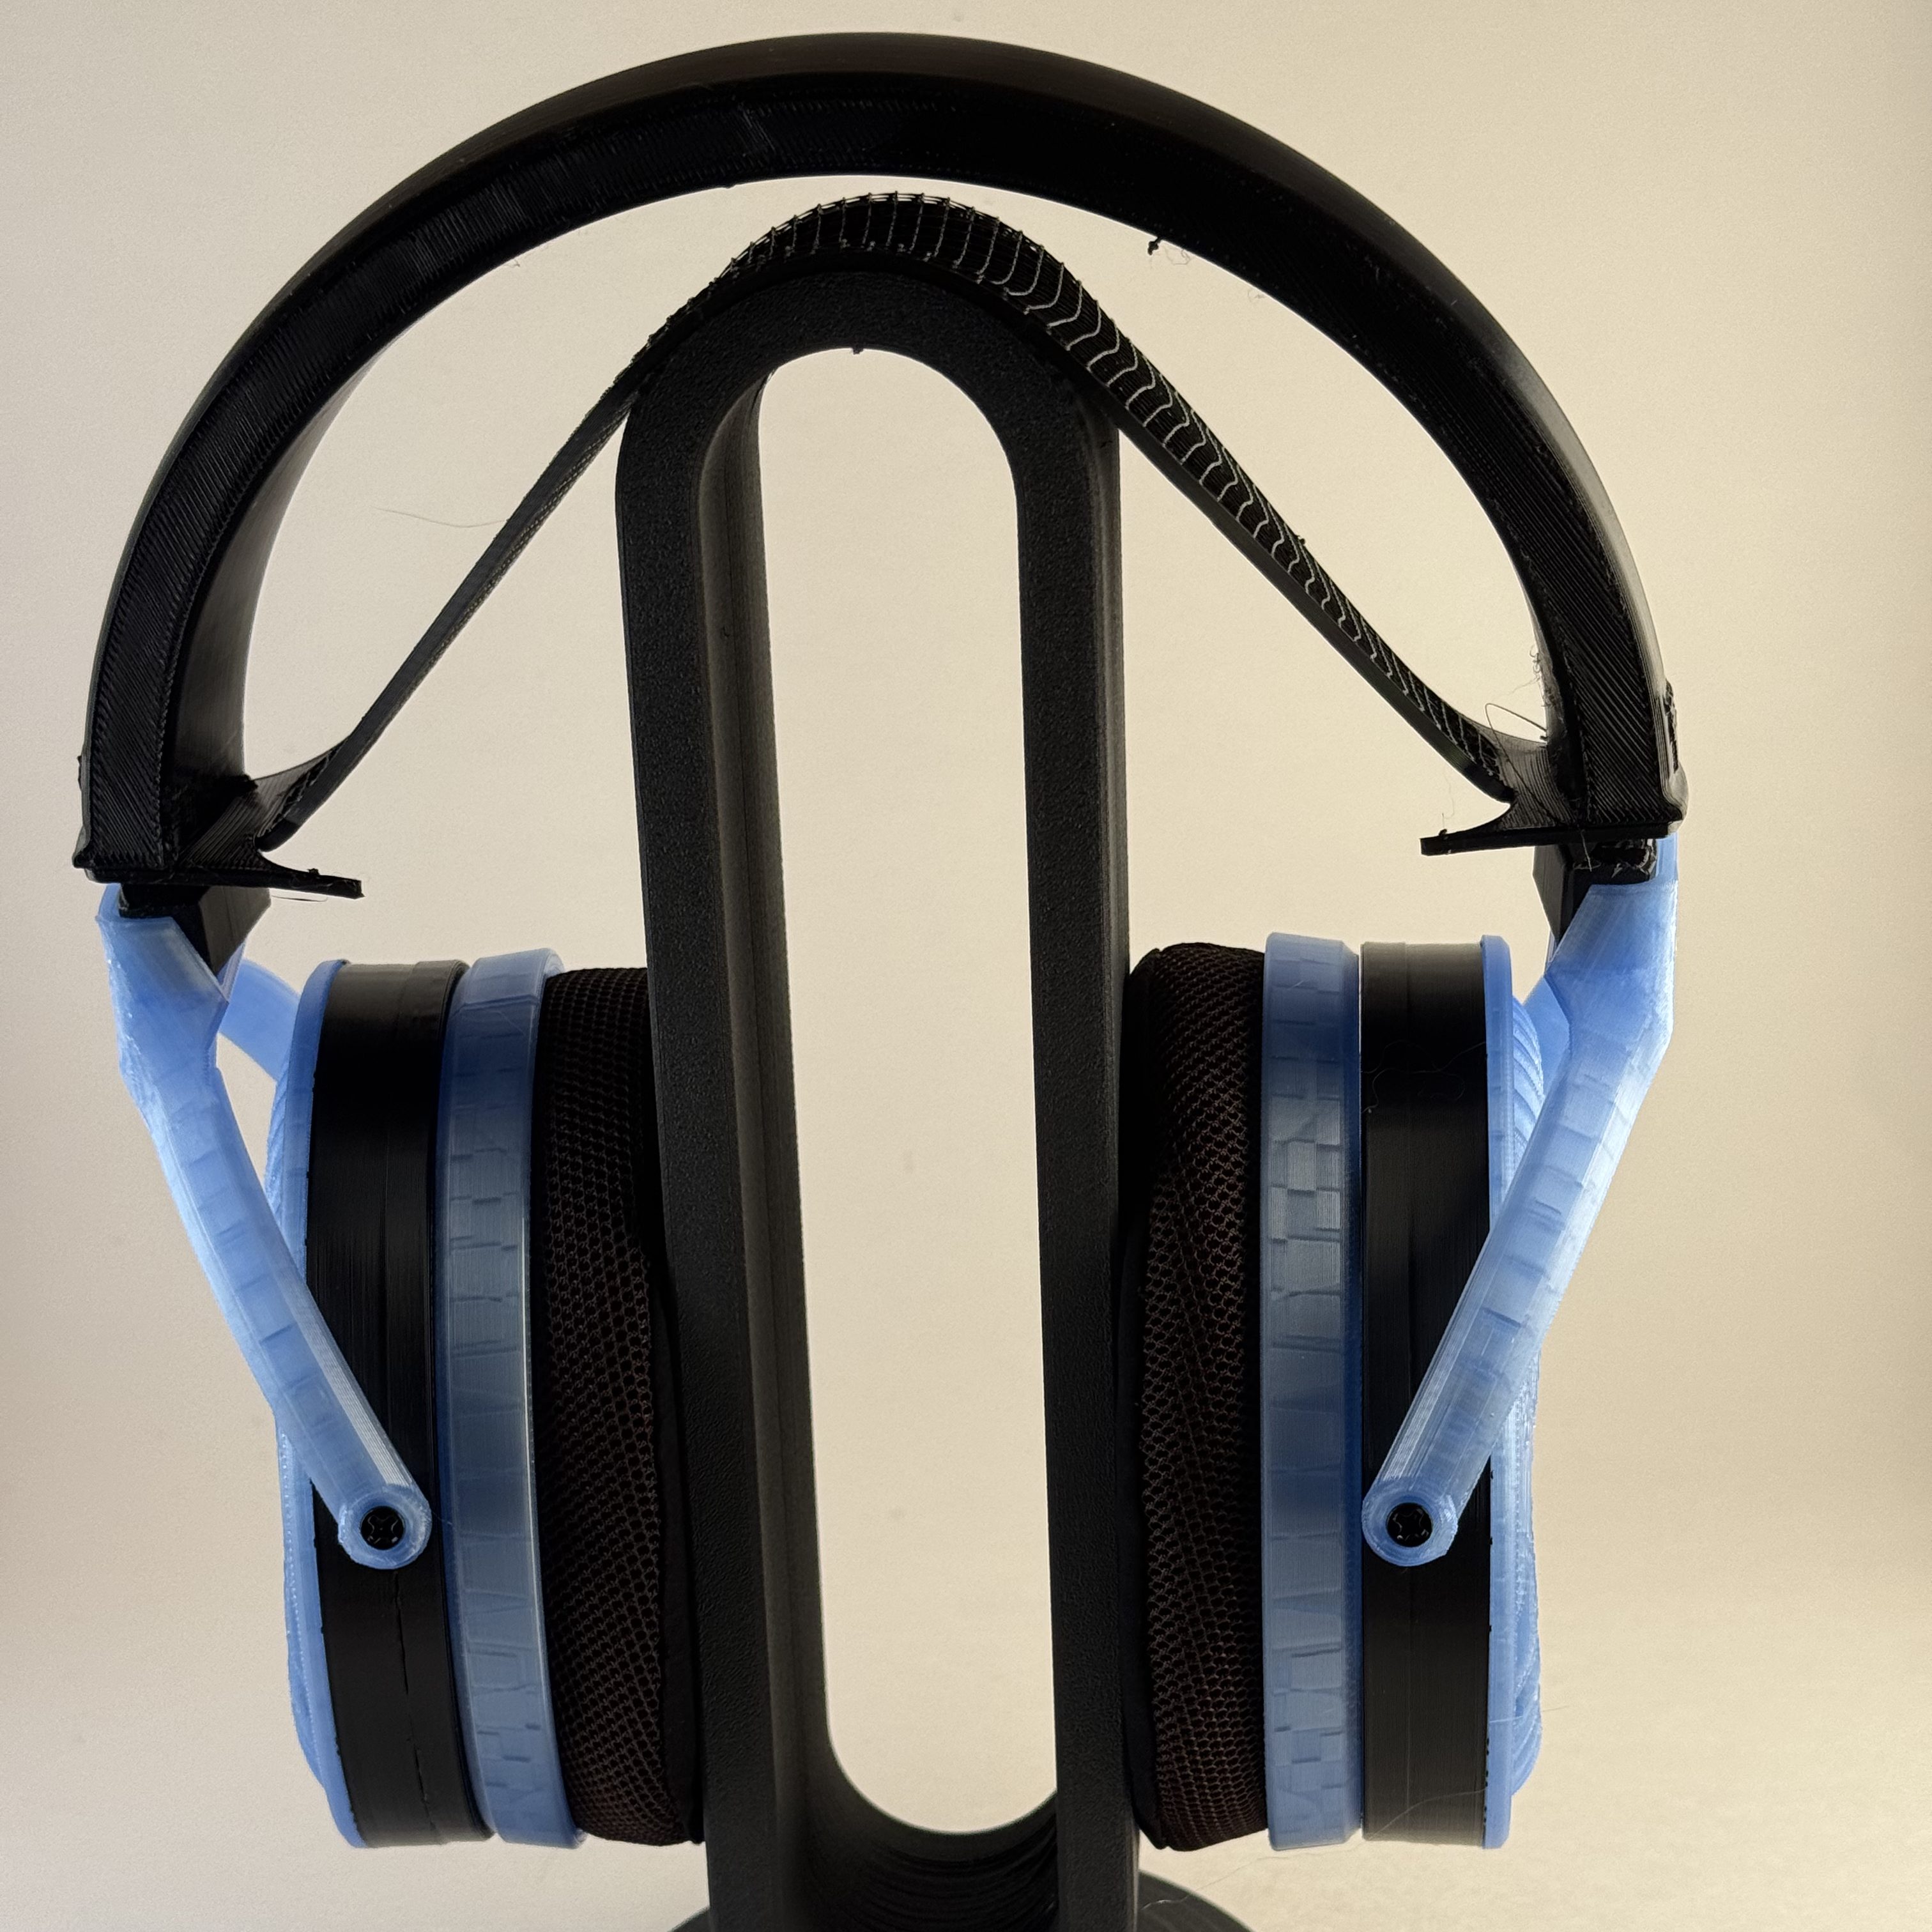
- Pick your color scheme and plan it out (taking into account the aesthetics of your chosen pads).
- Pick your materials. Use PETG or ABS/ASA for the all parts of this, but especially the attachment arms and yokes. The spacers and the headband are TPU.
- Watch the instructional video several times, and think about building a checklist. There aren’t any written directions for this build and it’s easy to overlook little steps if you’re trying to watch the video and solder. I managed to miss the step where you insert heat inserts for the 3.5 mm jacks on my first pair, and the step where you tighten screws into those heat inserts on my second pair, so I have to be VERY careful unplugging them as a result.
As an example, here’s my Ouroboros checklist:
Printing
None of this build is very hard to print, fortunately, though the yokes and attachment arms can be a little challenging with their overhangs and support removal.9
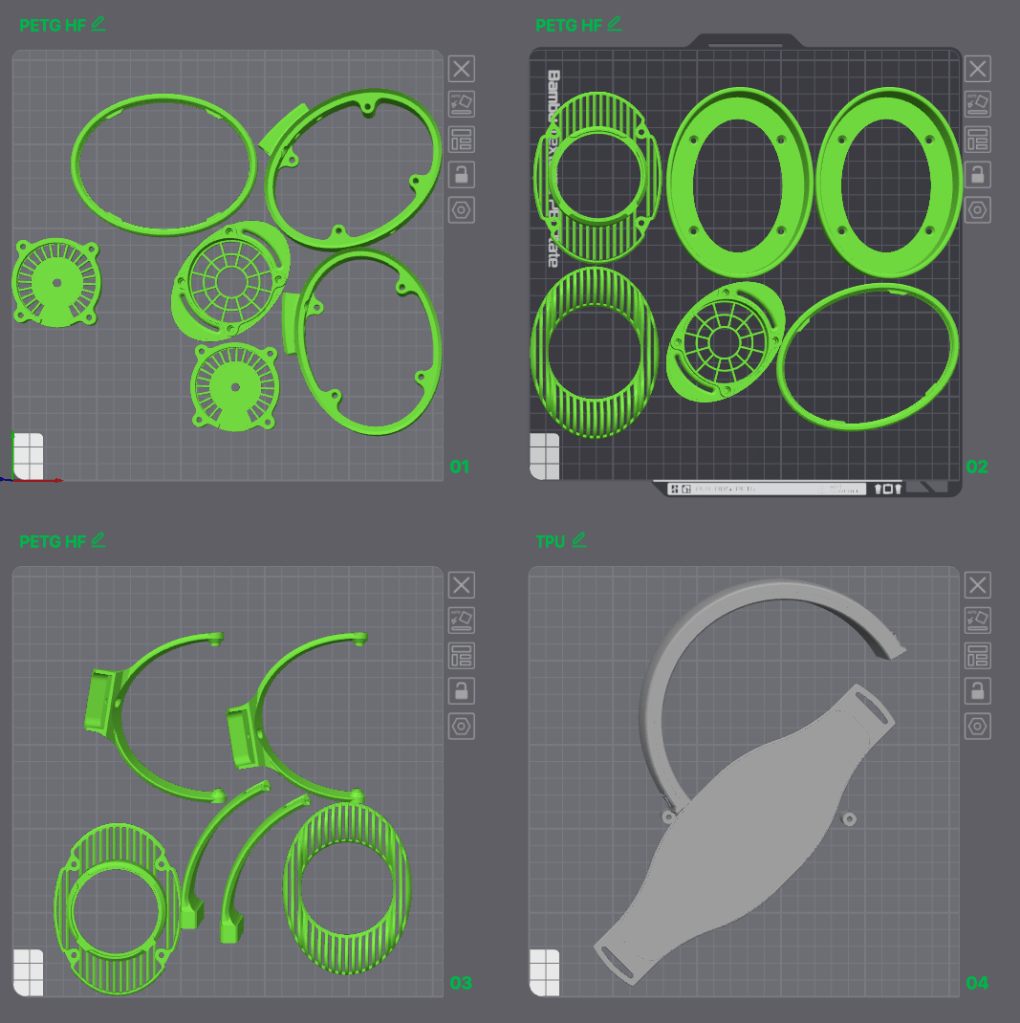
In total, this prints in a little less than 11 hours, and will run you a little less than a quarter spool of filament (160 grams of PETG and a little more than 60 grams of a TPU), if you don’t have any printer issues.
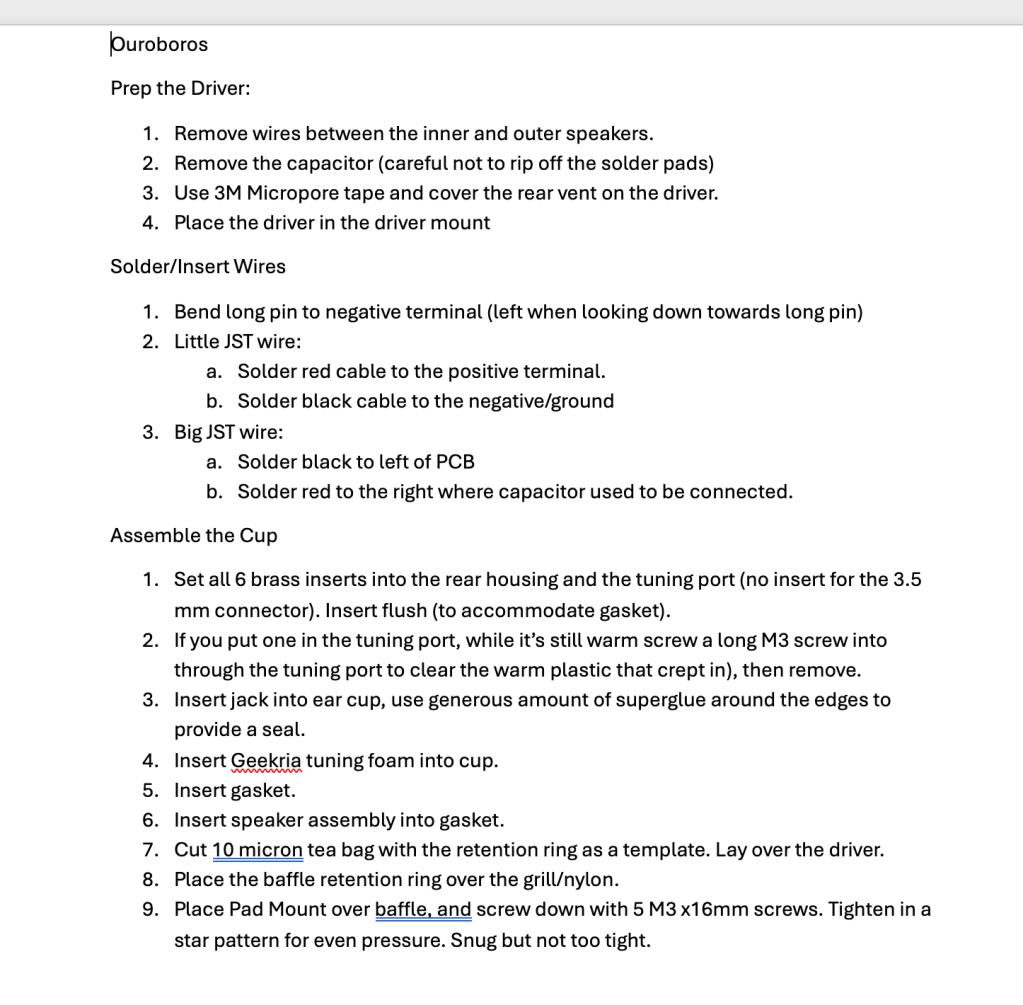
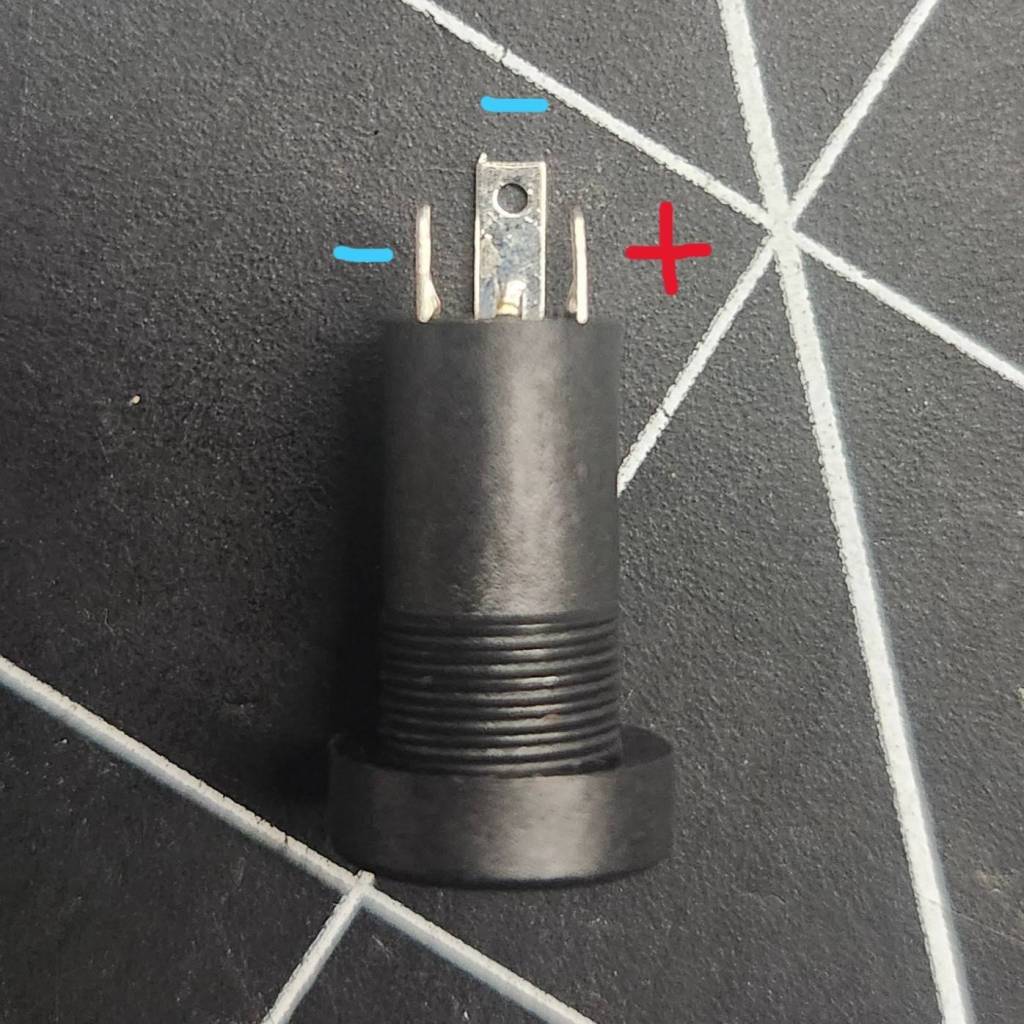
Assembly
Capra did a great assembly video, available here, but the one piece that’s a bit hard to see is the wiring. For the 3.5 mm jacks, you’re going to bend that back pin to the one on the left and then solder the black cable to the joined pins, and the red to the pin on the right. On the speakers, black goes to the left pad and red the right. Unlike the prior Satyr 3, there’s not a lot of room in the cup so I didn’t use the JST connectors s that Capra recommends for his other headphones. This will both require soldering one end or the other with the wiring already in the chassis, and make disassembling them to troubleshoot the wiring a frustrating exercise. Ask me how I know.
Review notes
Testing rig
Here’s my basic testing protocol.
Because this is a DIY headphone, my normal philosophy about allocation of resources in headfi doesn’t really apply and I’m running it on my Mytek Brooklyn Bridge streaming DAC/amp because I can, unless otherwise noted.
Volume
Here are the volume settings I use with the Satyr 4 (unless otherwise noted, running via Roon with no headroom management, playing Daft Punk’s “Face to Face” from Tidal):
- Apos Gremlin/Druid: 11:30 (-20 dB pre-gain)
- Chord Mojo: white, dark red, dark red, red
- Dongles:
- Apple (North American, Apple Music, iPhone 15): 70%
- Crinear Protocol Max: 100% (3.5 mm, boost)
- Holoaudio Bliss (KTE): -28 db (Low-Z, single ended), -34 dB (Low-z, XLR)
- Mytek Brooklyn Bridge: 57%
- Schiit:
- Fulla: 9:00
- Mimir/Jotunheim 2 (Mimir has a -15 dB pregain applied via Forkbeard): low gain, 10:30 (balanced); low gain, 12:00 (single-ended)
- Modi/Magni: low gain, 8:45
- Modius/Magnius: low gain, 11:00 (balanced); low gain, 9:00 (single-ended)
- Topping:
- DX5 II: -35 dB (balanced), -29 dB (single-ended)
- E30/L30: lowest gain, 10:00
My torture testing list: Apple, Tidal, Spotify.]
Sound
Overall, I’d classify the sound on the Satyr 4 as fun and engaging, if not the most detail-focused. They particularly seem to excel at denser, fuller music like “Just a Cloud” or “Easy” rather than sparser tracks like “What Did I Do?” or “Angel (Blur Remix)”. I’ll note that I used 68 Ohm resistors for both of my Satyr 4 builds; using different impedance resistors will shift the frequency response in potentially substantial ways (generally, more impedance = more bass, and less treble). They’re also a little … thin, sounding, overall? I find myself turning the volume up more than I usually do, particularly for those sparser tracks. They’re definitely a casual listening headphone rather than a critical listening (or gaming) one.
That said, they’re fun as hell to listen to with the right kinds of music. I’ve been enjoying rocking out to Tame Impala, some modern hip-hop, and some kinds of electronica. It’s a good reminder that while I tend to prefer more “neutral-ish” tunes, there’s a place in my heart (and my collection) for a good, solid v-shaped headphone.
Technicalities

The Peerless driver that the Satyr 4 uses (which it shares with the Satyr 3) is a pretty common one in both the DIY world and the independent headphone producer world, and is included in some VERY expensive offerings like the DMS Project Omega ($850), Aurora Australis ($900), and Hifi for All Dahlia ($1000). It’s an extraordinarily capable driver, and when it is implemented right can produce a remarkable sound profile, especially for less than $25/pair (less if you bulk buy).
On the Satyr 4, the soundstage is good, but not amazing, with reasonable width and decent precision/separation within it. The musicians in “Chan Chan” are spread out pretty well right-to-left and are generally placed correctly within that stage, though I would prefer a little more clarity and separation between instruments. The soundstage is mostly right to left without a ton of front to back (rotational) staging on “Love Can Damage your Health (Laid Mix)”). Instrument separation and timbre are solid if not amazing; I can identify the lead guitars on “Garcia Counterpoint” mostly by placement in the mix rather than tone, but instruments generally sound correct.
The dynamic range is excellent; starting at a comfortable volume, “It’s All So Incredibly Loud” begins getting unpleasantly loud starting around the 2:45 mark. Microdynamics are solid but not amazing, and stronger in the treble than the bass. I’d like a little more slam on the lower bell tones at the beginning of “Angel (Blur Mix)”, though the chimes are nicely accented.
Detail retrieval seems generally okay; there are definitely tracks where I feel like some of the fine-grain details are missing. As an example, the bass bell tones on “Angel (Blur Remix)” almost entirely lack the warble after the initial hit, and in places throughout my testing it felt like I was trading resolution and clarity for fun (aka bass elevation), for lack of a better term. It wasn’t problematic to me, though; this is not the headphone I’m grabbing if I’m hunting detail or engaging in critical listening. It’s just worth knowing what you’re signing up for.
Bass
The bass is the standout part of the Satyr 4’s frequency response. It’s definitely elevated over neutral, but in a way that is pleasant and not overdone. It’s not super punchy or slam-y, but it’s strong and generally well controlled even on a song like “Superpredators” which can give some much more expensive headphones fits. It also feels to me like there’s more slam and resonance around 50 Hz than higher up in the midbass. It really stands out on a track like “Violence,” particularly once it really gets going around 2:15, though like a lot of open-back, dynamic driver headphones you lose the very bottom end; around 3:40 on that track you lose a particularly punchy note that drops into the Satyr 4’s rolled off sub bass that will show up more strongly on a pair of headphones with a more linear bass extension.
Particularly at higher volumes, though, the bass is deeply satisfying and resonant. The bass on “What Did I Do?” is rich and lush, and precise (though again, the lowest notes start to roll off). The baritone sax on “Easy” is beautifully reproduced, and the kick drum throughout that track nicely thumpy. It’s one of my favorite reproductions of “Got ‘Til It’s Gone” as well, with a nicely punchy bass line.
To the extent that I have any criticisms of the bass reproduction, they’re generally complaints about the nature of open backs (particularly dynamic drivers) and not about this headphone in particular. I’m not the biggest fan of headphones with a midbass hump, but you have to spend a lot more on something like the Focal Clear to get objectively better bass performance from a dynamic driver, open-back headphone.
Midrange
The Satyr 4’s midrange is really good; vocals are clear and present and timbrally correct. Justin Hicks sounds correct on “What Did I Do?”, even if I might like him to be a little more forward in the mix. Jill Scott has the correct timbre on “Calls”, though she is occasionally a little overshadowed by the forward bass characteristic, as is Sampha on “(No One Knows Me) Like the Piano.” Amelia Meath comes through clearly on “Coffee”, though, so it seems mostly to be an issue with lower-pitched women’s voices and I’m guessing I can probably adjust that via EQ. Instruments in the midrange are similarly well balanced, though as noted above they can bleed into each other a little bit and I would like a little more separation between instruments overall. As an example, the guitars on “Garcia Counterpoint” are a little muddy and indistinct at times.
Treble
The treble is really well executed; never out of balance or harsh, even at the elevated levels that I find myself listening to the Satyr 4 at. It’s definitely there, and definitely clear, but even on “2021” the poorly recorded guitar riff never crosses into unpleasantness as it does on a lot of headphones. The bells on “Coffee” are clear and crisp without being overly so (though there is one percussion instrument that makes a snapping sound a little too loudly; again, I’m pretty sure with a little time I could track it down a take it down a dB or two; it’s not super sharp or loud).
Comfort
I’m going to skip the build section from my normal review process on 3D printed headphones, but I think it is worth talking about comfort.
To quote my Satyr 3 build/review, “I’ll start by saying that Capra is a freakin’ wizard with his headband. It’s … extraordinary. It just … works. It’s clampy enough to feel very secure and maintain a good, repeatable seal without being uncomfortable. The stretchy TPU band does a good job of spreading the weight out over the top of my head, and combines with just enough clamp force on these that the cups bear some of the weight, and I can wear these for a couple of hours before I start feeling any discomfort. I have printed … a lot of them.”
For this build, I opted to try the XL version of Capra’s headband to see how it was for comfort (just because I have a relatively large noggin); what I discovered is that the normal headband fits my head better, and the XL looks … well, a little ridiculous. Cyberman-esque, as John Darko would put it.
I’m also on record as appreciating the cooling pads he recommends/sells for the Satyr 3 more than I thought I would, and the Capra-branded pads he sells for the Satyr 4 are those same kind of cooling pads. I like them enough, in fact, that while I’m generally a fan of using OEM pads as much as possible, I snagged an extra pair of these that I may swap onto my beloved 6XX the next time they start to get a little worn down.10
The biggest advantage of the XL headband is that it does address my one issue with the design of the regular headband, which is that until you get used to and know what kinds of force you can apply to them, it can be a bit nerve-wracking to put them on and take them off; they feel VERY stiff when they approach being wide enough to actually put on my head and I’ve definitely broken some attachment arms and yokes/pivot blocks in my time. The XL band gives you more play for putting on/taking off the Satyr 4. Overall, though, the comfort is better for me with the regular headband and I’ve gone back to it for my Satyr 4s.
Overall
I’ve been on a bit of a roller coaster with these headphones. Right out of the gate, I was really impressed by how good they sounded with the well-balanced bass and treble. Over the next few days I started to notice the lack of detail and the fact that they can feel a bit thin, particularly with sparser music, but at this point I’ve more or less looped back around to being impressed. They’re fun as hell for active, engaging music and casual listening, though I’ll grab something else for quieter or more detailed, critical listening.
There are number of well-loved, commercially-available headphones that I’ll take these over without considering cost, and the fact that these use less than $70 in consumables is pretty damned cool.
Value/Comparisons
I’m not going to do a lot of value discussion or comparisons to commercial headphones here (feels weird and unfair to Capra since I have no idea if I built these right, though both my pairs sound identical) but I did a bit of a look-see on the Satyr 3 over in my Sundara review. These are the 6XX to the Satyr 3’s 600, and as noted below I’ll take them over the 3 most of the time.
I will do some quick comparisons to the other DIY, 3D printed headphones in my collection here, though.
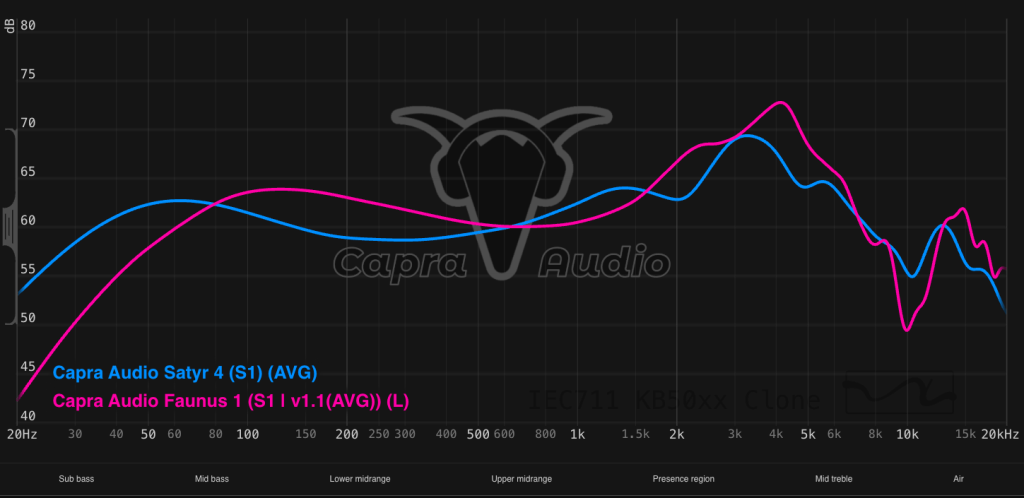
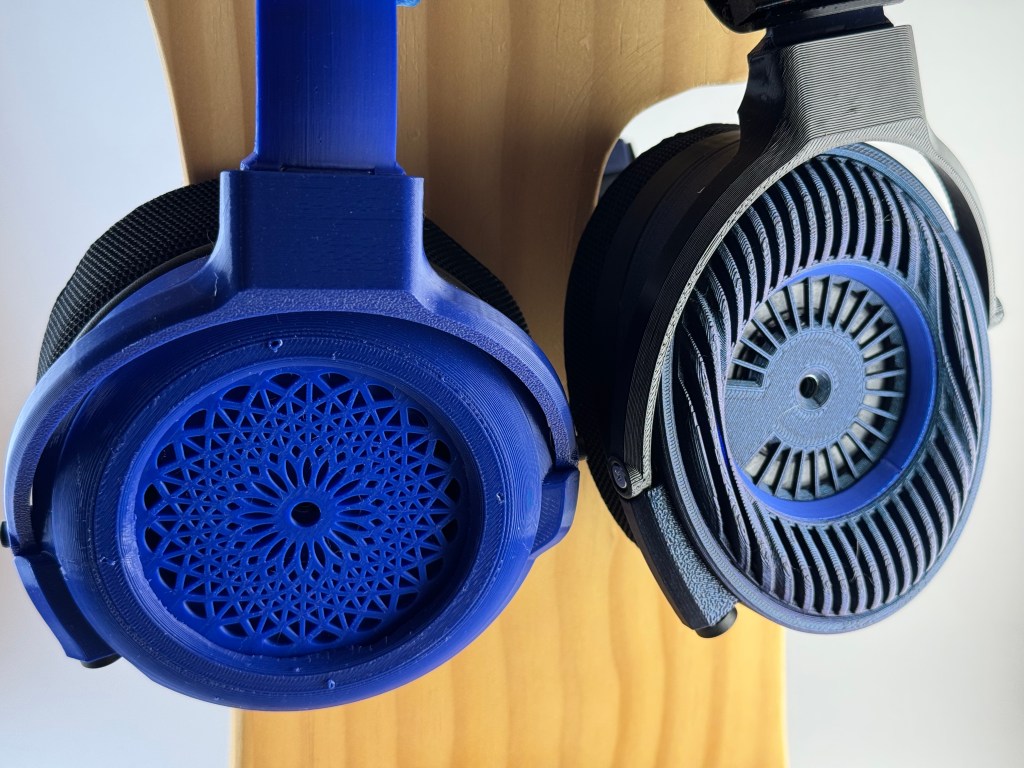
Capra Audio Faunus
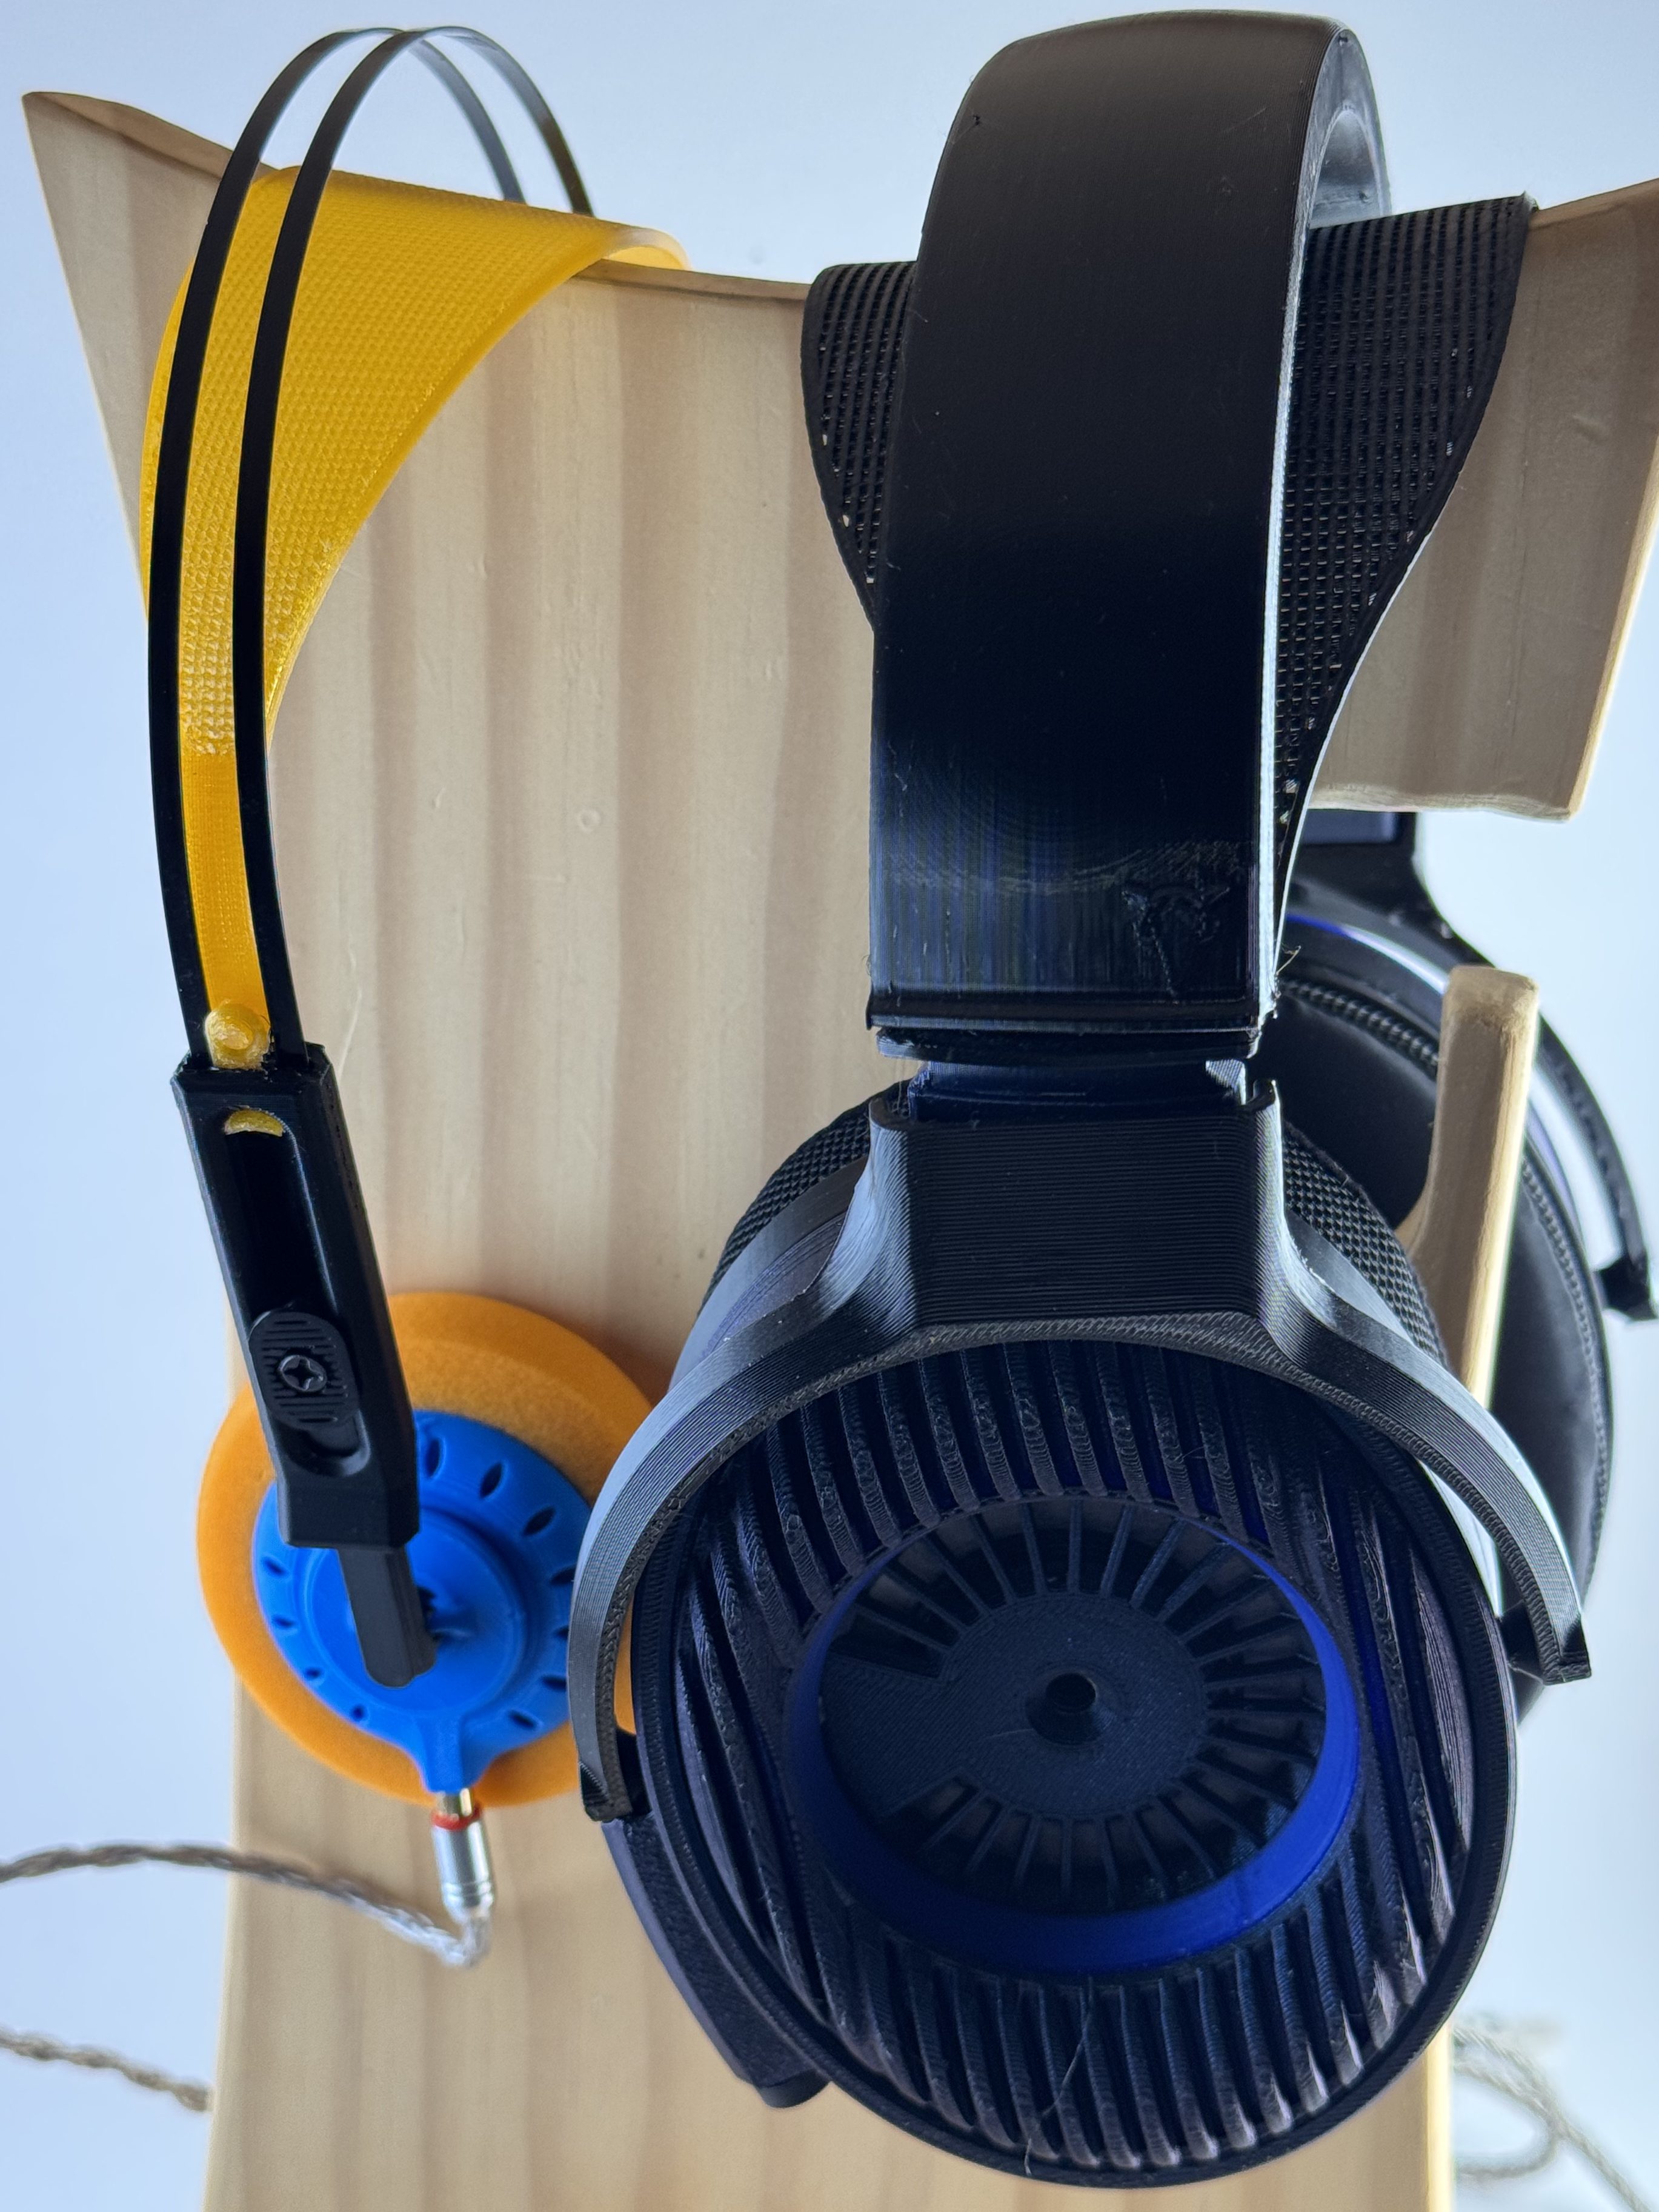
I don’t like on-ear headphones except maybe the Koss KCS75 … and the Faunus. You get a surprisingly full range of frequencies on both of them, and an even more surprising amount of bass thump from the Faunus. Even on a track like “Remain Nameless”, you really get to feel the pumping bass rhythm. The bass definitely bites deeper on the Satyr 4, though the Faunus has a really awesome mid bass to lower mid bump that works really well for some tracks (and awfully for others).
That said, I’d take the Satyr 4 over the Faunus almost any day. The Faunus are surprisingly comfortable for an on-ear, but like most on-ears, they’re not something I want to wear for long periods of time. The one place I think the Faunus edge the Satyr 4 out is in terms of detail retrieval; the Satyr 4 can be a little indistinct and muddy at times, and I’ve always been pretty impressed by the clarity and control the Faunus produce.
The Faunus are, for a sausage-fingered guy like me with poor close-up vision (thanks, LASIK!), a pain to assemble. Easy to source, though!
I’ll still take the Satyr 4 for pretty much all of my listening. That’s not a knock on the Faunus, though, as much as an acknowledgment of my own preferences. The Faunus is a fun headphone, though a slightly trickier print/build, and I should get around to reviewing it at some point in this series.
I’d say that I’d take the Faunus in situations where I want to be a little more inconspicuous … but then, I did print my Faunus headband in bright orange, glow-in-the-dark TPU and then paired it with orange Yaxi earpads.
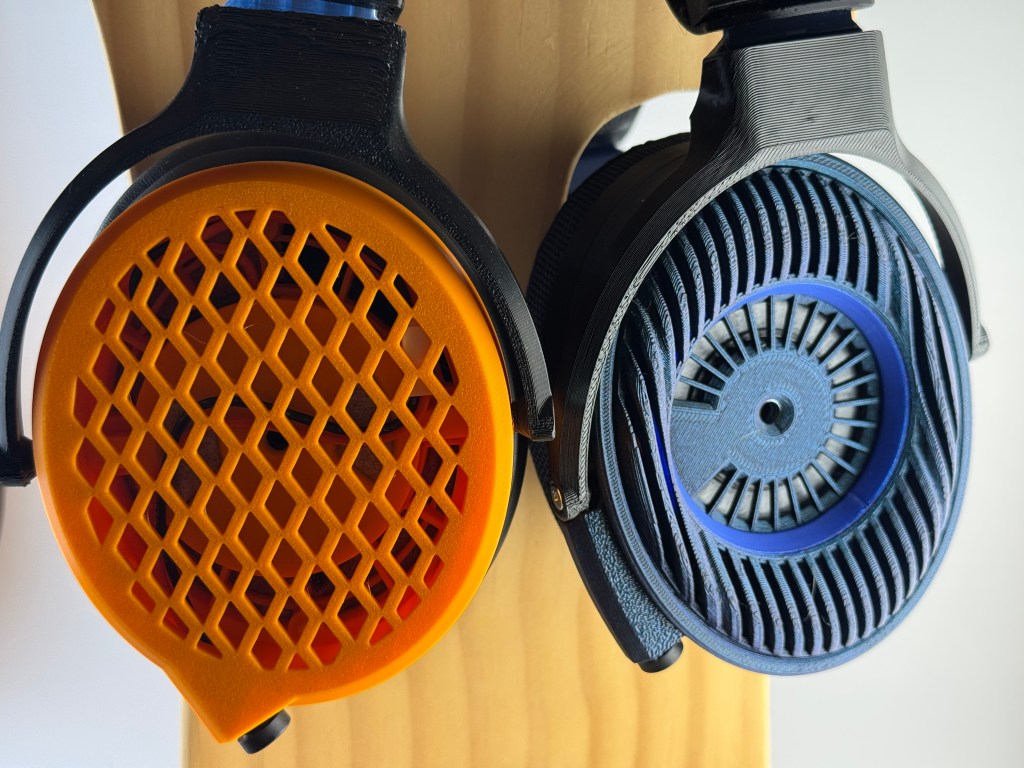
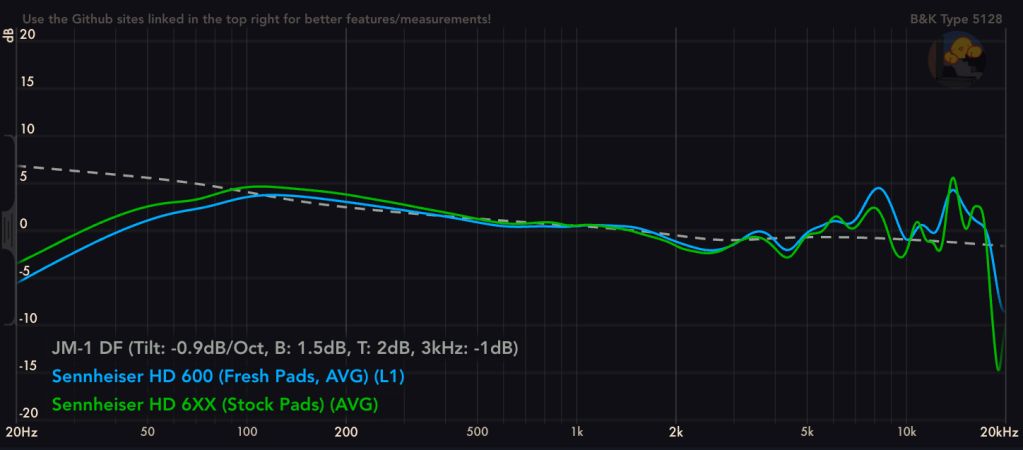
Capra Audio Satyr 3
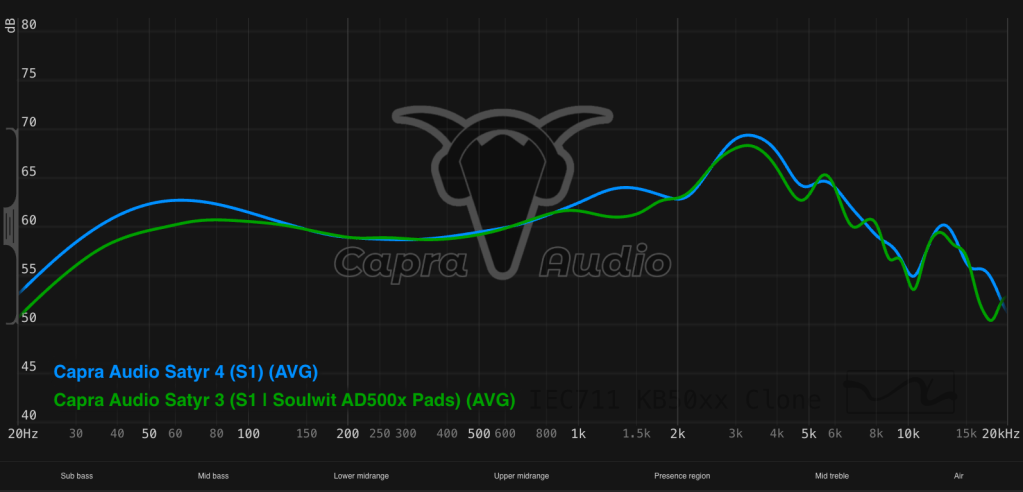
This is the most obvious comparison, and I have sprinkled some commentary here and there throughout this post. I’ve been thinking about it this way: the Satyr 4 is the Sennheiser x Drop HD 6XX to the Satyr 3’s Sennheiser HD 600: both good headphones in their own way, but one just has a much more fun tuning. If I were using one of these for critical listening it would probably be the Satyr 3, and for casual listening I’m going to grab the Satyr 4.
I do think the that while the Satyr 3 has slightly better staging and certainly better layer/instrument separation, the timbre on the Satyr 4 is more natural. Timbre on the 3 is great for vocals, but not always so great for some instruments (particularly some kinds of acoustic guitars tones) on a track like “Chan Chan”. By comparison, the 4 is much more consistently correct-sounding even if instruments bleed together a little more.
Comfort and build wise, it’s really six of one, half a dozen the other. I tend to prefer round earpads over ovals on a lot of headphones, but the pads on both are compliant enough that it’s a pretty marginal difference, if any. I definitely prefer the appearance of the Satyr 4 over the Satyr 3’s stock design, though I REALLY like qyw’s stained glass fascia for the Satyr 3 and I’m looking forward to seeing what he (and the other members of the Capra Discord) do with the Satyr 4.
The 3 are easier to source and build,11 and marginally cheaper. The instruction video is definitely better for the 4, though I missed having the written instructions to follow along with the way I did with the 3.

Much like I more or less always grab my 6XX over my 600, I’m going to be reaching for the Satyr 4 a lot more than the Satyr 3. Again; this isn’t a criticism of the 3 so much as a realization of how much I appreciate a nicely tuned v-shaped headphone.
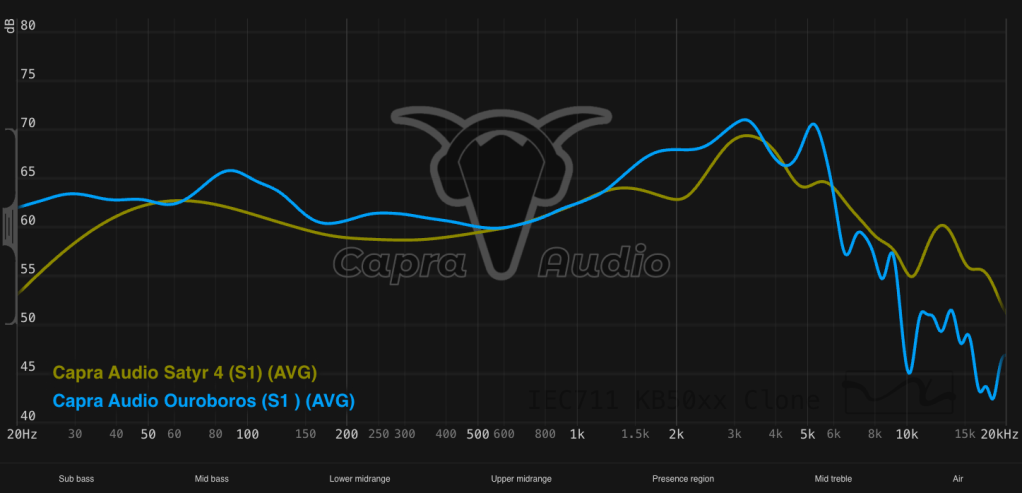
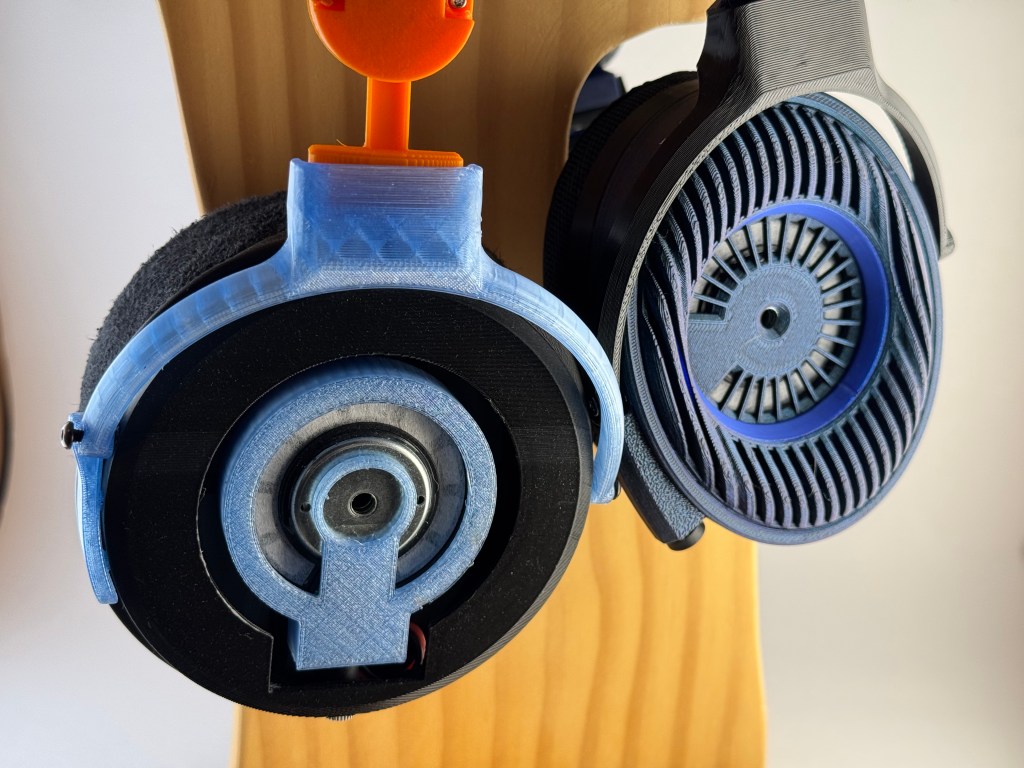
Capra Audio Ouroboros/Golem-modded Ouroboros

I really like the Ouroboros, particularly with Golem’s mods. There’s a reason I broke my “no video” policy for them. They’re also a big pain in the butt to source and build. You can’t buy the drivers (though you might be able to from Ali Express now?) and instead have to buy old, crappy Turtle Beach headphones, then shuck them to get the drivers out without damaging them. They also require the nylon “tea” bags that the Satyr 4 require, and if you’re building the Golem modded version you need a few additional, difficult to source pieces (tuning stickers/paper, Dekoni tuning discs, etc.), and the instructions were … minimal. But in return for all of that, you got one of a VERY small handful of closed-back headphones that I really, genuinely, enjoy listening to. And for a price you really can’t even get close to in the commercial market.
So how does the Satyr 4 match up to the Ouroboros?
Well, for an open-back you get WEIRDLY close on bass. The Ouro is definitely bassier (the Golem version by a smaller amount), but they’re both really good, well-controlled bass. The mids are closer than I would have expected too, though the Satyr 4 have the edge here, and while I’d definitely take the Satyr 4’s treble presentation over the stock Ouro, I prefer the Golem over the Satyr 4 by a hair. The biggest difference between the two is in the staging; the Satyr 4 is a reasonably wide soundstage with maybe sub-par separation, while the Ouro is a much more intimate soundstage but with distinctly better separation. The Satyr 4 also has a more natural timbre, with the Ouro occasionally coming across a tinge metallic, particularly in the treble.
The Satyr 4 is also more comfortable; as much as I enjoy the Ouro, they’re a wear for a couple of hours at a time headphone rather than a wear all day headphone.
If you’re picking a first DIY headphone project, I’d definitely direct you towards the Satyr 4. Easier to source, print, and build, with better instructions and support. But if you want a good closed back without spending a ton of money (or if the FT1 just doesn’t work for you for whatever reason), I’d commend the Ouroboros to your attention.
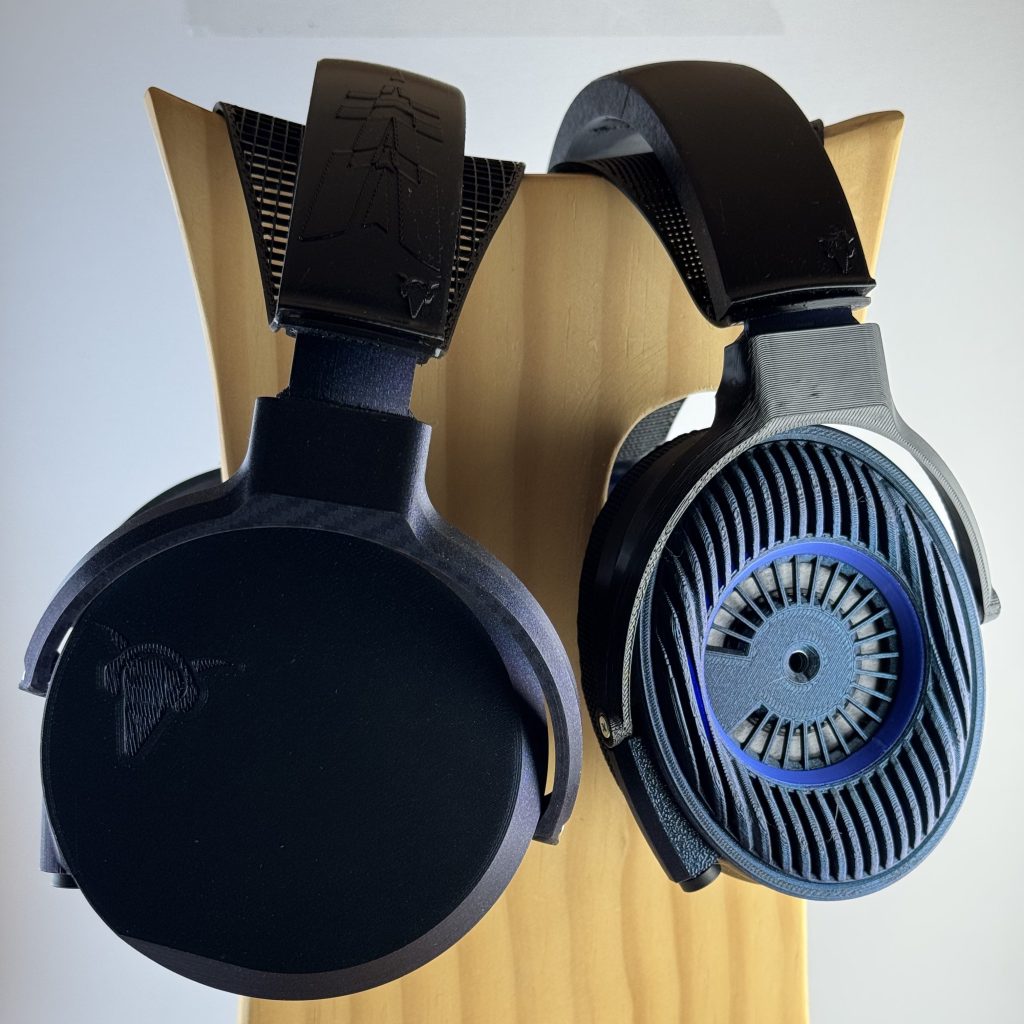
DMS Open Omega
I think of the Open Omega as being a little more of a critical listening headphone than a casual listening one, and I think that’s true in comparison to the Satyr 4 as well. In my Satyr 3 review I remarked that I slightly prefer the Omega to them, but I think the Satyr 4 flips that. The bass is better on the Satyr 4, the mids pretty similar, and the treble MUCH better controlled on the Satyr 4 than the Omega. The Omega wins on detail and soundstage (similar width, better separation). It’s hard to compare comfort just because my Omega are currently setup with a headband that I’m developing (and that’s in early stages), and the other alternative would be the Capra headband. So it’s hard to differentiate other than that the Omega uses a larger, more comfortable earpad for my ears.
Makes me really wish I had a decent measurement rig!
Both for sound and for ease of printing and building, I’m taking the Satyr 4. For me, getting a clean build of the Omega required finding a CO2 laser and a bunch of components I won’t probably ever use again, and the pads DMS picked, while comfortable, are VERY expensive compared to any of the Capra options. Overall, the Omega end up being around $120 to build, compared to more like $60-70 for Satyr 4.
I think DMS was aiming at a critical listening headphone rather than a casual listening one, and at least with the homebrew version I have, he didn’t particularly hit the mark. They’re perfectly nice headphones, but they’re just not something I’m going to grab very often. The Satyr 4 might be, just for the pure fun factor.
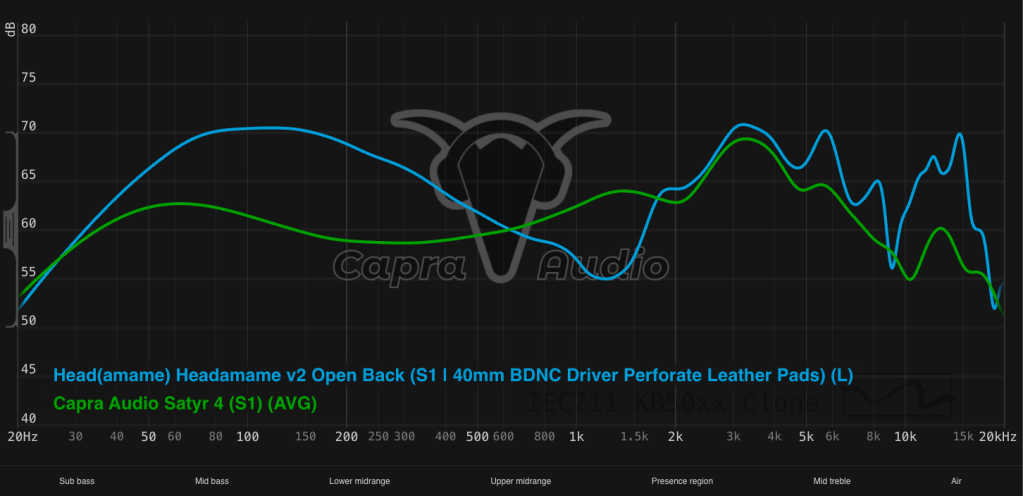
Head(amame) Open/Closed
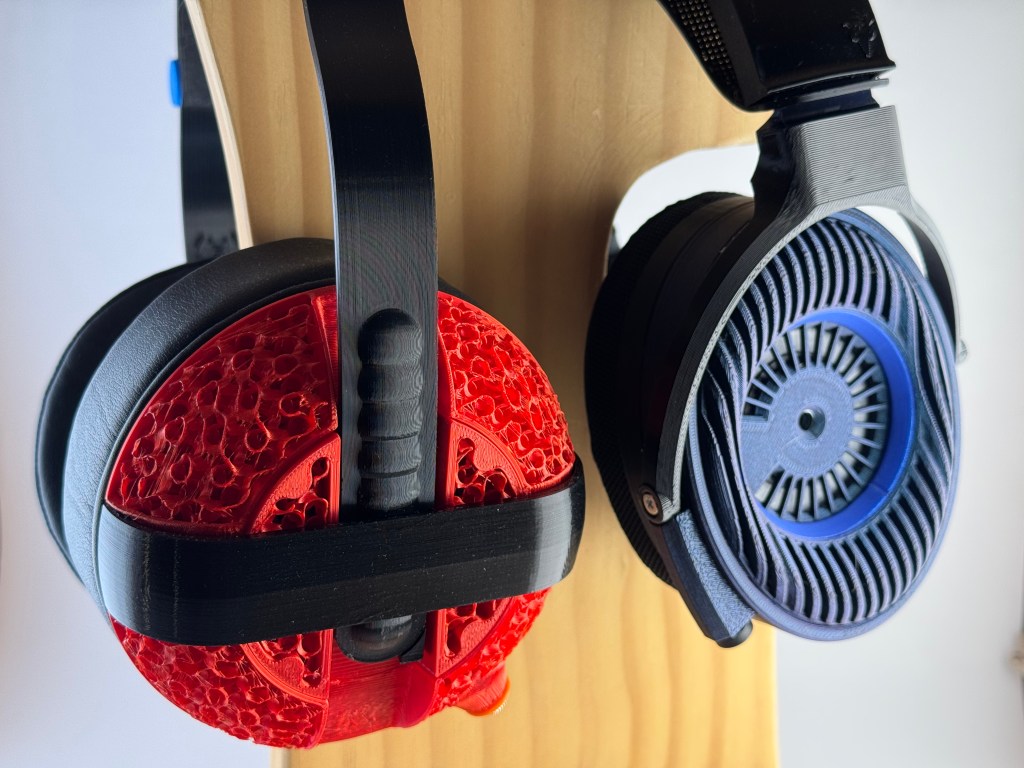
I am loathe to criticize individual creator’s projects but … let’s be honest, these aren’t great headphones. They’re cool. They look pretty good, they’re easy to build, and it’s really great to have a kit option available if you don’t want to have to screw around with hunting down parts, but … they’re not great sounding headphones. The Head(amame) Open is one of a VERY small number of headphones were I can understand what people mean when they say a pair of headphones is veiled. For me, vocals on the Open feel like the singers are wrapped in a thick pillow with the volume turned up to the point where you can *almost* hear the vocals, but the bass is burying everything. This isn’t the pair you build if you want good sound quality.
The Head(amame) Closed is … weirdly maybe a little better, at least to my ears? The vocals are less stuffed up, and the bass is less boomy, but they’re still not a headphone I’m going to use very often (or really, ever).
If you’re not particularly confident in your tinkering skills and don’t know what to look for, the Head(amame) kit is a fun project to tip your toes in the water. They’re just not what I’d recommend to anyone looking for a pair of headphones that you want to listen to a lot. Head(amame) also made some interesting choices in their kit that I wouldn’t necessarily recommend; using mini-XLR connectors at all, particularly the cheap ones that they provide that don’t really fit other mini-XLR cables, makes them harder for people to use or build on their own without some level of sophistication. I build my closed back with the kit, and immediately turned around and build the open version with components I sourced (including dual 3.5 mm jacks), and got what I think is a better (at least more easily usable?) product as as result.
Kudos to Head(amame) for making an accessible option for people who are DIY headphone-curious; it’s a great project, but a less great headphone. Now I’m really curious to see what he and Capra have done with the forthcoming Head(amame) Pro, and I’m confident it will be a better headphone.12
I’m taking the Satyr 4 over either version of the Head(amame). And if I really need a closed back … I’m making Ouroboros (or the Golem mod).
Conclusion
The Satyr 4 are a really damned fun headphone for most of my listening. They’re not something I’d grab for critical listening, or anything that’s quiet, sparse, or primarily acoustic, but for most other things they’re pretty great. They’re also really comfortable (going back to the 6X0s after a few hours with these makes the 6X0 feel INCREDIBLY clampy). They’re nicely light, as well, and reasonably easy to source in the US (with the potential exception of the nylon mesh). The assembly is definitely more challenging than some of the other 3D printed headphones out there; the lack of written directions, the way the nylon mesh is captured into the headphone, and the tight interior (which makes using JSTs harder) all combine to make this a slightly more advanced build than something like the Satyr 3 or the Head(amame)s. Still easier than the Faunus, though!
If you’re a true newbie who doesn’t know how to solder and doesn’t want to learn, the Head(amame) kits are your best bet. BUT, if you know a bit about soldering or are willing to learn, I think the Satyr 4 (or Ouroboros!) are a much more interesting, fulfilling project AND produce a better sounding headphone overall. Particularly if you’ve never spent any time with good, well-tuned, audiophile-style headphones, this headphone is worth your time. Add in the fact that there is both a really excellent instructional video AND a Discord full of helpful folks who want you to produce a good product (and Capra himself hanging out and answering questions) and this would be my pick for most folks who are 3D headphone curious.
- This image on my computer is labeled “‘Murka, Fuck Yeah.jpg”. Yes, I am a millennial. Why do you ask? ↩︎
- Capra Audio: Ouroboros, Ouroboros (Golem Mod), Oreoboros, Satyrs 3 and 4, and Faunus; Head(amame): Open and Closed; Maya Audio Sword; and DMS Open Omega. ↩︎
- Counting only the portions of the materials actually consumed in the build. All in, you’re looking at about $126 out the door. ↩︎
- And with the XL Capra band and suspension strap. ↩︎
- You don’t always WANT an electric screwdriver, but it’s nice in a pinch. ↩︎
- go back and forth on whether these are actually helpful, but I think particularly for the 3.5 mm jacks this is a really helpful tool if you don’t get the X-tronic with built in arms. ↩︎
- I’m paranoid about solder beads; they’re small enough and have little enough thermal mass that they’re *probably* fine, but I like a surface I can either cut on or drop hot metal on. ↩︎
- These are open backs so they’re never leaving the house with me. I found the the pivot block on the adjustable arms was my most common point of failure on both the ‘Murkaphones and my first Ouroboros, so I’ve swapped entirely to the static arms after making the Blueberry Satyr. If you want adjustable, I’d make a few extra sets of pivot blocks and set the heat inserts to keep around. ↩︎
- Bizarrely, apparently the right way to print the yokes is with the angled piece facing up and supports along the length of the arms; your mileage may vary but I’ve never printed it that way. ↩︎
- It’s worth noting that the 6X0 family is pretty sensitive to pads (wear and design), and most of them don’t sound great so you should appreciate a good pair when you find them. ↩︎
- I personally found the nylon mesh annoying to work around and it can be hard to reliably buy, and the way you have to sandwich the various pieces during the assembly can be a little challenging. That said, the fact that you build the drivers into a safe enclosure up front gave me a lot of comfort on my second build, even if the friction fit was a teensy bit tight. ↩︎
- Interested enough in it that I broke my rule about no longer even looking at audiophile Kickstarters after a series of rug pulls. ↩︎

Leave a comment